vTiger Tweaks
Google Maps in VTiger: Service now loads only when it is called
January 18, 2019
Article
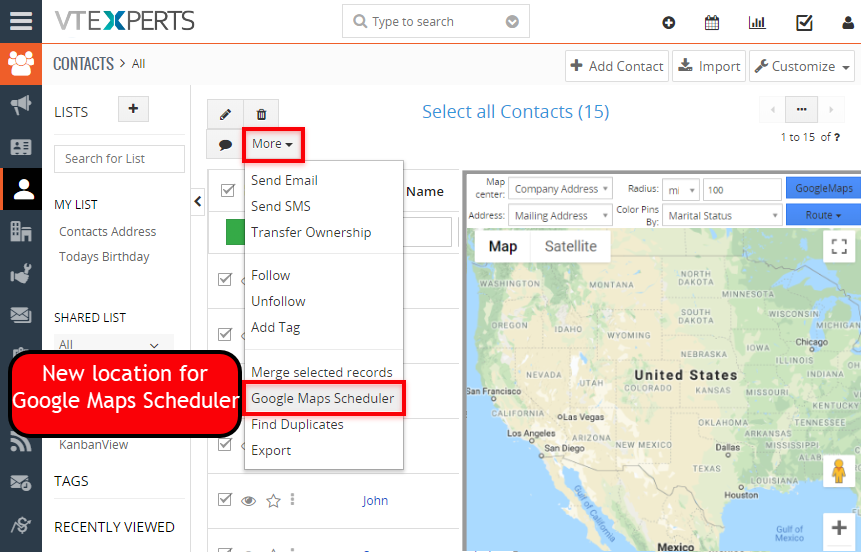
Our extension, Google Maps & Route Integration, helps VTiger users to reach the leads/ clients more efficiently by showing them as colored pins on the Google Maps. It enables users to choose the Map Center which can be anything from Company Address to User or Zip code. It can draw routes automatically or manually and according to four different types I.e Walk, cycling, Transit and Drive. These can also be printed as ‘directions’ using smart devices. This extension allows users to schedule their route as well as print it in the form of a map. This feature is very much identical to Google Maps. It also supports multiple addresses when used with Google Address Lookup extension. New Feature We have tweaked it a little bit so that the service now loads only when it is called. This keeps the system robust and efficient. You can go to any module for which this extension is enabled. On the Top left, there is “More’ button. The Google Maps will
Round Robin Assignment Extension For VTiger by VTExperts – New Release
January 10, 2019
Article
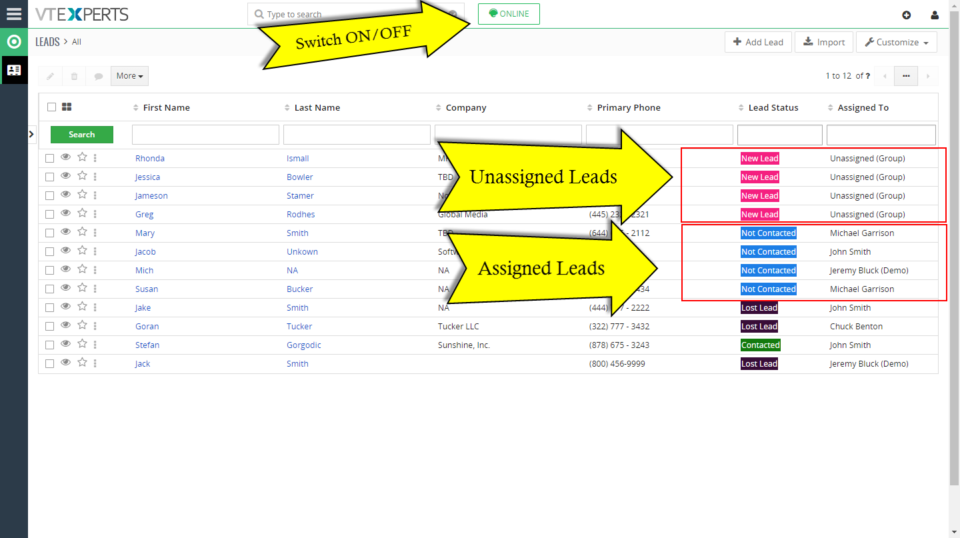
There are two ways in VTiger to assign users to Tickets, Leads, Opportunities etc. One would be to assign a user manually to a record. The other is to automated the assigning of records on the basis of conditions configured in the settings area. The second method is possible using our new extension Round Robin Assignment for VTiger. Round Robin Assignment The VTExperts Round Robin Extension automatically assign users to tickets, leads (or any other module). Round Robin Policy configuration consists of a trigger field e.g. “Ticket Status”, value (Unassigned Value) that will identify any unassigned tickets e.g Status is “NEW” and value (Assigned Value) that will be used to update ticket when it’s assigned e.g Status is “Open”. You can set the automation to run for only online users or do not distinguish at all. The configuration panel lets you setup the conditions. You can select module, status field
Kanban View Icon Moved To Lists In VTiger
December 3, 2018
Article
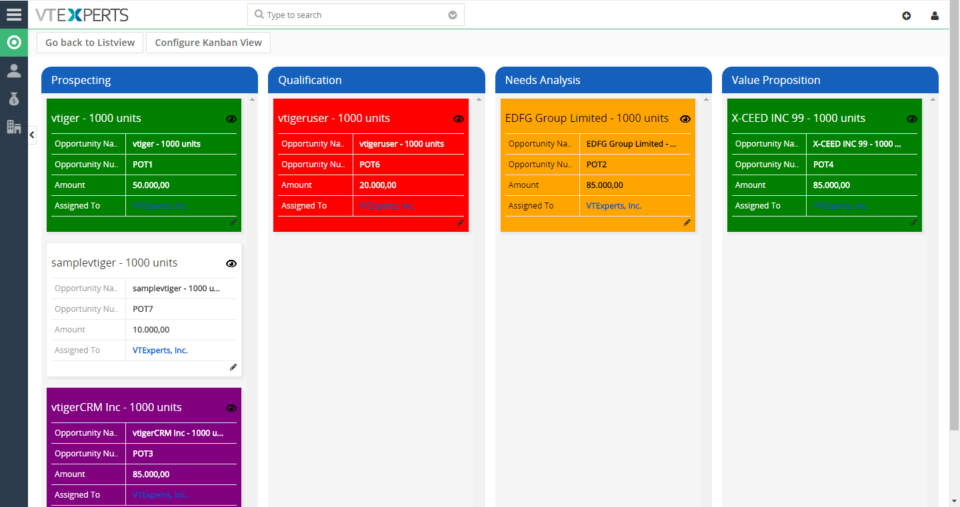
Kanban View in VTiger Most of the systems have Kanban view to visualize sales and support performance and workflows. In VTiger open source, we cover this void. Kanban view is an extension for VTiger open source that allows to quickly create dynamic cards and exhibit the team’s performances as well as to collaborate with teams and manage sales, opportunities, tickets, projects, project tasks, or any other list of records. The extension also supports drag & drop feature to quickly move cards among columns that are configurable field values. This updates the field values/status/stages of the records (cards). How to Access Kanban View in VTiger (New) We are hereby to announce a UI change, where we moved the Kanban view button from top and added it to the lists in every module. This looks like a slight change, but that actually saves Kanban resource from being triggered every time the listview
Add Fields To Quick Create Modal Popup In VTiger 7
October 19, 2018
Article
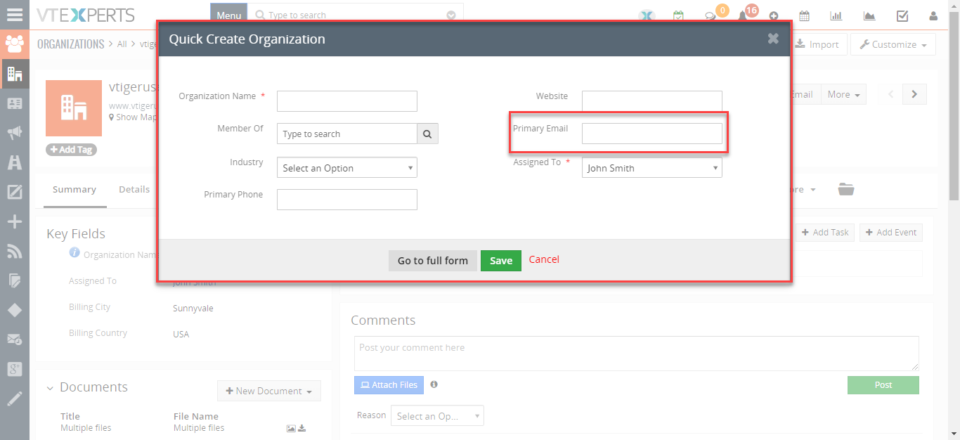
In Vtiger 7, User can add fields in the quick create modal popup. They can add/delete the fields in the modal popup according to their needs and it will save their time. How to Add Fields in Quick Create Go to Menu > Settings > CRM Settings > Module Management > Module Layouts & Fields. Select the Module. Click “Quick Create” button to add it in modal popup. Now this field will show in quick create modal popup. For further help, contact us on help@vtexperts.com. We’ll be glad to be of service.
New Feature in Advanced Comment Extension : Comment Modification Tracker
September 18, 2018
Article
Advanced Comments extension is merely an enhancement to standard VTiger comments functionality. It adds upto two picklist fields to the comments section and allows the user to “categorize” comments added. Also, these comments can be highlighted on the basis of configured picklist value, which makes it even more handy. We have added yet another useful feature to this extension, named ‘View Previous Version’. It will enable user to view the changes made in it and stored in a log. With ‘ View Previous Version’ you can see the time when the changes are made along with the user who made them. To edit a comment, simply go to any module for which the comments are enabled. Click on the edit button under that comment, make the changes and save. You can see the original comment by clicking on the ‘View Previous version’ button under the comment. In order to view
Log Employee Times Automatically Into Time Sheets With Time Tracker
September 2, 2018
Article
The Timesheet extension enables the VTiger users to track employee/user time, visually. It basically allows users to log time spent on particular tasks, with their exact duration. These time logs can then be associated with any record within VTiger. This extension supports custom periods, which allows to adjust the length of the period suitable for the business hours. The time records can then be locked to prevent any further modifications. It also automatically calculates the Totals and show them in an easily understandable manner. Lastly, the admins can import/export the data, run reports, or create workflows using these time records as well as run reports. So, this is a must-have extension for payroll management and tracking the time spent (how and where) by contractors. We have further enhanced the efficiency of Timesheets by making it compatible with another very useful tool of ours, Timetracker. It allows showing and hiding the
Filters are added in Complete Record Timeline/Summary (Communication + Updates) Extension for VTiger
July 16, 2018
Article
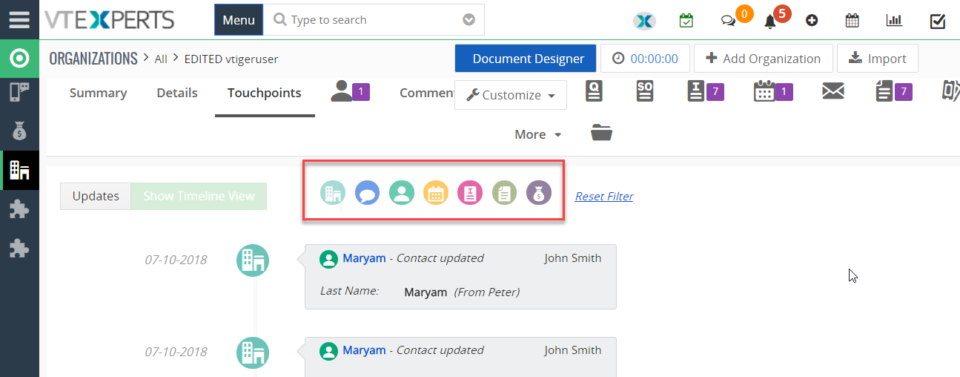
In VTiger, if you are trying to find out more details about a contact/organization/lead, you would have to click through all the related lists and review any tickets/opportunities one by one. However, with the Complete Record Timeline/Summary (Communication + Updates) Extension for VTiger, you will be able to see all of it in a single glance. What it does is that it enables the user to see any communication (emails, calls, comments) as well as updates for a selected record. It rolls up the information from 3 relationship level deeps, meaning if you are viewing organization timeline, you will see any information related to organization (emails, updates, comments) as well as any information related to organizations’ tickets/opportunities (or other related modules). We have added filters in this extension so you can see the updates of a selected module separately from the main timeline. For example, when user clicks any
Box.com Integration with VTiger has been launched
May 22, 2018
Article
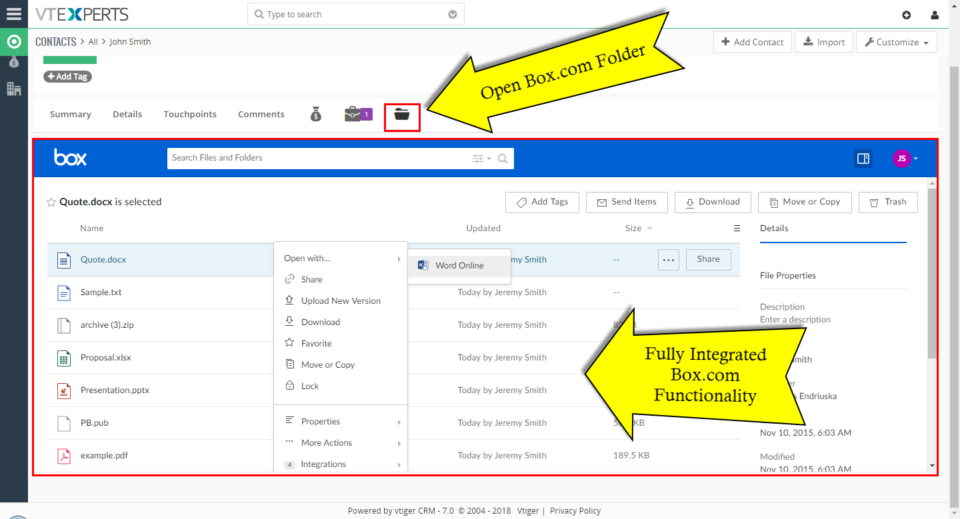
The Box.com Integration seamlessly sync VTiger with Box.com and you can assign Box.com folders to the any of the VTiger Records. Then you’ll be able to perform numerous functions like uploading the documents/folders, edit files online, review file revisions, share files etc directly from Vtiger (without opening Box.com). This integration allows unique records to be assigned to any of the records per module like Project, Opportunities & Order by in- built folder selector. It’s configuration is simple and it requires SSL certification active on you CRM URL otherwise the Box.com API doesn’t work. Once you configure the integration and assign folders to the enabled modules, you can view Box.com files and folders from VTiger. Go to one of the selected modules and open a record. Then go to the Box.com tab Now you’d need to link a folder to this record. For that purpose, click the “Choose Folder” button. It
Field Formula Calculation/Concatenation for VTiger is available
May 7, 2018
Article
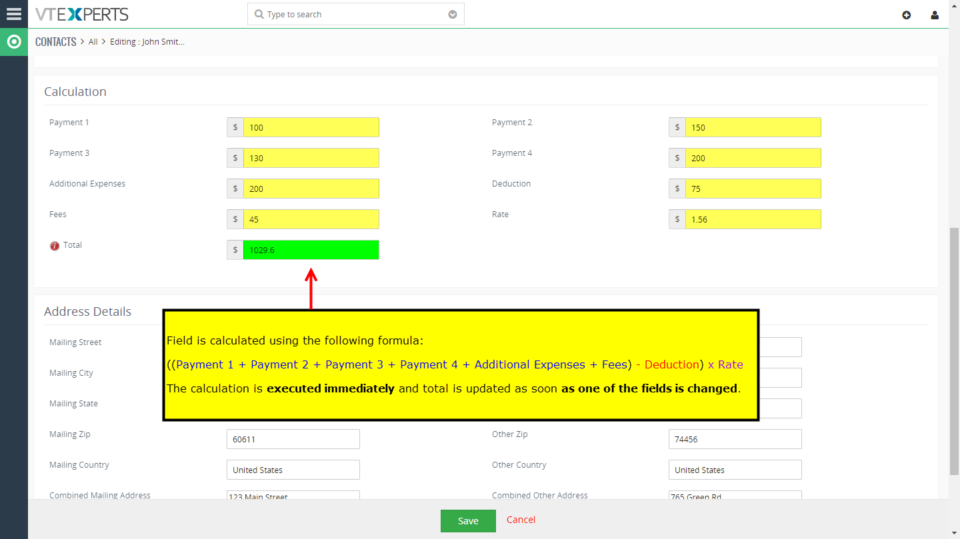
Real Time Field Formula calculation/Concatenation Extension for VTiger 7 is yet another helpful tool for automation as well as productivity. It allows various functions to be performed using standard and custom fields like addition, multiplication, subtraction division of number/amount/decimal as well as other custom functions like changing the Field X value based on the value in field Y, all in real-time. That is the best thing as you don’t have to wait for the data to be saved so you can see the SUM/Total/Combined text spot on. Another great feature of this extension is that it works with the text fields to concatenate the data. This is an addition that was not available before. Moreover, it is very user friendly and can be configured by standard VTiger Workflows in the module manager. The extension is now available for VTiger 7. Some of its most common uses are explained below: 1.
Send Email From VTiger With Different Email Account/Account In VTiger 7
April 13, 2018
Article
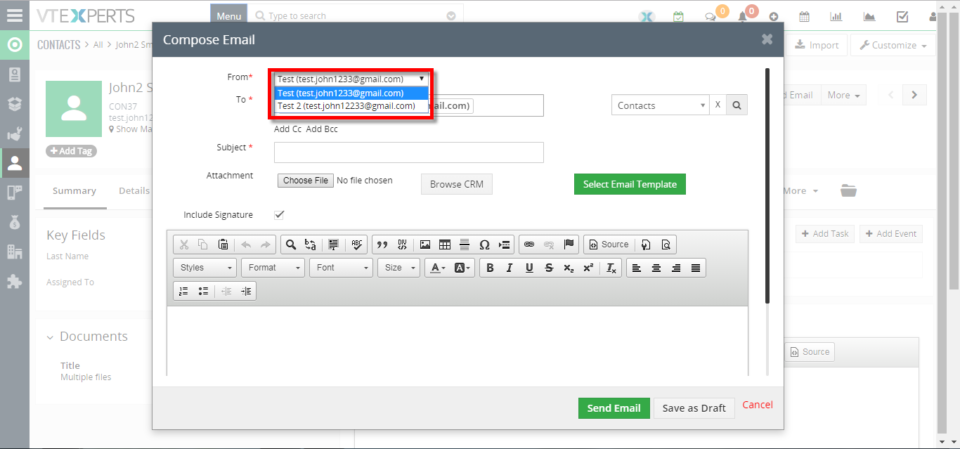
Outgoing Email Server Extension allow each user to have his/her own Outgoing Email Server(SMTP). Email server settings can be configured by admin, or each user can do it for him/herself. It supports IMAP function, meaning that every email sent will also be stored in user’s “Sent” folder on webmail/email server. How to Send Email From VTiger with Different Email Accounts Go to My Preferences and click on the “Outgoing Server” button. Click on the “Create” button and Configure the Outgoing Mail Server. Now open a contact and click on the “Send Email” button and select the Email account you want to send the mail from. Here you can see this mail is sent from VTiger Outgoing Mail Server. For further help, contact us on help@vtexperts.com. We’ll be glad to be of service.
Multi Currency setup on a record level instead of a user – VTiger Customization
March 4, 2018
Article
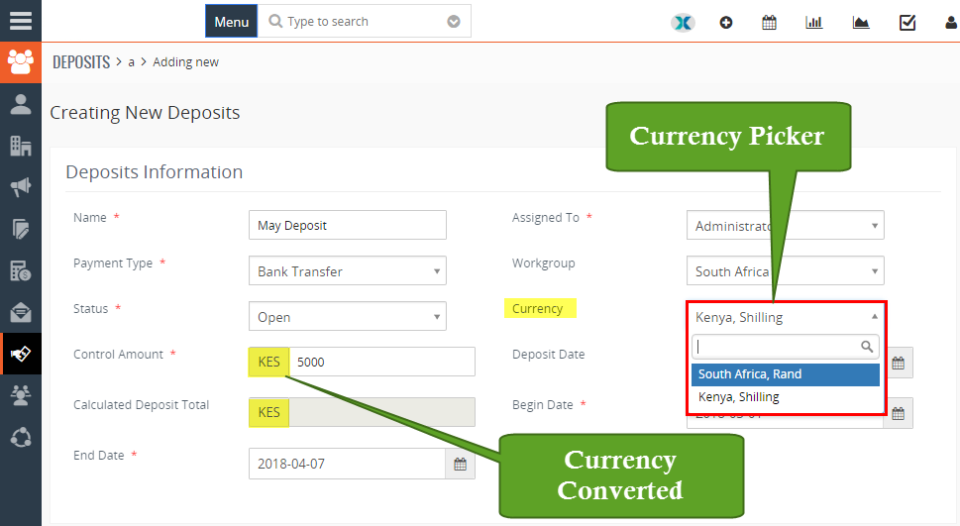
Businesses working with multiple currencies in VTiger often run into limitations, where the currency can only set on a user level, while the currency should be set on the record level. At the moment, the multi currency is supported on Invoices, Quotes, Sales & Purchase Orders. However, that’s not sufficient in most cases, the businesses need to set currency for other modules as well as be able to view records in set currencies. One of our customers manages deposits, batches and invoices in multiple currencies. We added an option to set currency on a record level i.e batch or deposit. This allows user to see the proper currency set as well as report on it. The currency symbol is maintained on the record level as well as lists.
Option to set picklist/dropdown values to Active/Inactive – VTiger Customization
March 2, 2018
Article
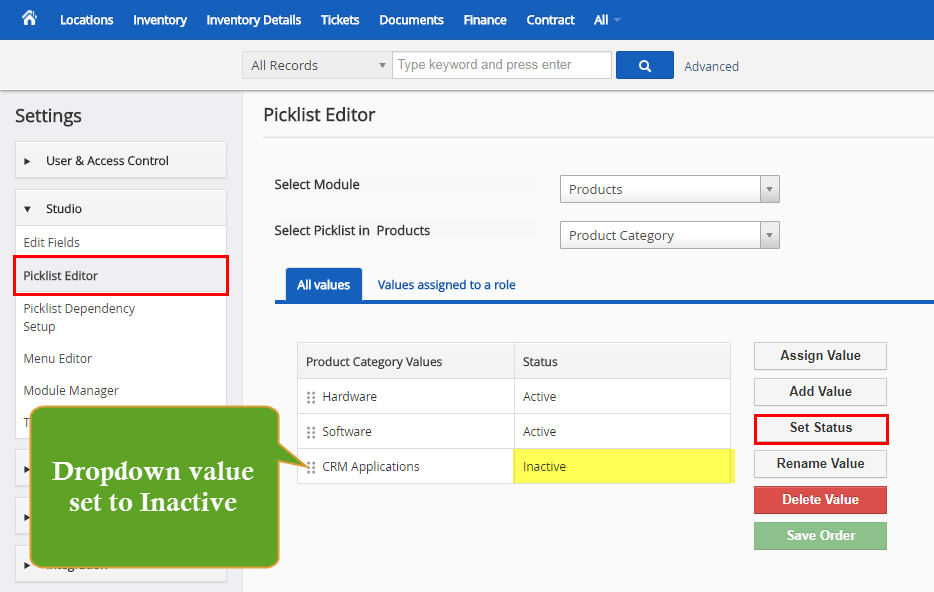
VTiger has an option to create custom picklist fields and define the values that go into that dropdown/picklist. The only downside is, that in order to remove dropdown value – you have to delete and replace it with something else. In many cases, this is not acceptable solution. For example, if you are selling certain type products i.e “Product Category” is “Hardware” and decide you no longer need the “Hardware” value – your only option is to delete it completely, which would update all existing products and clear or replace that value. This is just not acceptable. We built an option to retire picklist values by setting them “Inactive”, meaning that the value will remain on the record e.g product, however the users will no longer be able to select it in the dropdown nor will it show up anywhere else.
Customized Record Numbering Using Date (Month & Year) – Customization for VTiger
March 1, 2018
Article
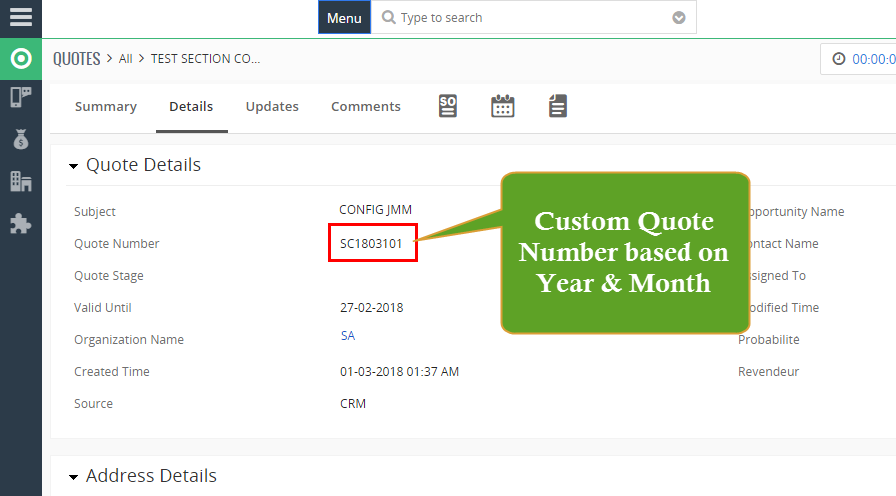
Record Numbering in VTiger is very limited. In Standard VTiger, you can only configure record numbers to have prefix and a sequence number. In most cases, this is not sufficient. We get a lot of requests to customize record numbering and add customer name as prefix, month, date or a custom field value. Here’s what we did for one of the customers: Prefix: SC (quote) or AFF (opportunities) (This never changes) Year : 18, 19, 20, etc.. (This is updated once a year on the 1st of January of each year, and we take the last two digits of the year. This is applied on both quotes and opportunities range numbering.) Month: 01, 02, 03, 04, etc .. (This is updated the 1st of every month, based on the numbering of the month within the year. Once a year, you will have the yearly and monthly change at the same time
Tile & Hover Text In VTiger Calendar Job Scheduler Is Now Configurable With Fields
January 31, 2018
Article
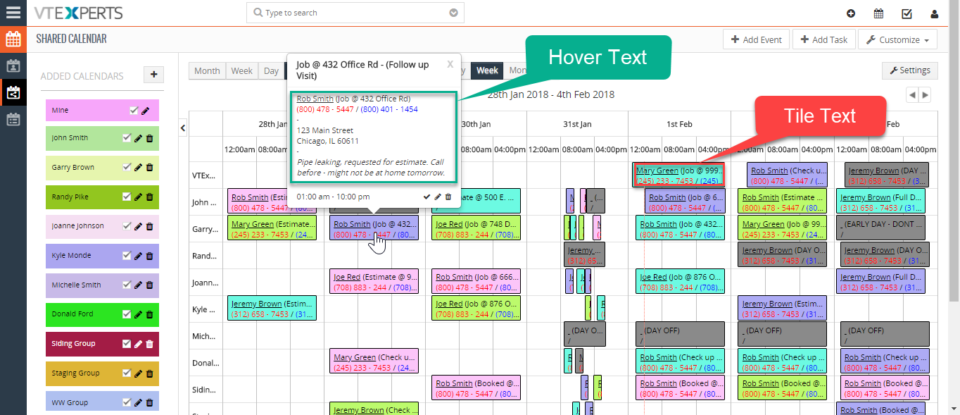
VTiger Job Scheduler is the extension that enhances your VTiger Calendar’s capability to manifolds. It gives you day, week, and month views in a way that events and tasks do not overlap and become very easy to manage. With the latest update of the extension Job Scheduler or Advanced Calendar for VTiger, it allows you to edit and configure the information that is shown by default on an event or task block as well as when you hover your mouse cursor over it. You can insert some default text, map fields from the events and tasks, and configure them with the rich text editor according to your needs. It also allows you to map fields from the related modules. So say if you need to know the name of the Contact or Organization with which the current event is, if you need to know the place where the event
VTiger Customization: Mass Print Documents (Select Multiple + Print Selected)
January 22, 2018
Article
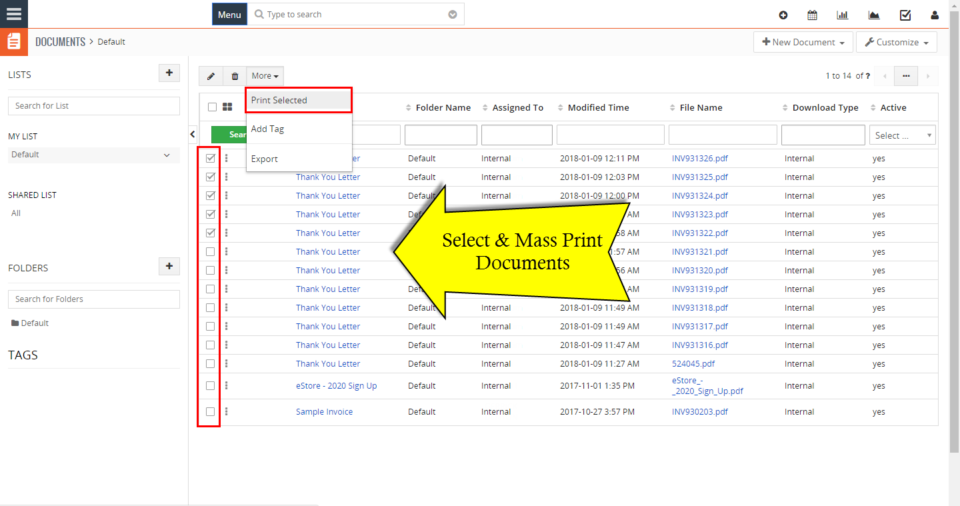
One of our customers is heavily focus on producing contracts, invoices, letters that get saved as PDF documents. These documents are generated using PDF Maker or Document Designer and attached to a related record (automatically). All of these documents have to be eventually printed and mailed out. It’s a tedious process to download each document and then print, so instead – we came up with a solution to mass print selected documents. The way it works is – the user goes to the document list, selects the filter/view and picks documents one by one or just all at once and “Prints selected”. We added an option to “Print Selected” under “More” (see screenshot). The button produces a combined PDF file, that can be printed or saved for other purposes.
Add “Send Mail” Button To Custom Modules In VTiger 7
November 10, 2017
Article
In VTiger 7, VTE Custom Module Builder does not add “Send Mail” button to custom modules because the Email field is not a default field when creating a custom module. You can do it by changing the code of the Custom Modules. How To Add “Send Mail” Button Add the function below to modules/CustomModuleName/models/DetailView.php file.
Allow Quantity Of 0 In Quotes/Invoices/Sales & Purchase Orders In VTiger 7
November 7, 2017
Article
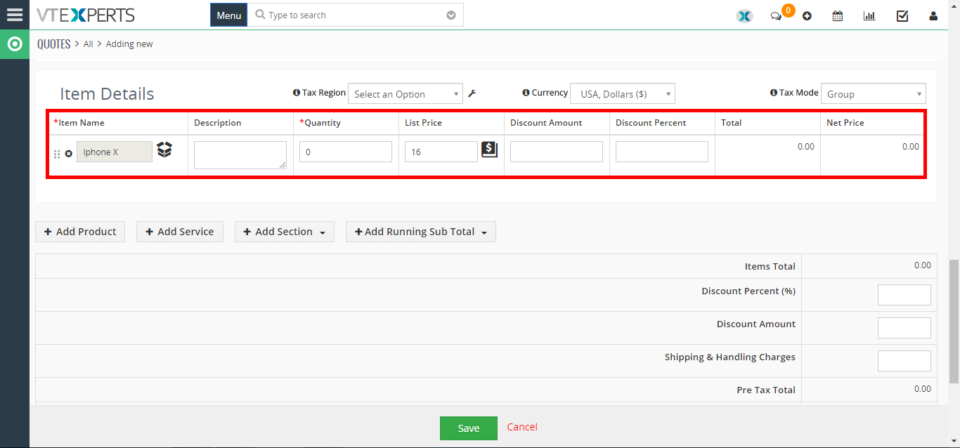
The Quantity default value is “1” in VTiger. If a user wants to show the product in the quote and doesn’t want to add its price in the total, he needs to set the Quantity to “0”. To set the default value follow the steps mentioned below. Issue: Adding items with Qty 0.0 in order to list Optional on Quotes That way the Products price would be visible for the customer but it would not affect the quote’s total. Solution: Open file: layouts\v7\modules\Inventory\partials\LineItemsContent.tpl Change data validation engine for Quantity. Around row 135 you find this code. <input id="{$qty}" name="{$qty}" type="text" class="qty smallInputBox inputElement" data-rule-required=true data-rule-positive=true data-rule-greater_than_zero=true value="{if !empty($data.$qty)}{$data.$qty}{else}1{/if}"/> Replace it with this: <input id="{$qty}" name="{$qty}" type="text" class="qty smallInputBox inputElement" data-rule-required=true data-rule-positive=true value="{if !empty($data.$qty)}{$data.$qty}{else}1{/if}"/> For further help, please send an email to help@vtexperts.com. We’ll be glad to be of service.
Change Icon For Custom Module In VTiger 7
November 3, 2017
Article
Don’t like the default icon, you can change the default icon after Creating a Custom Module with the help of Custom Module Builder Extension. User can set the icon of their own choice by following the steps mentioned below. Issue: How to change the icons of custom modules which have jigsaw puzzle icons by default? Solution: You need to create a css file “layouts/v7/modules/{moduleName}/resources/Styles.css” and add into vtiger_links table. Then get content of icon class in “layouts/v7/lib/vt-icons/style.css” Replace content in “layouts/v7/modules/{moduleName}/resources/Styles.css” For further help, please send an email to help@vtexperts.com. We’ll be glad to be of service.
Change Template Order When Composing Email In VTiger 7
November 1, 2017
Article
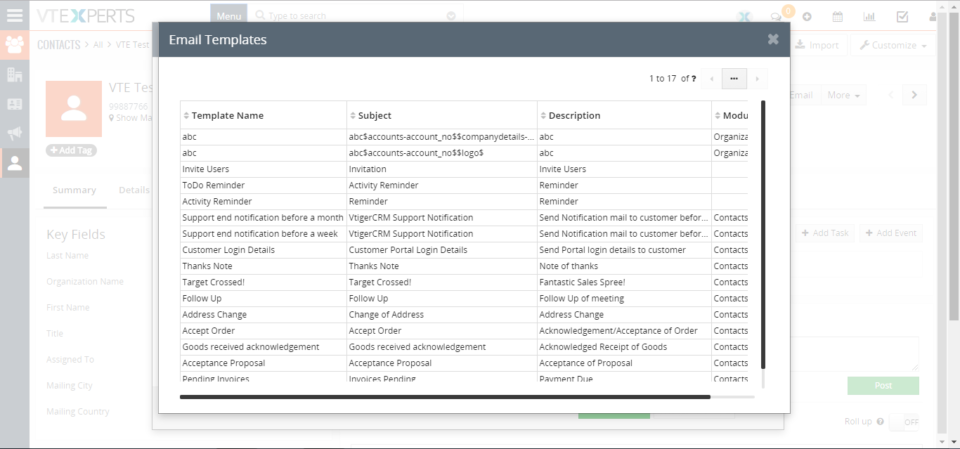
Want to change the order of the Email Templates. The purpose of this feature is to allow users to keep the mostly used templates on top of the list. It saves the users’ time to scroll down and find the template. Here’s how to change the standard sort order of the email templates. Solution: Go to modules/EmailTemplates/models/ListView.php find function getQuery() {} inside that function , Change query as per your need. For more information on email templates check out vtiger wiki: https://wiki.vtiger.com/vtiger6/index.php/Email_Templates As well as a customization we did for email templates, that you might find helpful: VTiger 6 Customization: Customized Email Templates with Sharing/Permissions + Workflows . For further help, please send an email to help@vtexperts.com. We’ll be glad to be of service.
Remove AD From Dashboard Page In VTiger 7
October 30, 2017
Article
Unwanted add’s on your Dashboard. If you want to get rid of those add’s follow the steps mentioned below. Issue: I need to remove the extension store banner ad displayed on dashboard. Solution: Create a new .php file in the root director with this code. Just copy paste this code in a php file, name it whatever you want, save it and then upload it in the root directory. Once uploaded, you have to run it in the browser. For further help, please send an email to help@vtexperts.com. We’ll be glad to be of service.
Can’t Save Webform Configuration (Selected Fields Do Not Save) In VTiger 7
October 29, 2017
Article
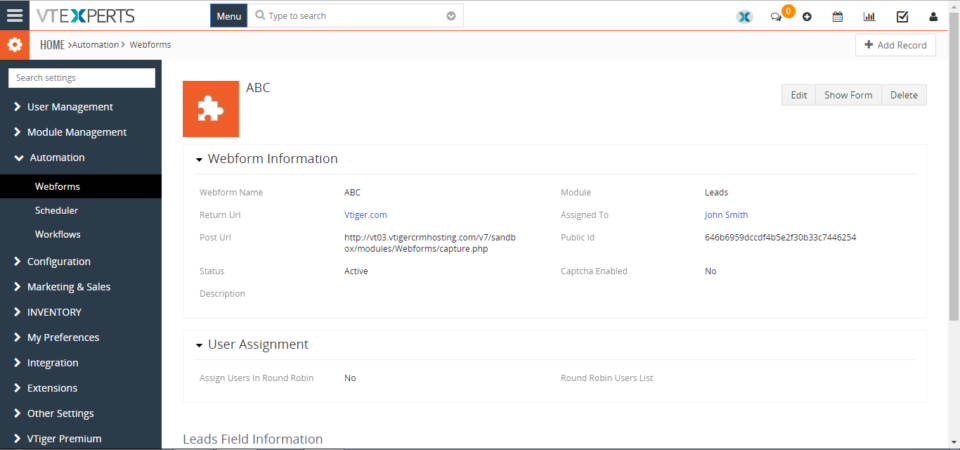
There’s a very common bug circulating around for a while in VTiger 7 Webforms. The bug doesn’t allow to save configuration of Webforms after setting them up. Using HTML option doesn’t work either. I was asked for a solution to this problem too many times that I preferred to put the solution into writing. Issue: Webforms do not seem to be working in 7.0. When trying to set up a new webform, it does not save the preference of fields. Moreover, using the form HTML, nothing is displayed. Solution: If you run into that problem, you need to update following tables in your database. In case the tables are not there, create them: Table: vtiger_webforms Table: vtiger_webforms_field For further help, please send an email to help@vtexperts.com. We’ll be glad to be of service.
Non Admin Users Can’t See Lists (Blank Area) In VTiger 7
October 27, 2017
Article
Issue: I have assign users to a role and then assign privileges directly to a role however even if I assign every privilege to a users role and sign into that users account that user still cannot see any content unless they are an admin. Solution: Running the following SQL commands to create the tables will solve the issue: For further help, contact us on help@vtexperts.com we’ll be glad to be of service.
VTiger 7 Workflow Customization: Set Scheduled Activity/Task Start Time XX Minutes from Current Time
October 3, 2017
Article
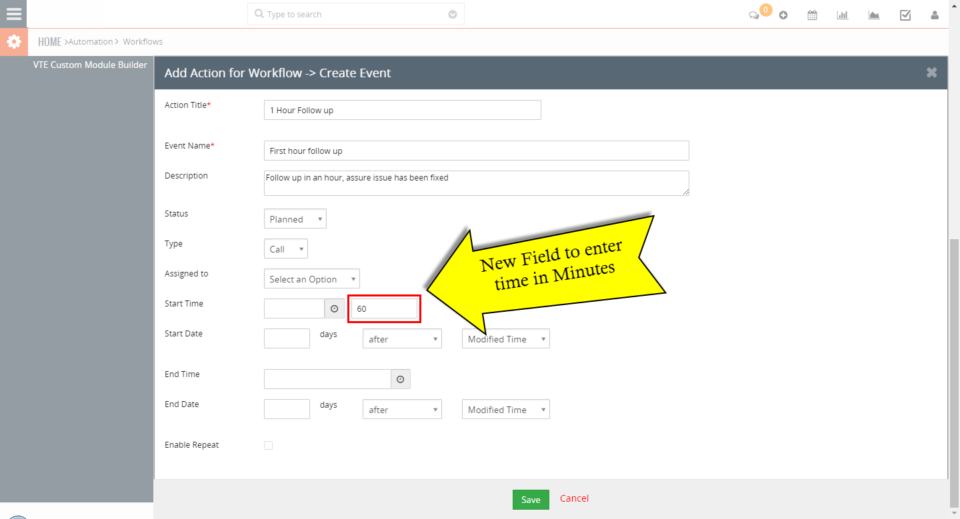
VTiger has a very flexible and powerful workflow/automation capabilities. Utilizing VTiger workflows, you can automatically schedule activities, tasks, send emails, updated fields, create records, invoke custom functions and much more. As we were working with automatically scheduling activities, we realized that there’s no way to set dynamic start/end time of the event/task. This mean, that every time there’s an activity created via workflow – the start/end time will either be “the time activity was created” or you have to preset the time to be e.g 8:00am. One of our customers have a very strict SLA/change management process, which requires activities to be created right away and the start/end time set based on the time of the creation, meaning that “Start Time should be 60 minutes from now”. We have customized VTiger workflow actions (Add Task & Add Event) and added a new field next to “Start Time”, which allows


VTiger 7 Customer Portal Customization: Set Portal Password