vtiger CRM
Execute Multiple Actions With One Click In VTiger 7
May 31, 2018
Article
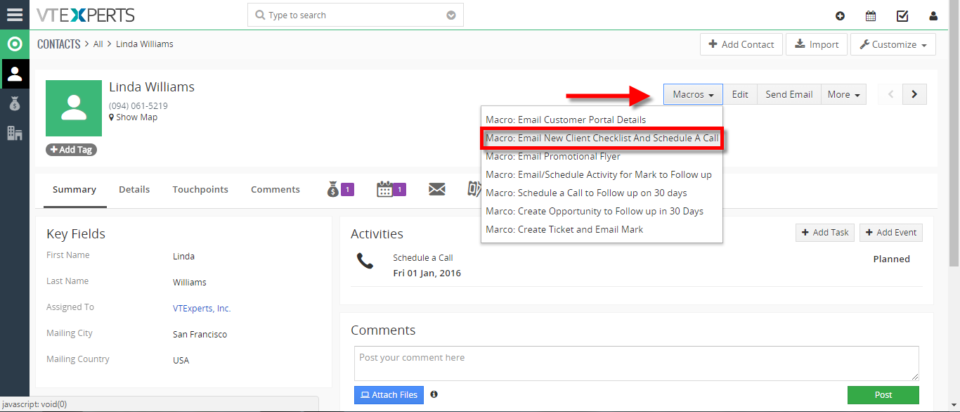
Macros for VTiger is an Extension that provides users with the function to create predefined actions (workflows) and trigger them from the record Detail/Summary View – with just a single click. It enables a “Macros” button (Trigger) and indication icon when the macro has been executed. How to Execute Multiple Actions with One Click Go to Menu >> Settings >> CRM Settings >> Extension Pack >> Macros. Click on the “New Workflow” button. Add the workflow name and the Target Module. Add Actions, this will be executed when the Macros will be clicked. You can add Multiple actions which then can be executed with a single click. Add the action title, start time and the start date then click on the Save. You can see the Macro button in the records. Click on the desired Macro to trigger the workflow. Here you can see with a single click a Mail has been sent to the client and a Event is
Add Related Module To Document Designer In VTiger 7
May 31, 2018
Article
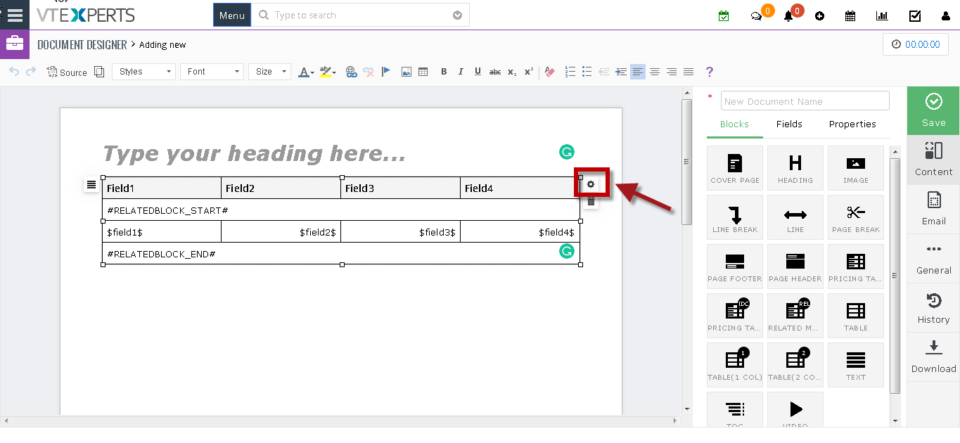
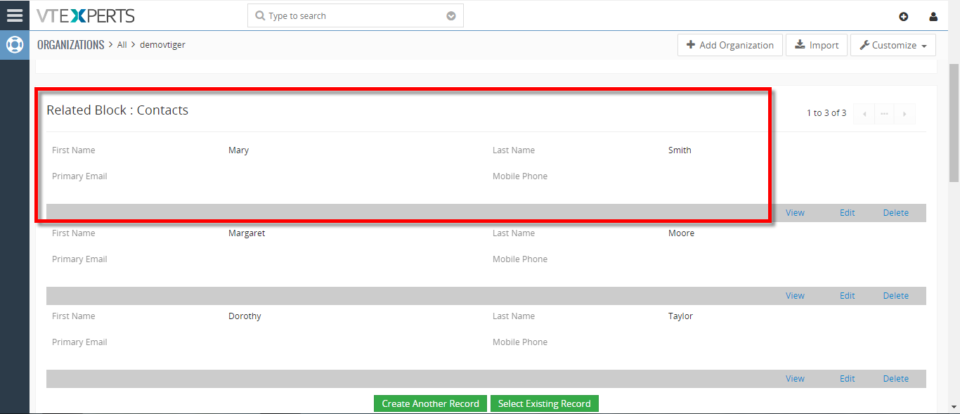
VTiger Document Designer is the ultimate tool for document automation. It’s an easy to use template builder to design professional PDFs and online documents. It’s mostly used to elaborate proposals, quotes, invoices, sales and purchase orders. In addition, it allows you to map and show data from Related Modules. How to Use Related Module in Document Designer Go to the Menu > Settings > CRM Settings > Extension Pack > Document Designer and click on the “Add” button to create a new template. Click on “Properties” tab. From here select the Primary Module. Now go to “Blocks”. Drag and drop the “Related Module” block. When you hover the cursor on the Related Module Block, two Icons will appear of Settings and Delete. Click on the Settings Icon. Add the related Fields. You can also select the
Allow VTiger Users To Edit VTE Advanced Reports
May 31, 2018
Article
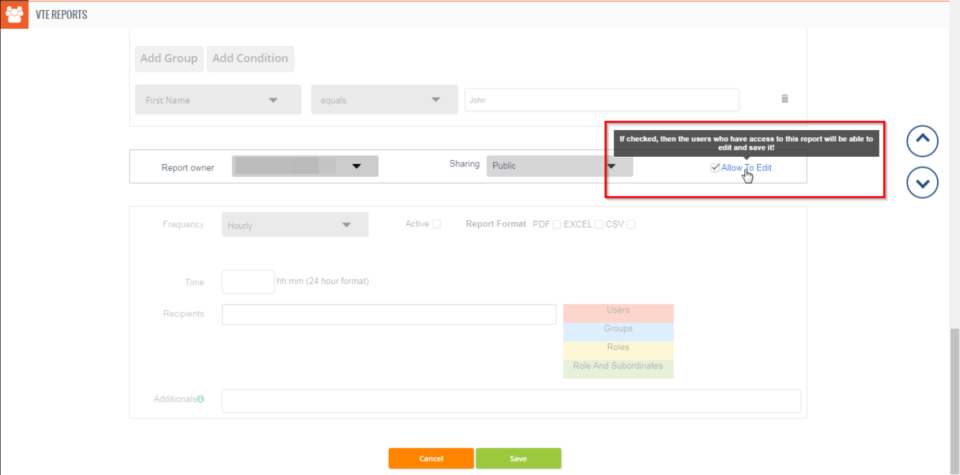
VTE Reports is an advanced module that fulfills all the requirements of VTiger users that are missing in the standard VTiger Reports. You can check all the features of VTE Reports extension for VTiger 7 and VTiger 6 in Product page We’ve added a tiny but extremely useful and requested feature, where you can allow other users to edit reports. Previously, a report could only be edited by the owner. Moreover, standard VTiger Reports do not support it. How to Allow Other Users to Edit Reports To do so, in the Edit mode of a report, move down to the step where “Report Owner” and “Sharing” are selected. You can now see a new checkbox saying “Allow To Edit”. Check this box to allow other users, who have access to the report, to edit and save it. More information on the feature and how to configure VTE Reports
Set Sales Forecast Targets In VTiger 7
May 29, 2018
Article
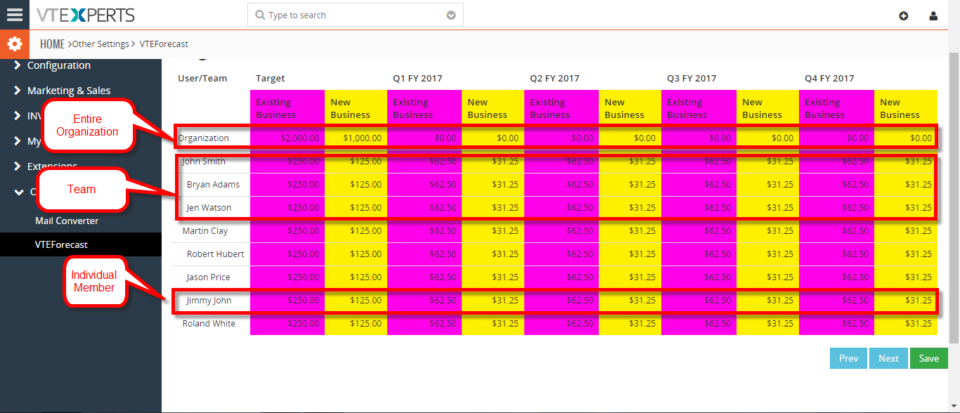
Sales Forecast for VTiger Extension was designed to help manage and predict Organization’s current and future Opportunities. It includes ability to view the entire company’s Opportunities as well as drill down to each Team or User. It also includes ability to specify Targets for each Team/User, and configure periods How to Set Sales Forecast Targets Go to the Menu >> Settings >> CRM Settings >> Extension Pack >> VTE Forecast. and click on the “Forecast Settings” button. Click on the “Targets” tab. Here you can Specify Targets for your Team, Organization or the Individual Member. You can do that by the Time Or Date period that you have set up. For further help, contact us on help@vtexperts.com. We’ll be glad to be of service.
Schedule Reports To Non VTiger Users By Adding Email Addresses In VTiger 7
May 24, 2018
Article
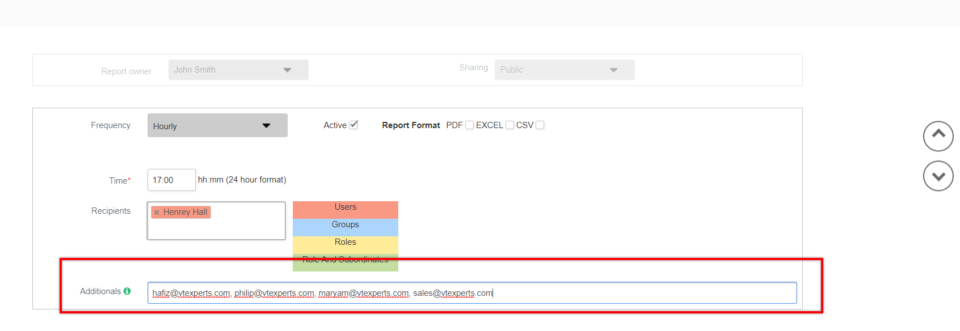
As most of you are already familiar with the Advanced Reports Extension for VTiger 6 and VTiger 7 , this is the module that more than 85% of our clients use. We make sure we are regularly upgrading our extensions to meet your requirements. Using VTE Reports extension for VTiger, you can configure and send the scheduled reports regularly to any email address, even if he/she is not a user in your VTiger CRM. How to Send Scheduled Reports to Non VTiger Users To do so, in the edit mode of a report, you need to go to scheduling section of reports. This is the one where you can configure frequency of the outgoing reports as well as time and recipients. At the bottom, you will find the “Additionals” field. In the “Additionals” field, you can add as many email addresses as you want (separated by commas). Once configured, those
Tabs Extension For VTiger 7 Now Supports Multiple Blocks
May 24, 2018
Article
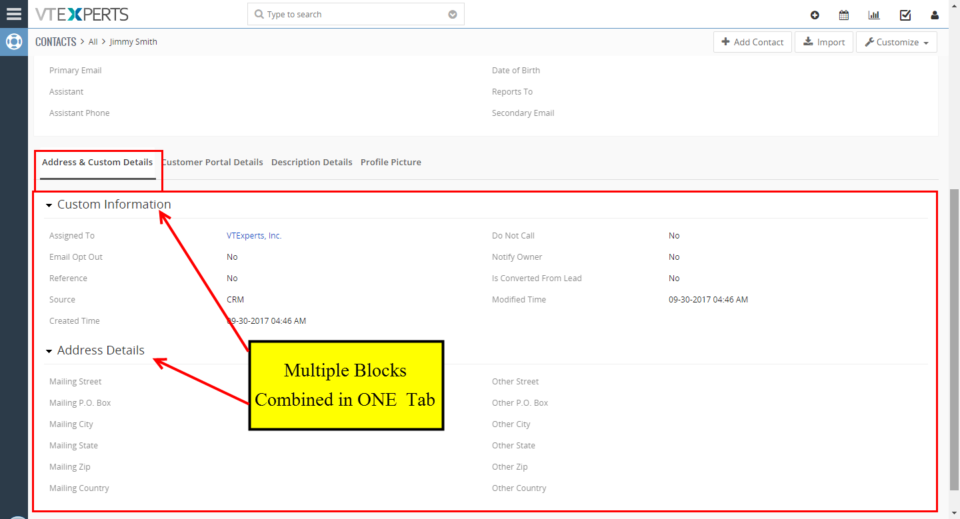
Tabs for VTiger 7 is an extension that converts field blocks into Tabs – to present the data in a different way according to your requirements. This is a more organized view that is very convenient to follow. To learn more about Tabs for VTiger 7 extension Click here. There’s a new feature added to the extension, that allows to merge multiple blocks in one tab. That means, if you have several related blocks that should be shown together, you can combine them into one tab using the extension. How to Configure Multiple Blocks Using Tabs To do so, go to the Module Field & Layout. You will see a settings wheel button besides the “Convert to Tab” switch above every block. When you click it, it will ask you to give a name of the Tab. You can combine several blocks by giving them same name in this
Mass Upload Documents In VTiger 7
May 22, 2018
Article
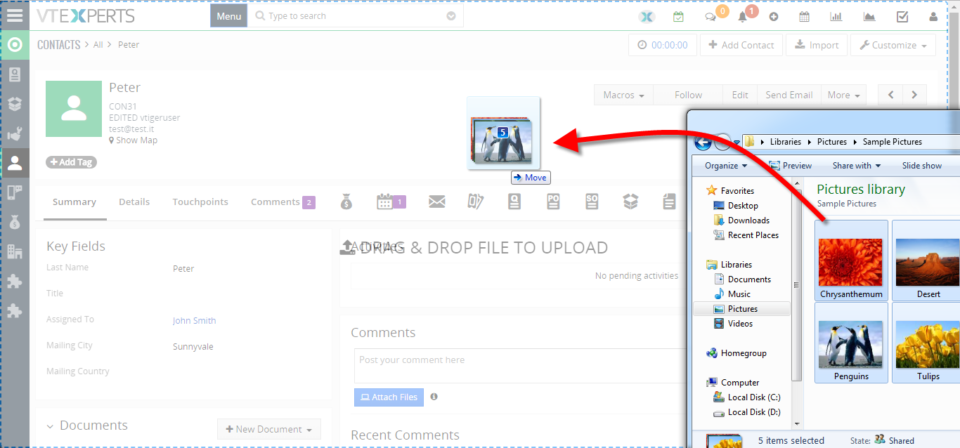
Drag and Drop Documents is an extension designed to boost efficiency when uploading documents to VTiger. It allows the user to simply drag and drop file anywhere on the screen and the file is created as a document and linked to VTiger record (one that file was dropped on). How to Mass Upload Documents Select the multiple files and Drag and Drop them into the VTiger record. It will then automatically upload the files under the Documents. Here you can see All the Files that has been Dragged and Dropped in the VTiger record. For further help, contact us on help@vtexperts.com. We’ll be glad to be of service.
Box.com Integration with VTiger has been launched
May 22, 2018
Article
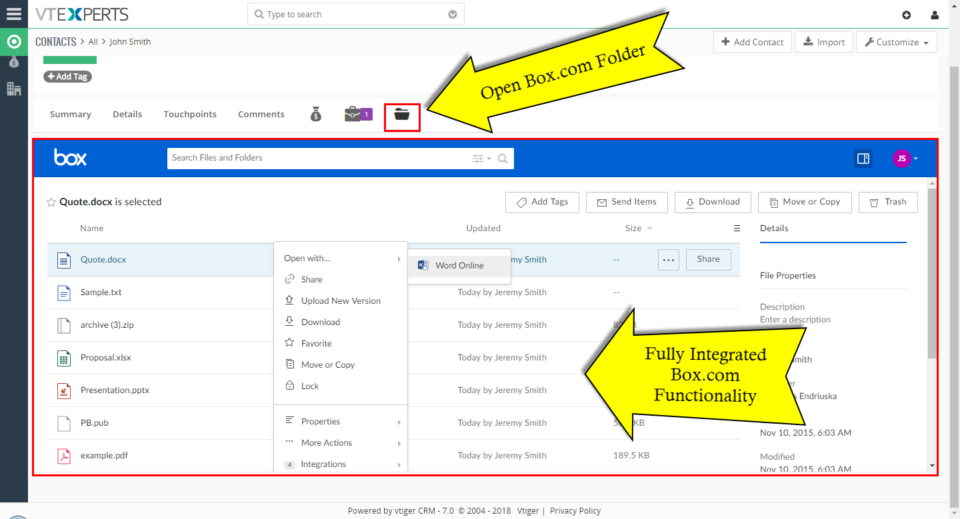
The Box.com Integration seamlessly sync VTiger with Box.com and you can assign Box.com folders to the any of the VTiger Records. Then you’ll be able to perform numerous functions like uploading the documents/folders, edit files online, review file revisions, share files etc directly from Vtiger (without opening Box.com). This integration allows unique records to be assigned to any of the records per module like Project, Opportunities & Order by in- built folder selector. It’s configuration is simple and it requires SSL certification active on you CRM URL otherwise the Box.com API doesn’t work. Once you configure the integration and assign folders to the enabled modules, you can view Box.com files and folders from VTiger. Go to one of the selected modules and open a record. Then go to the Box.com tab Now you’d need to link a folder to this record. For that purpose, click the “Choose Folder” button. It
Enable Digital Signature In VTiger 7
May 19, 2018
Article
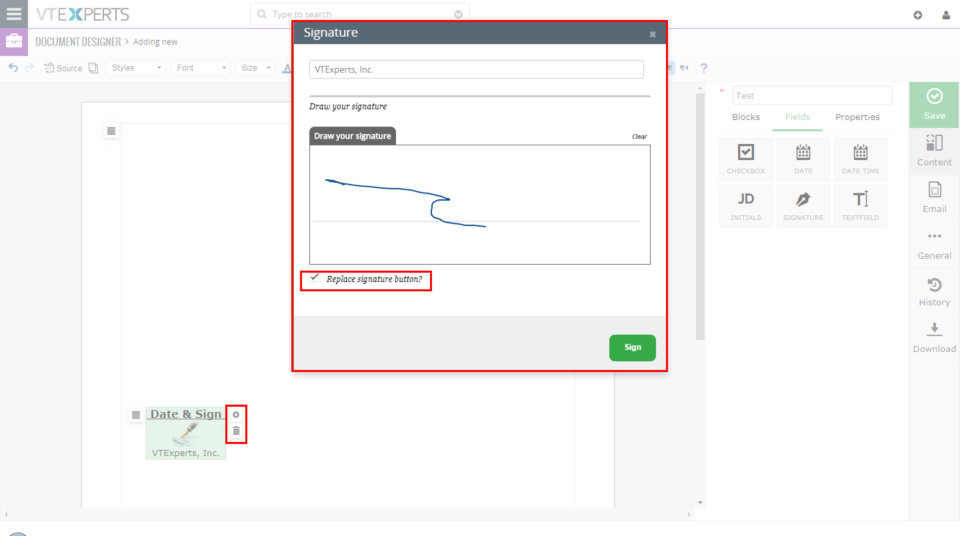
Proposal & Document Designer is the ultimate sales tool for document automation. We extend the power of your CRM and give you everything you need to turn your leads into clients and close deals faster. No need to switch between word processors, CPQ tools, e-signing apps, and your inbox. Proposal & Document Designer for VTiger lets you create sales documents, employ dynamic quoting, get electronic signatures, and automate your workflow all the while. How to Enable Digital Signature In Document Designer Add a Signature Field. When the signature element is first added, it defaults to be “Signed by the recipient”. In most cases this is what we want, meaning that once you send the document, the recipient will be able to click on the signature icon and place the signature. You can also pre-set signature by clicking on the gear icon and drawing the signature. If you do that, your drawn signature will show up
Introducing the Google Drive Integration with VTiger
May 18, 2018
Article
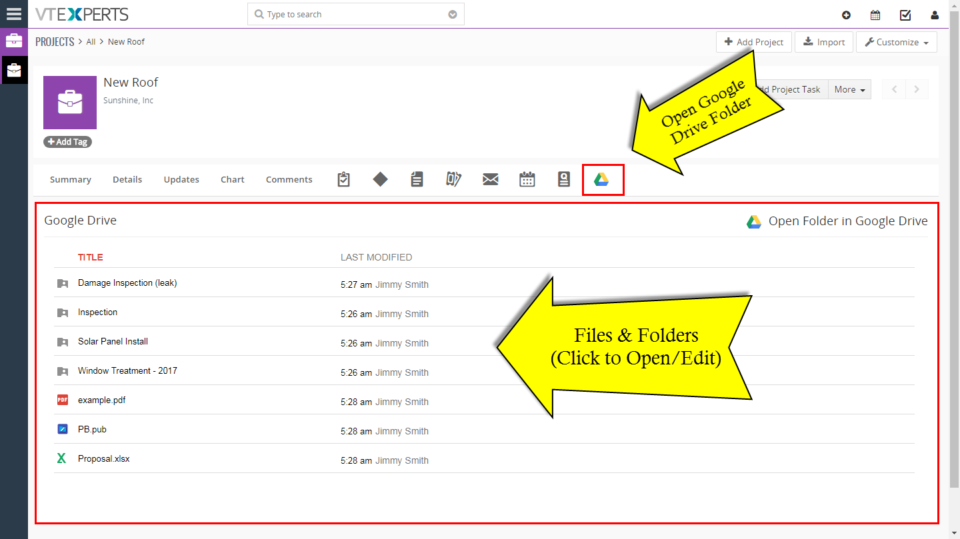
Google Drive is one of our recently added extensions that seamlessly integrates Google Drive with VTiger. Not only the Documents /Files/Folders in Google drive can be accessed from VTiger but they can be edited without downloading to your computer (supported files include Word, Excel, Text & images etc) by the Google File Viewer/ Editor. You can assign unique folders from Google Drive to the individual records and modules using a Built-in Folder Selector. It also shows the assigned Files/ Documents in two supported views that is Grid and List view. This integration also supports all modules, meaning that you can assign folders to any record e.g project, opportunity, order and access the folder while in VTiger. It is very user-friendly, Module-manager compatible and got a rather straight forward Configuration Panel. After the configuration you can choose, create or assign folders from Google Drive to the records. For that, open a
Enable 2 Step Authentication In VTiger 7
May 16, 2018
Article
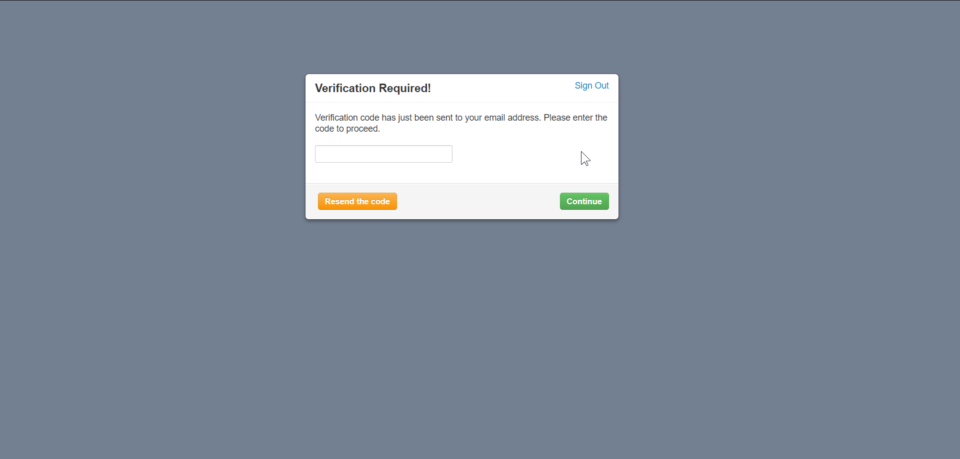
Enhanced Security extension is designed to enforce proper security standards in VTiger. The extension for VTiger also lets system admins enable 2 – Step Authentication as an extra layer of CRM security. Upon configuration, a code is sent to users’ emails, which is required to login. How to Enable 2 Step Authentication Go to Menu >> Settings >> CRM Settings >> Extension Pack >> Enhanced Security. Check box to active the 2 Step Authentication. You can also Set an Email Template. That code is for generating random number Code. You must select a user who will be excluded from the 2 step authentication in case your Email server stops working or you get locked out. Here you can see when a User try to login into the CRM using his/her Username and Password system will ask for Verification Code. For further help, contact us on help@vtexperts.com. We’ll be glad to be of service.
Turn On Kanban View In Opportunities In VTiger 7
May 14, 2018
Article
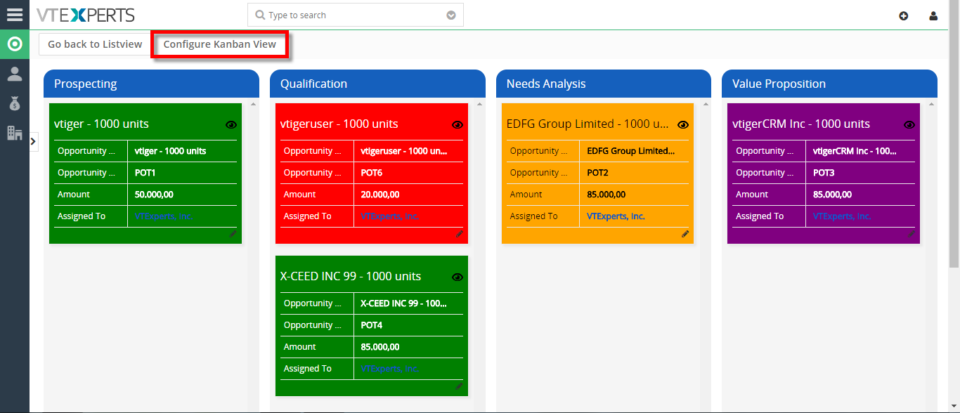
Kanban View is an extension with which you can easily create dynamic “cards” to visualize your workflow. Each module, e.g. Opportunities, Tickets, Tasks, Projects can be configured to have different sets of fields on the card as well as the “grouping/primary field“. Kanban view is mostly used to collaborate with team and manage sales opportunities, tickets, projects, tasks or any other list of records. How to Turn on Kanban View For switching to Kanban View in Opportunities click on the Blue Button on the upper right corner of the screen. You can Drag and Drop Opportunities from one stage to another. To Configure Kanban View Click on the the button on the upper left corner of the screen. Here you can Add new columns and Tile Fields. For further help, contact us on help@vtexperts.com. We’ll be glad to be of service.
Hide Assigned To Field In VTiger 7
May 11, 2018
Article
Conditional Layouts is an Extension with which you can configure unique layouts for different types of records. It allows the system administrator to systematize what fields/blocks to show based on other field values. It has an intuitive interface to configure conditions as well as fields to be shown, hidden and made mandatory. How to Hide Assigned To Field Go to Menu >> Settings >> CRM Settings >> Extension Pack >> Conditional Layouts. Click on the “Add Conditional Layouts” button. Select a Module. Add a Condition on which Conditional Layout will trigger. Add a task and select the Field and its Value. Here you can see when the Condition is true the field gets Hidden. For further help, contact us on help@vtexperts.com. We’ll be glad to be of service.
VTExperts Comply With GDPR Regulations Update 2018
May 11, 2018
Article
This article explains the compliance of VTExperts Inc. with GDPR’s regulations until 2018. VTExperts has always been up to date when it comes to security standards and safety measurements. We’ve already been following the best practices in regards to collecting, processing, and managing our Clients’ data. So we took this opportunity to clarify how do we go about the data we have and how much is it that we collect. As we deal in VTiger CRM versions VTiger 7 and VTiger 6, GDPR affects greatly all of the CRMs just as VTiger CRM. For legal documentation, please see our GDPR compliance statement. What Data Do We Collect? It is often considered that our extensions collect huge amount of data as they require constant connectivity to Internet. Here’s the correction. We DO NOT collect any of the data through our extensions. Our extensions need connectivity to our license server to
GDPR Compliance
May 11, 2018
Article
VTExperts Inc. & GDPR Regulations Update 2018 This document explains the compliance of VTExperts Inc. with GDPR’s regulations until 2018. In this statement, its explained how do we collect, process, and manage our Clients’ data, as well as what data is collected. The data privacy, consent, and withdrawal is also discussed. Collection of Data Via Extensions We state in full responsibility that there is NO data collected via extensions. We only require connectivity between your server and our license panel for the purpose of license validation. If you setup a firewall and configure port 80 to ping 162.243.0.162, that will ensure no data movement as well as smooth working of extensions. Via Webforms and Emails We do collect some data that is not sensitive at all: Form Submission: There are 4 forms: i) Contact Form at support page – does not collect any data and only used to allow
See Complete Record History In VTIger 7
May 10, 2018
Article
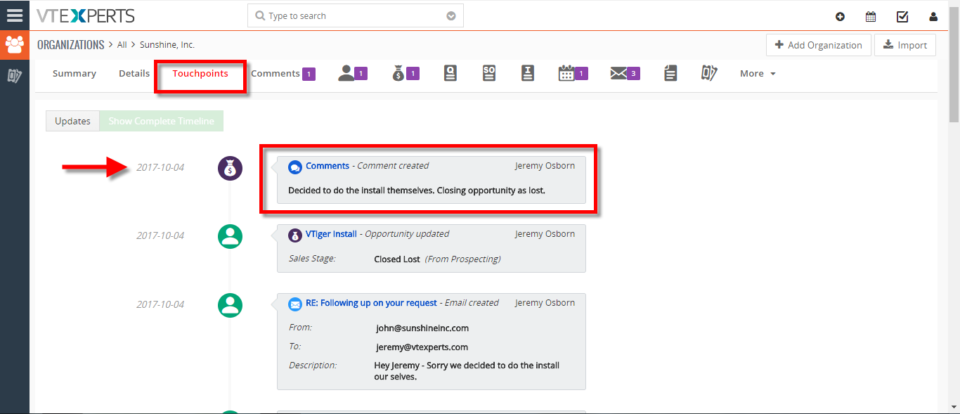
Record Timeline/Summary extension was designed to provide complete record visibility. On the timeline, the user can see any communication (emails, calls, comments) as well as record updates. It rolls up the information from 3 relationship level deeps, meaning if you are viewing organization timeline, you will see any information related to organization(emails,updates,comments) as well as any information related to organizations’ tickets/opportunities (or any other modules). How to See Complete Record History Go to Menu >> Settings >> CRM Settings >> Extension Pack >> Complete Timeline. Select the Number of Fields to show and Number of Characters to show in the description. Then select the Modules. Go to Organizations(Or any other select module) and open a record. In Touch Points Tab you can see complete Time Line with date/Time and details. It shows complete Time Line from the date record is created. For further help, contact us on help@vtexperts.com. We’ll be glad to be of service.
Merge Duplicates In VTIger 7
May 7, 2018
Article
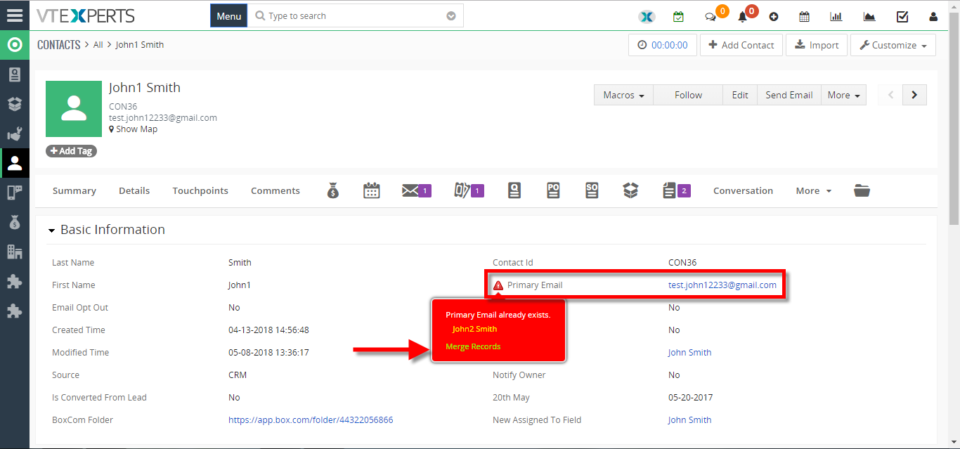
Duplicate Check & Merge is an extraordinarily useful extension for VTiger that is designed to find & merge any existing duplicate records, as well as to prevent any potential duplicates. How to Merge Duplicates Go to Contacts Details there you can see a Red Sign before records which have duplicate values. Click on the sign and click on the “Merge Record“. Click on the “Merge” button. The Primary record will be retained after the merge. You can select columns to retain values but the other records will be deleted. Click on the “Merge” button to apply the merge. For further help, contact us on help@vtexperts.com. We’ll be glad to be of service.
Field Formula Calculation/Concatenation for VTiger is available
May 7, 2018
Article
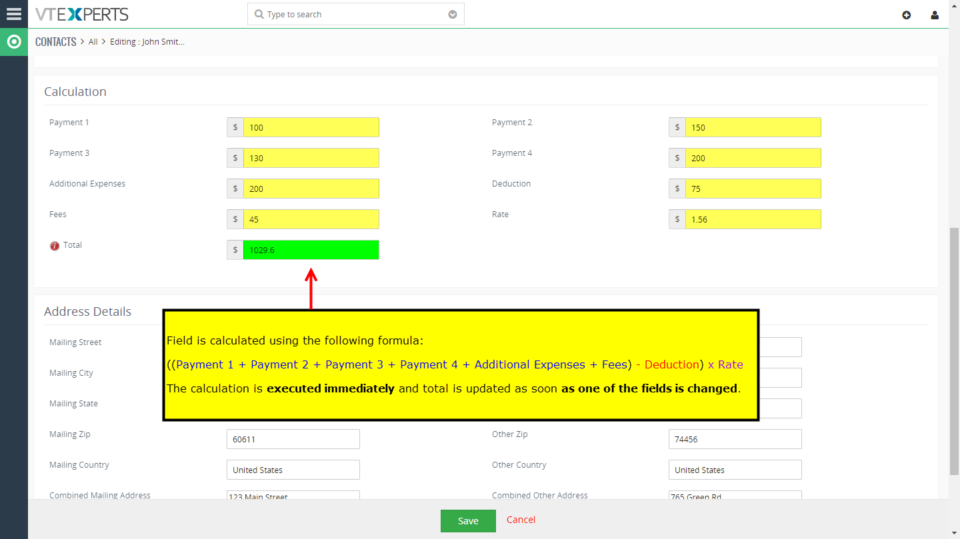
Real Time Field Formula calculation/Concatenation Extension for VTiger 7 is yet another helpful tool for automation as well as productivity. It allows various functions to be performed using standard and custom fields like addition, multiplication, subtraction division of number/amount/decimal as well as other custom functions like changing the Field X value based on the value in field Y, all in real-time. That is the best thing as you don’t have to wait for the data to be saved so you can see the SUM/Total/Combined text spot on. Another great feature of this extension is that it works with the text fields to concatenate the data. This is an addition that was not available before. Moreover, it is very user friendly and can be configured by standard VTiger Workflows in the module manager. The extension is now available for VTiger 7. Some of its most common uses are explained below: 1.
Backup VTiger Database To A FTP Server
May 2, 2018
Article
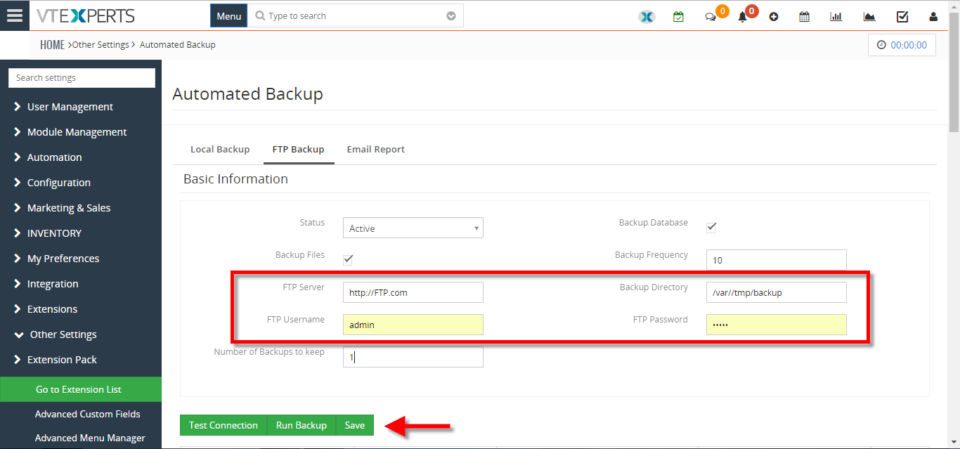
Automated Backups Extension for VTiger is designed to allow system administrators to easily backup VTiger Files & Database to a local folder or an off-site FTP. How to backup vtiger database to a FTP server Go to Menu >> Settings >> CRM Settings >> Extension Pack >> Automated Backup. Click on the “FTP Backup” tab. Add the FTP access details and click on the “Save” button. For further help, contact us on help@vtexperts.com. We’ll be glad to be of service.
Create Custom Module In VTiger 7
April 30, 2018
Article
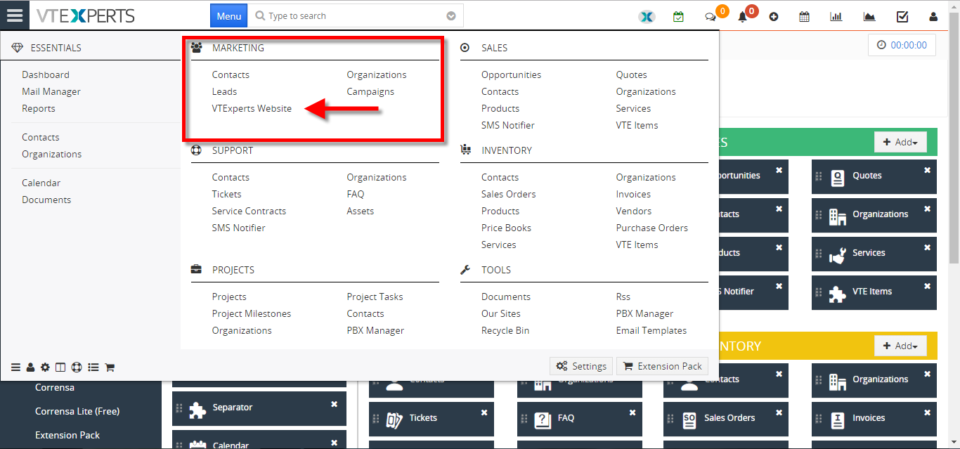
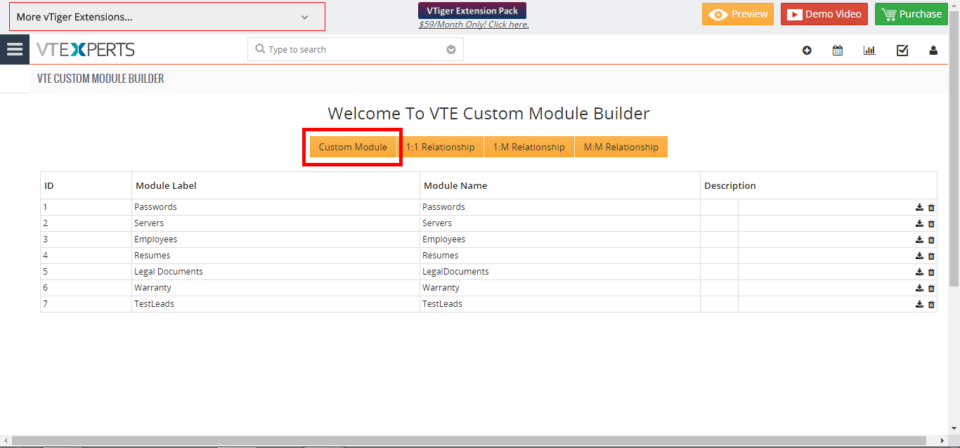
In VTiger 7 you create Custom Modules. The purpose of this extension is to help the user to create a module according to his requirements and you can relate modules with each others by using this extension. How To Create Custom Module Go to the “CRM Settings” and click on the “Other Settings” drop down menu button and select “VTE Custom Module Builder“ From here click on the “Custom Module” button to create a new module. Set the Module name and label and click on the “Save” button to create the module. For further help, contact us on help@vtexperts.com. We’ll be glad to be of service.
Attach Emails From Outlook To VTiger 7
April 27, 2018
Article
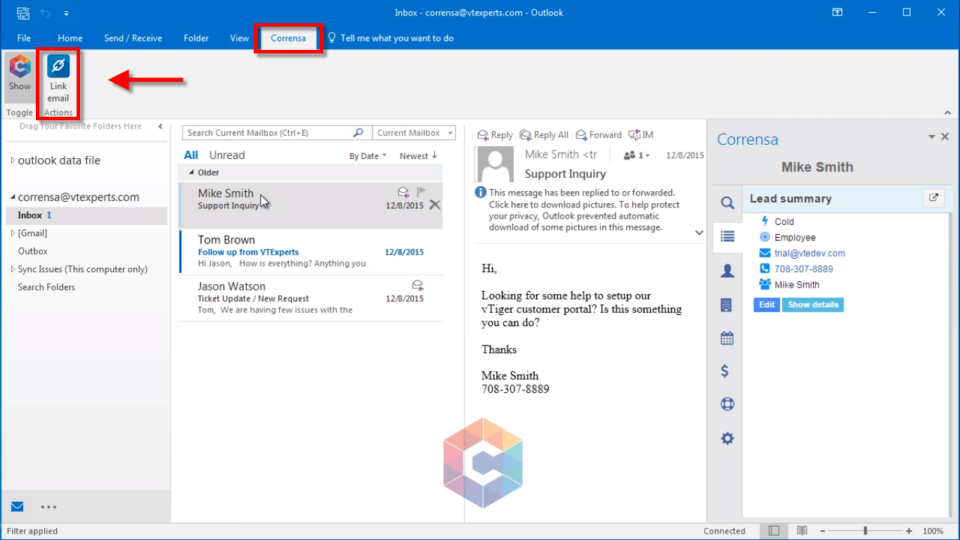
Corrensa is a complete Gmail, Outlook, Office 365 Integration for VTiger. It is designed to allow users to view, edit & create Leads/Contacts, Organizations, Tickets, Opportunities, Activities & more from within the Email interface. It’s a Google Chrome Extension + Outlook Plugin that can be installed/download from Google Chrome Store – Corrensa. How to Attach Emails from Outlook Click on the “Link Email” button that will attach the email to the VTiger record. For further help, contact us on help@vtexperts.com. We’ll be glad to be of service.


