vtiger tricks
Run Pivot/Matrix Reports In VTiger 7
April 17, 2018
Article
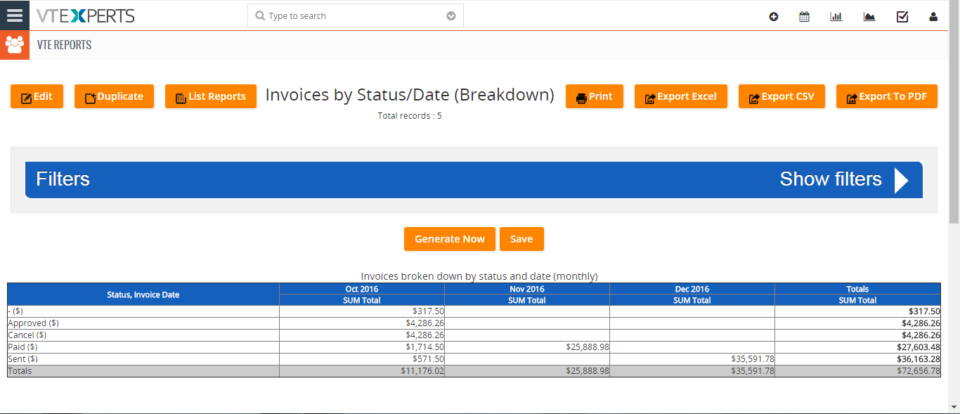
Professional Reports is a tool built to fulfill the needs of all the businesses looking to run complicated, but easy to read reports. It includes a report builder which is capable of creating detailed, summary, pivot, chart reports. All the charts and reports can be placed on the dashboard for quick & easy access. How to Run Pivot/Matrix Reports Go to the Menu >> VTE Reports and click on the “Add Report” button. Enter the Name, Description, Module and the Folder Here we can Sum, Average, Min and Max values when working with invoices. For this example we only use Total. Here you can change the label of the Total. Here we have the ability to create Rows and Columns for Matrix Reports. Here we can filter our Reports Status. Configure Report sharing(For this example we use Public). Then we can use Frequency for schedule Reports. Here we
Send Email From VTiger With Different Email Account/Account In VTiger 7
April 13, 2018
Article
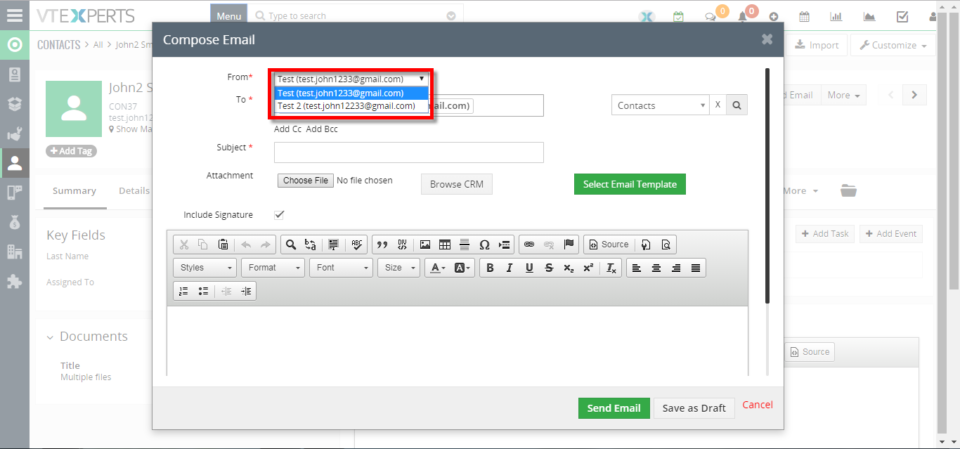
Outgoing Email Server Extension allow each user to have his/her own Outgoing Email Server(SMTP). Email server settings can be configured by admin, or each user can do it for him/herself. It supports IMAP function, meaning that every email sent will also be stored in user’s “Sent” folder on webmail/email server. How to Send Email From VTiger with Different Email Accounts Go to My Preferences and click on the “Outgoing Server” button. Click on the “Create” button and Configure the Outgoing Mail Server. Now open a contact and click on the “Send Email” button and select the Email account you want to send the mail from. Here you can see this mail is sent from VTiger Outgoing Mail Server. For further help, contact us on help@vtexperts.com. We’ll be glad to be of service.
Combine 2 Fields Into One In VTiger 7
April 13, 2018
Article
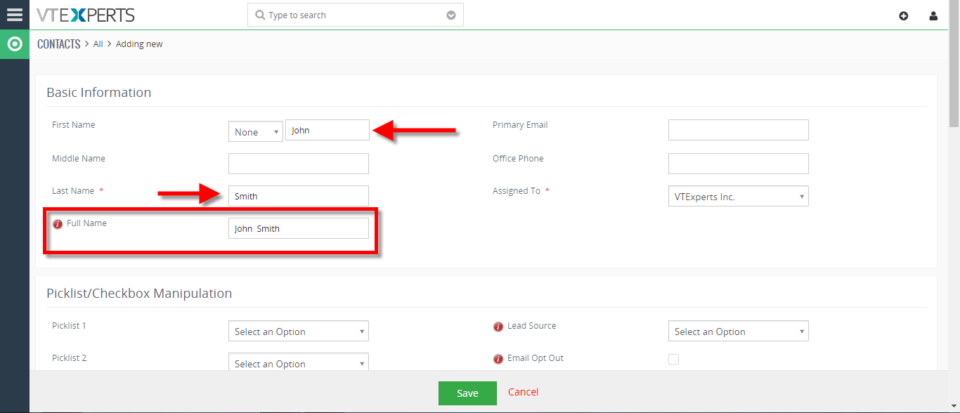
Field Calculation/Concatenation in Real time is designed to allow field calculations to be made as you type (on the spot). It displays the formula field results instantly without having to save the record in order to see the calculation result (standard VTiger workflow functionality). How to Combine 2 Fields Into One Go to Menu >> Settings >> CRM Settings >> Automation >> Workflows. Click on the “+ New Workflow” Button to create a new workflow. Enter a workflow name. Enter the conditions for this example anytime these fields are Not Empty we want to trigger the calculations then Add and an action which is Field Formula. Enter the action title. Check box the Execution on demands which means it calculates as soon as the user enters the value in the field. Then add the field and select the expression for this example we need Concat(a,b) and we add a fields and put it on the spot of a
Automatically Calculate Fields In VTiger 7
April 11, 2018
Article
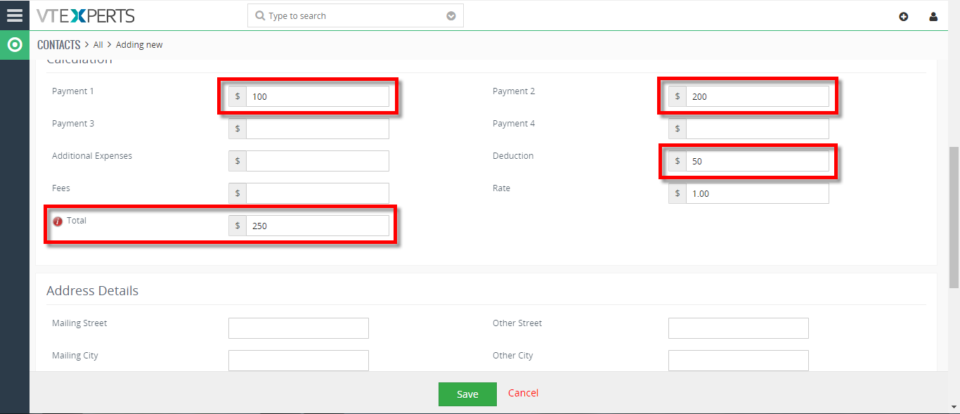
Field Calculation/Concatenation in Real time is designed to allow field calculations to be made as you type (on the spot). It displays the formula field results instantly without having to save the record in order to see the calculation result (standard VTiger workflow functionality). How to Automatically Calculate Fields Go to Menu >> Settings >> CRM Settings >> Automation >> Workflows. Click on the “+ New Workflow” Button to create a new workflow. Enter a workflow name. Enter the conditions for this example anytime these fields are grater than equal to 0 we want to trigger the calculations then Add and an action which is Field Formula. Enter the action title. Check box the Execution on demands which means it calculates as soon as the user enters the value in the field. Then add the field and select the expression for this example we need to add the field and Arithmetic Function While creating
Calculate Days Between Dates In VTiger 7
April 10, 2018
Article
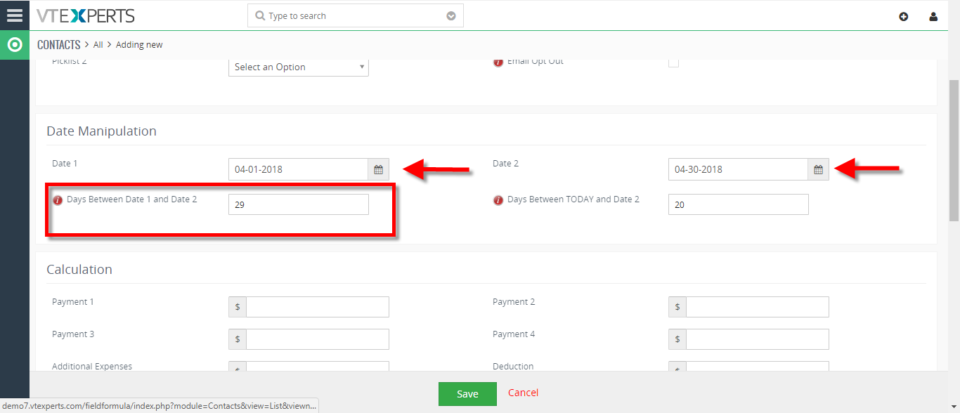
Field Calculation/Concatenation in Real time is designed to allow field calculations to be made as you type (on the spot). It displays the formula field results instantly without having to save the record in order to see the calculation result (standard VTiger workflow functionality). How to Calculate Days Between Dates Go to Menu >> Settings >> CRM Settings >> Automation >> Workflows. Click on the “+ New Workflow” Button to create a new workflow. Enter a workflow name. Enter the conditions for this example anytime these fields are not empty we want to trigger the calculations then Add and an action which is Field Formula. Enter the action title. Check box the Execution on demands which means it calculates as soon as the user enters the value in the field. Then add the field and select the expression for this example we need time_diffdays(a,b) and add the filed names on a and b. While creating a
Create Assets From Purchase Orders In VTiger 7
April 10, 2018
Article
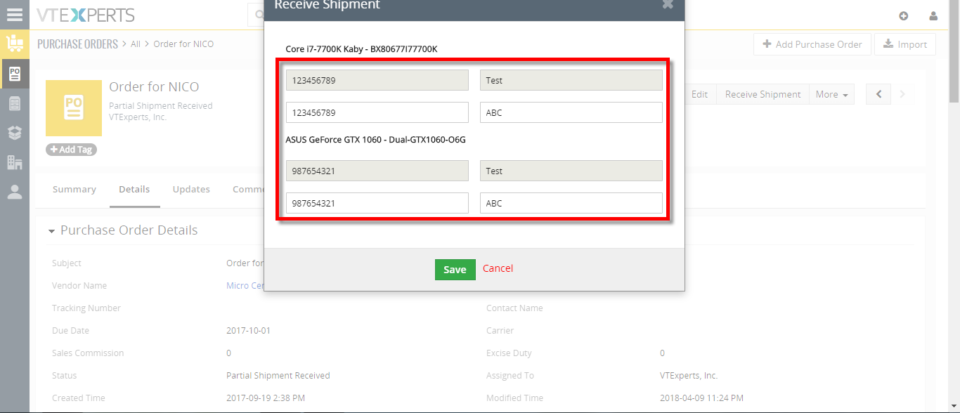
Receive/Create Asset from Purchase Order is an extension designed to efficiently create new assets based on what is being received from Purchase Order. It’s intuitive popup displays Product Number and Name and adds a row for each qty so the user can put in serial number and receiving notes for each product & qty they are receiving. In addition, it supports Partial Shipments and prevents duplicate parts to be received. How to Create Assets from Purchase Orders Open a Purchase Order and click on the “Receive Shipment” button. We’ll get a popup to enter a serial number for each quantity item that we’re receiving as well as receiving notes, Enter the serial numbers and click on the save button. It will change the status to Partial shipment Received and Assets will be automatically added. To complete this shipment click on the “Receive Shipment” button the one’s we already received are not longer editable so we can now add
Stop User From Saving Record Based On A Condition In VTiger 7
April 6, 2018
Article
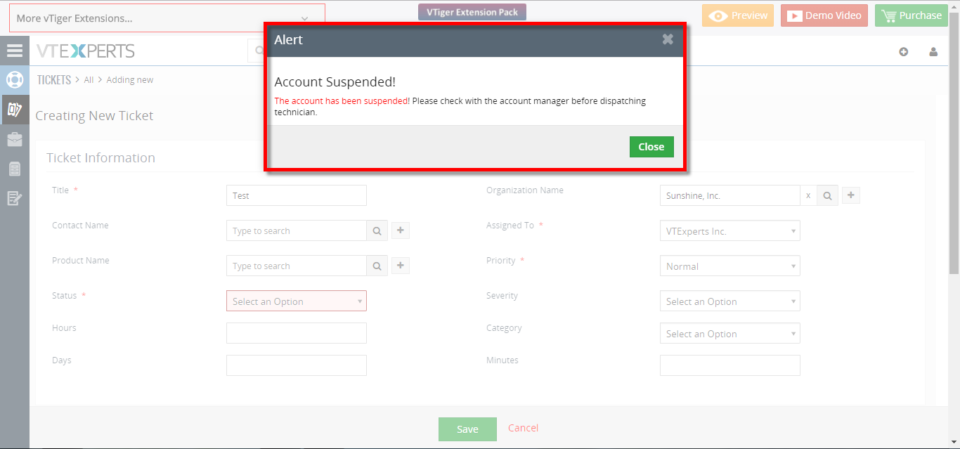
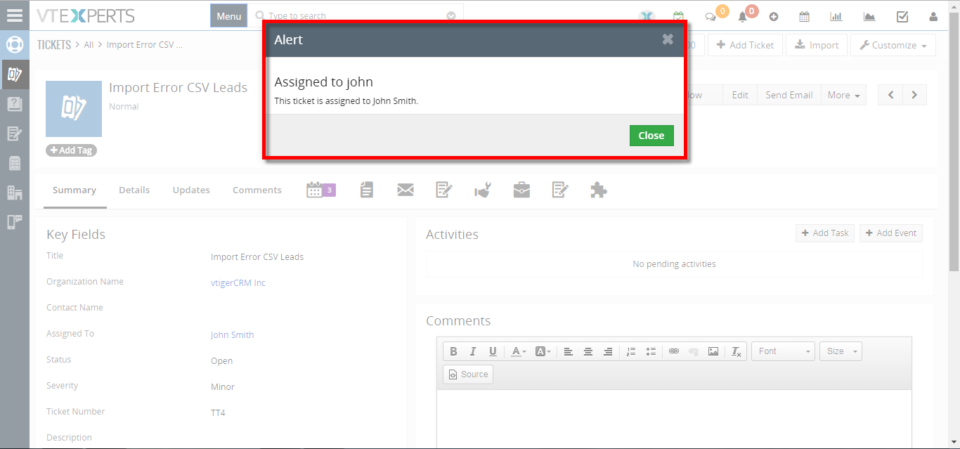
Conditional Alerts/Popups Extension is designed to trigger popups/alerts based on a certain field(s) value on the record. It supports edit/create views, meaning that as you fill in the field – you can trigger an alert/popup on the screen and prevent record from being saved. How to Stop User from Saving Record Based on a Condition Go to Menu >> Settings >> CRM Settings >> Other Settings >> Conditional Alert/Popup. Click on the “New Conditional Alert/Popup” button. Select the Module and enter the description. Add Condition for which you want to get alert of. Enter the Alert title. Enable/Disable alert opetions according to your needs. For this example we need Alert while saving the record. When you create a record it will show you an alert when the condition is true and it will not allow you to save the record. For further help, contact us on help@vtexperts.com.
Customize Block Into 5 Columns Layout In VTiger 7
April 5, 2018
Article
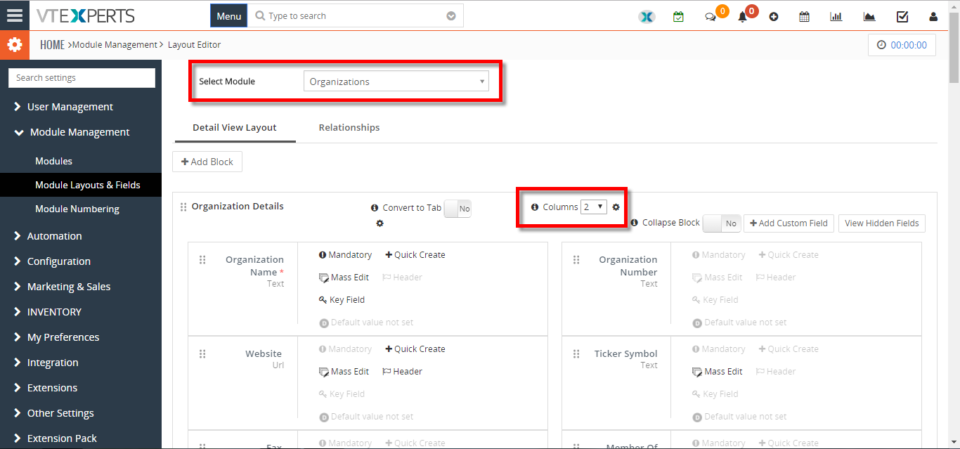
Multi Column Blocks/Layouts is designed to convert standard vtiger block layout (2 column) into multi column layout (up to 10 columns). Very easy to use and configure. Columns are configured in standard “Field & Layout Editor” by simply setting number of columns and dragging and dropping fields in desired area. How to Customize Block into 4 Column Layout Go to Menu >> Settings >> CRM Settings >> Module Management >>Module Layouts and Fields. Select the module and Set the “Columns” to 5. Arrange the fields and click on the “Save” button. Here is the 5 Blocks Layout. For further help, contact us on help@vtexperts.com. We’ll be glad to be of service.
Customize Block Into 4 Column Layout In VTiger 7
April 4, 2018
Article
Multi Column Blocks/Layouts is designed to convert standard vtiger block layout (2 column) into multi column layout (up to 10 columns). Very easy to use and configure. Columns are configured in standard “Field & Layout Editor” by simply setting number of columns and dragging and dropping fields in desired area. How to Customize Block into 4 Column Layout Go to Menu >> Settings >> CRM Settings >> Module Management >>Module Layouts and Fields. Select the module and Set the “Columns” to 4. Arrange the fields and click on the “Save” button. Here is the 4 Blocks Layout. For further help, contact us on help@vtexperts.com. We’ll be glad to be of service.
Create Alert/Popup In VTiger 7
April 3, 2018
Article
Conditional Alerts/Popups Extension is designed to trigger popups/alerts based on a certain field(s) value on the record. It supports edit/create views, meaning that as you fill in the field – you can trigger an alert/popup on the screen and prevent record from being saved, How to Create Alert/Popup Go to Menu >> Settings >> CRM Settings >> Other Settings >> Conditional Alert/Popup. Click on the “New Conditional Alert/Popup” button. Select the Module and enter the description. Add Condition for which you want to get alert of. Click on the “Add Task” button to specify alert. Enter the Alert title. Enable/Disable alert opetions according to your needs. When you open/create a record it will show you an alert when the condition is true. For further help, contact us on help@vtexperts.com. We’ll be glad to be of service.
Customize Block Into 3 Column Layout In VTiger 7
April 2, 2018
Article
Multi Column Blocks/Layouts is designed to convert standard vtiger block layout (2 column) into multi column layout (up to 10 columns). Very easy to use and configure. Columns are configured in standard “Field & Layout Editor” by simply setting number of columns and dragging and dropping fields in desired area. How to Customize Block into 3 Column Layout Go to Menu >> Settings >> CRM Settings >> Module Management >>Module Layouts and Fields. Select the module and Set the “Columns” to 3. Arrange the fields and click on the “Save” button. Here is the 3 Blocks Layout. For further help, contact us on help@vtexperts.com. We’ll be glad to be of service.
Create Custom Tabs In VTiger 7
April 2, 2018
Article
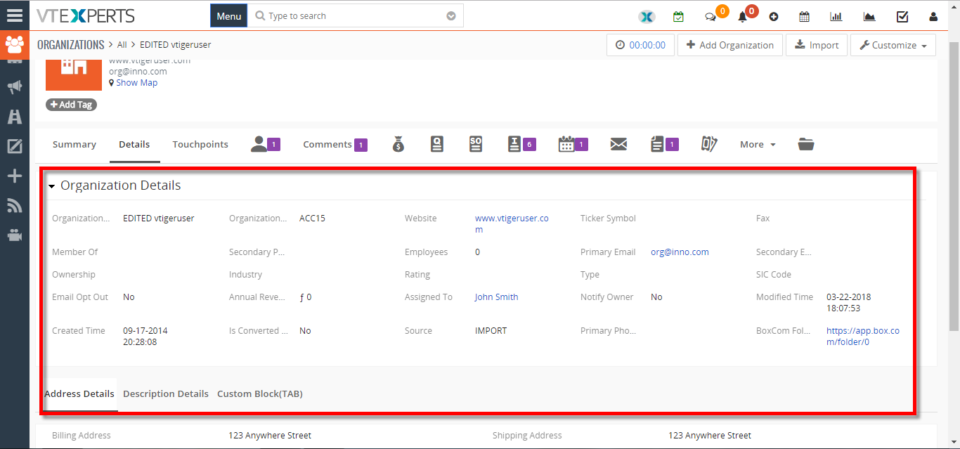
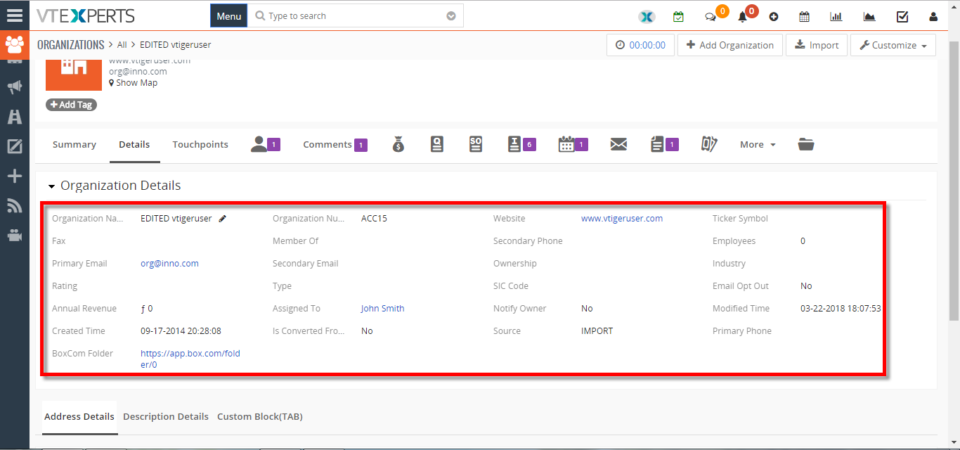
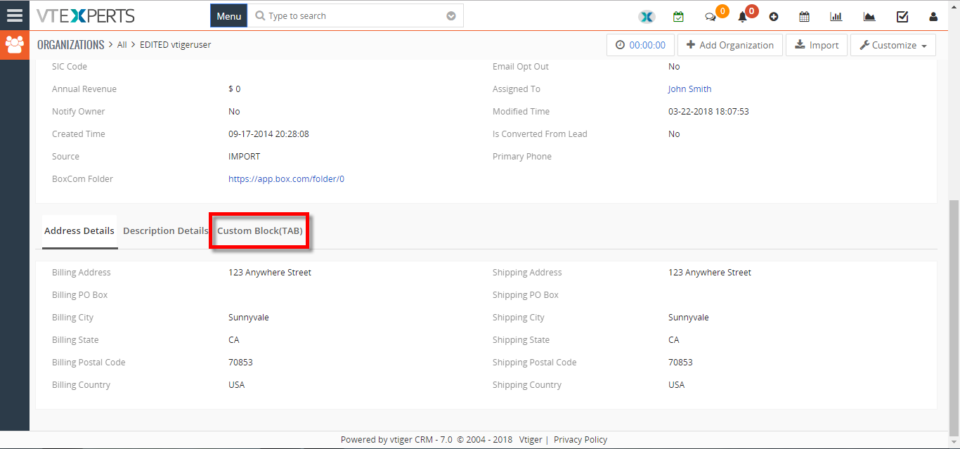
In VTiger 7 user can convert field blocks into Tabs by using our Tabs Extention. Easy to configure (just switch the block on/off), compatible with all modules as well as fields. Tabs will contain the same fields/functionality as blocks. How to Create Custom Tabs Go to Menu >> Settings >> CRM Settings >> Module Management >> Module Layouts And Fields. Select the module and click on the “Add Block” button to create a custom block. Enter the block name and select its position. Click on the “Convert To Tab” switch to convert that custom block into a Tab. Here you can see in the Organization Details the Custom block is showing in a Tab. For further help, contact us on help@vtexperts.com. We’ll be glad to be of service.
Configure Activity Reminders (popups) In VTiger 7
March 29, 2018
Article
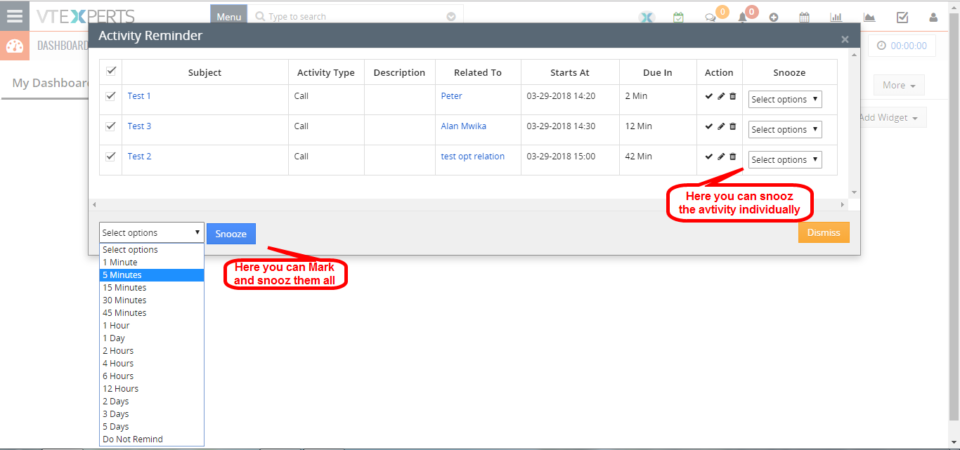
Activity Reminder (Alert/Popup) Extension is designed to calendar reminders similar to outlook. The reminder popup shows up automatically when the activity is due and displays current day’s activities with basic details such as subject, description, related to (contact, lead, organization, etc..) as well as Due In. In addition, built-in Snooze option allow the user to snooze all or individual activity. How to Configure Activity Reminders Go to the Menu >> Settings >> CRM Settings >> Other Settings >> Calendar Popup and select the modules. Click on this Icon to see all the Activities for the day. You can also snooze the popup. For further help, contact us on help@vtexperts.com. We’ll be glad to be of service.
Track If Anyone Is Exporting Or Copying Data In VTiger 7
March 29, 2018
Article
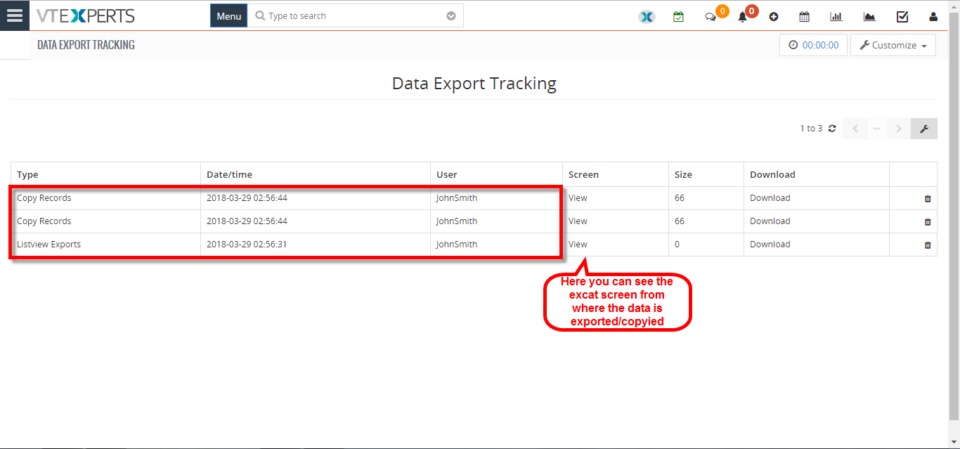
Data Export Tracker is an Extension that allows system administrators to track any export or data copy initiated from the CRM. It tracks exports from Lists, Reports, Scheduled Reports as well as copying data using “CTRL+C” or Mouse (Right Click > Copy). How to Track Exporting or Copying Data Go to Menu >> Settings >> CRM Settings >> Other Settings >> Data Export. Click on the “Edit” button to configuring. Check box the conditions you want to keep track of and click on the “Save” button. Here you can see if anyone have Exported/Copied the data with the Date and Time the the User too. For further help, contact us on help@vtexperts.com. We’ll be glad to be of service.
Edit Organization From The Contacts In VTiger 7
March 23, 2018
Article
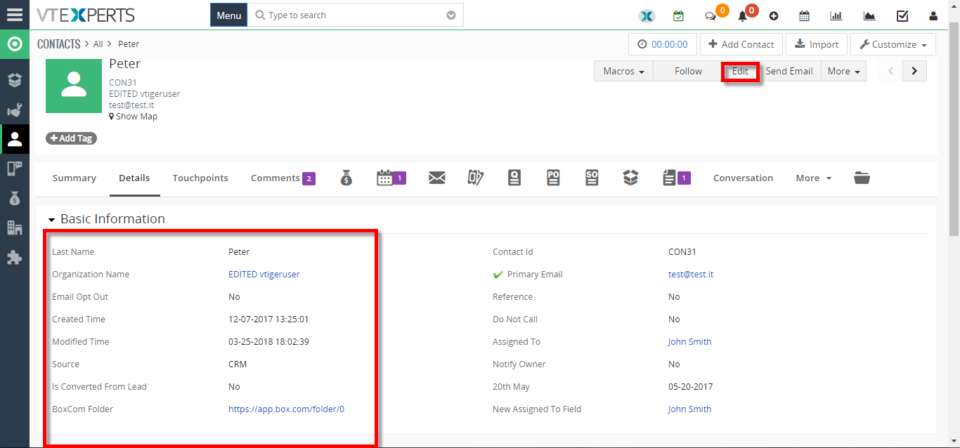
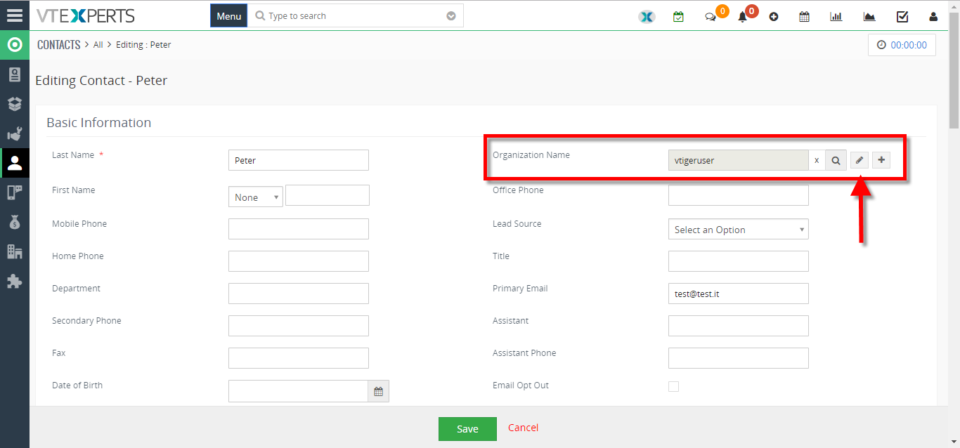
Quick Edit extension for VTiger is developed to give the ability of edition of related records (1:m, 1:1) when in Edit/Create view of primary record. The extension adds “Pencil” icon next to every Relation field with which you can avail the editing capabilities. How to edit Organization from the Contacts Open a “Contact“ and click on the “Edit” button. Here you can see next to the “Organization Name” there is a “Pencil Icon” click on it to open a Quick Edit window. It will allow you to change the information on the Organization while you’re still on the Contacts. Here you can see the applied changes. For further help, contact us on help@vtexperts.com. We’ll be glad to be of service.
Export Lists To Excel Instead Of .csv In VTiger 7
March 16, 2018
Article
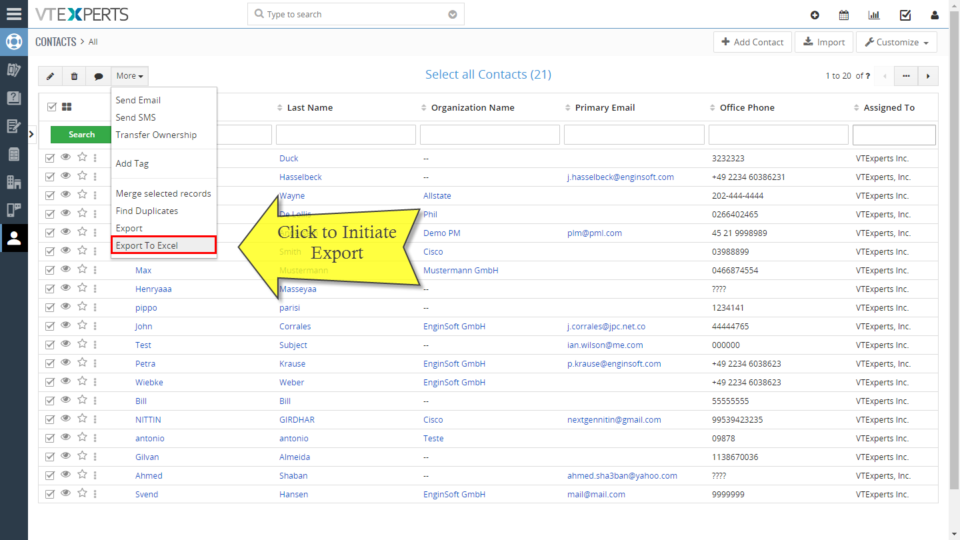
List Export to XLS Extension is designed to make exports from VTiger a little easier. It adds an option to export information from VTiger lists into .XLS (excel), while standard functionality only supports export to .csv, which can be tedious to format. How to Export Lists to Excel Go to any list and select the number of records and than click on the “More” button and select “Export to Excel” to create an export into “Excel”. Here you can Export selected Records, Data on the current page and Export all data. It will produce an Excel File which will look like this. For further help, contact us on help@vtexperts.com. We’ll be glad to be of service.
Timesheets Extension For VTiger Is Now Available
February 26, 2018
Article
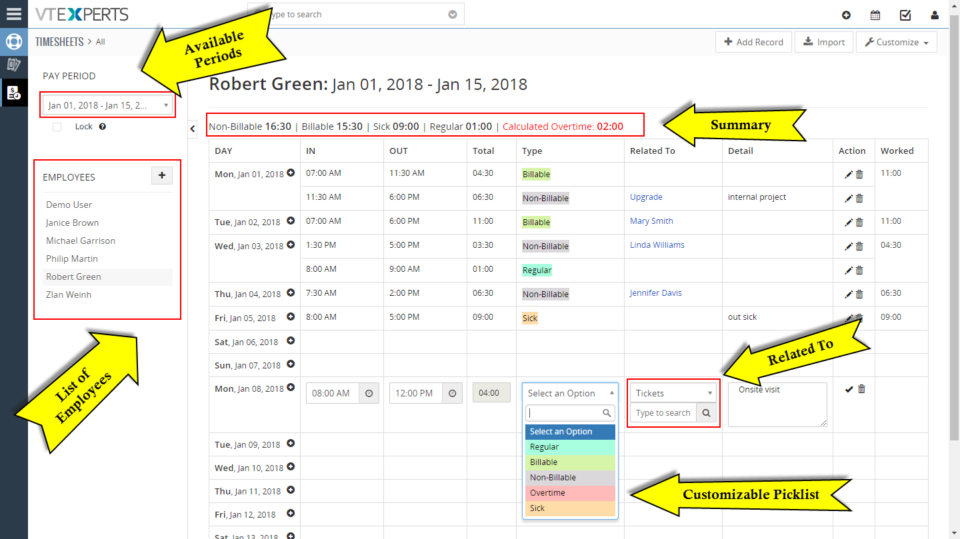
There were lot of requests for this extension in the past year. As most of our extensions are focused to “keep it all under one hood – CRM” (Email Marketing/Campaign for VTiger is the best example), keeping track of workers’ timings was very problematic before, not to mention bringing it to the CRM for billing, records, configuring workflows, and reporting. That’s the reason we developed this record-keeping extension Timesheets for VTiger that allows users to log the time spent in details as well as system admins to keep tabs on them. Timesheets is an extension for VTiger designed to elegantly track employees’ (users) time, with ability to visualize it. It supports custom periods, where you can adjust the length of the period to fit your business. In addition, periods can be locked to prevent any further modifications. It’s simplistic design, makes it extremely easy to log the time and specify
View User Activity (New/Updated Records, Comments) For The Day In VTiger 7
February 21, 2018
Article
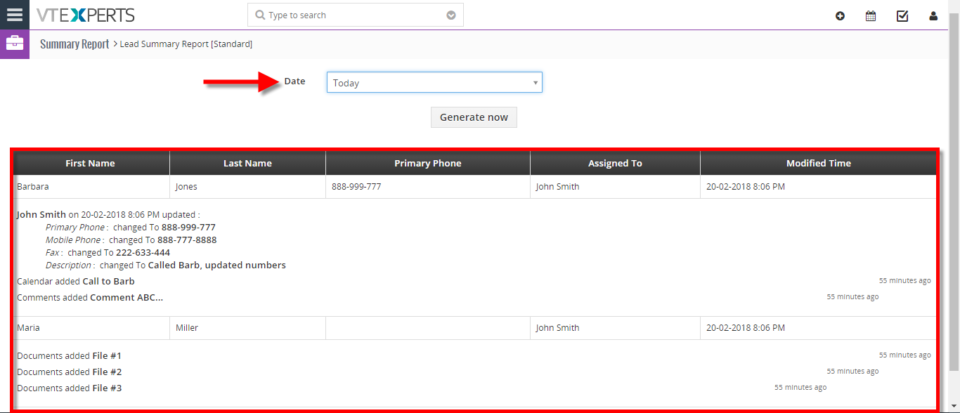
User Summary Report extension is designed to allow the system admin to see activity on certain records or list of records. It allows to monitor every created or updated record. How to View User Activity for the Day Go to the “Menu“. Click on the “Projects” and select “Summary Reports“. Click on a “Summary Report“. Here We can see the information such and First name, Last name, Address etc. Down below we can see the Updates made today. For further help, contact us on help@vtexperts.com. We’ll be glad to be of service.
Configure Custom Colors On Calendar Tiles In VTiger 7
February 20, 2018
Article
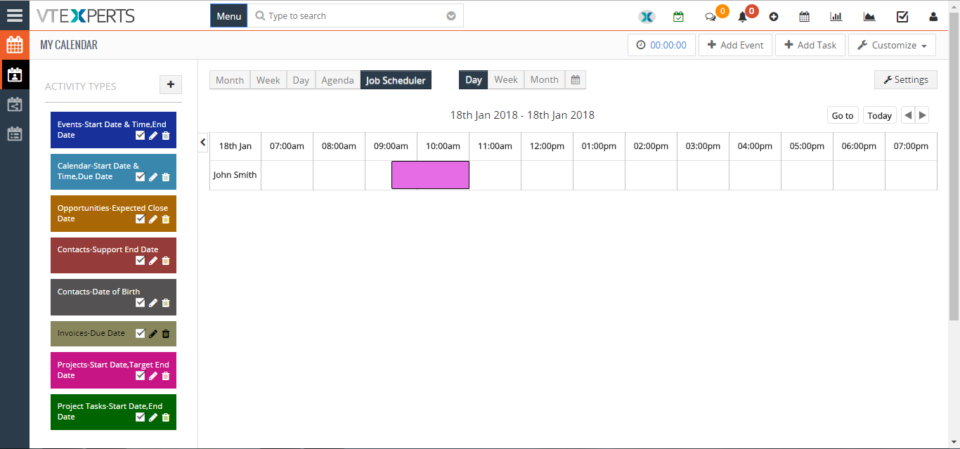
In Vtiger 7, User can pick the colors per user or Per status by using our VTiger Job Scheduler/Calendar extension which is a must-have for organizations that rely on calendar. How to Configure Custom Colors on Calendar Tiles Click on the “Calendar” icon on the top right corner of the screen. Click on the “Settings” button. Select “Yes” in the “Use Status Colors” option. Go to the “Picklists Values“. Select “Module” and click on the “Edit” icon. Than select the “Color” for picklist. Click on the “+ Add Value” button to add a status value. Add “Item Value” and select the “Color“. Create Event and select a “Status“. Here it will show the “Color tiles“. For further help, contact us on help@vtexperts.com. We’ll glad to be of service.
Customize Text On Calendar Tiles In VTiger 7
February 15, 2018
Article
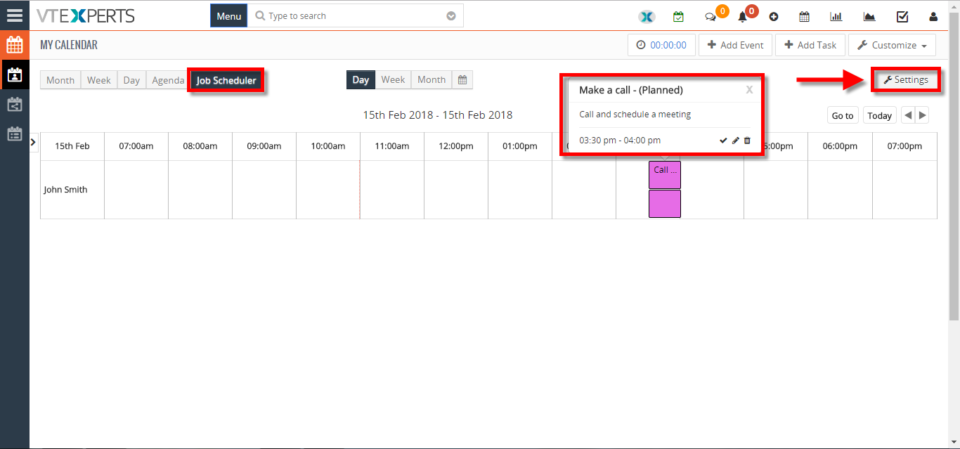
We enhanced standard VTiger calendar by adding a Job/Work Scheduler view. This allows users to see events assigned to each user without them overlapping onto other users/hours. Tile/Box text is configurable + unique colors can be assigned based on status (also configured by user). How to customize text on calendar tiles Click on the “Calendar” icon on the top right corner of the screen Select “Job Scheduler” and and click on the “Settings” button. Click on “Click here to configure tile & hover text“. Click on the “Edit” button. Here you can put any text or select form the fields that are related to this activity or task. For further help, contact us on help@vtexperts.com. We’ll be glad to be of service.
Create Product/Service Bundles In VTiger 7
February 14, 2018
Article
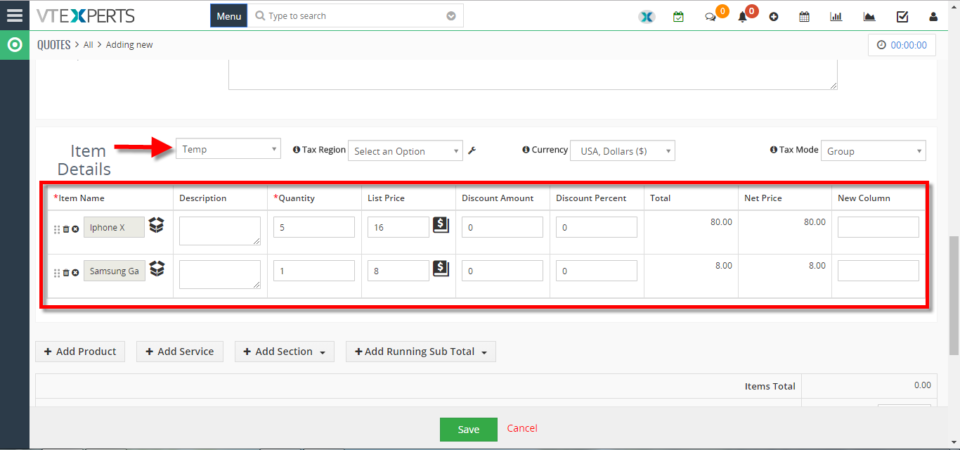
Quote/Invoice/Order Templates extension allows you to define products/services which can be reused on the quote/invoice/order at any time. If you often find yourself creating the same quotes/invoices/orders or adding the same set of items over and over again, this will be a huge time saver for you. How to Create Product/Service Bundles Go to the “Menu” and select “Product and Service Templates“. Click on the “+Add Template” button to create a new Template. Add “Template Name” and select “Module“. Now add “Products and Services” and click on the save button. Here you can see while creating a quote you can add “Product/Service Bundles“. For further help, contact us on help@vtexperts.com. We’ll be glad to be of service.
View Your Sales/Opportunity Forecast By Sales Rep In VTiger 7
February 8, 2018
Article
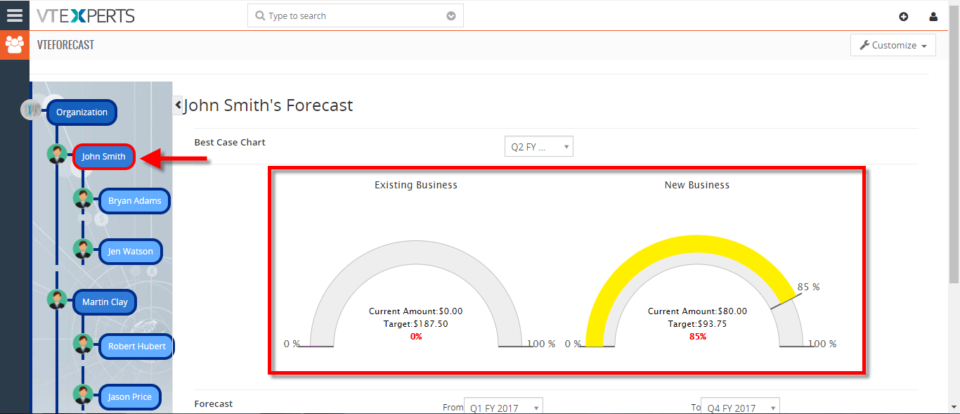
Sales Forecast for VTiger Extension was designed to help manage and predict Organization’s current and future Opportunities. It includes ability to view the entire company’s Opportunities as well as drill down to each Team or User. How to View Your Sales/Opportunity Forecast by Sales Rep Go to the “Menu” and select “CRM Settings“. Under “Other Settings” select “VTE Forecast“. Then click on the “View Forecast” button. You can view the Forecast for the entire organization or you can view it by sales team and the Sales Rep. For further help, contact us on help@vtexperts.com. We’ll be glad to be of service.


Color Code Comments In VTiger 7