

vtiger tweaks
Remove multiple emails from send email box (Document Designer)
December 30, 2021

Article
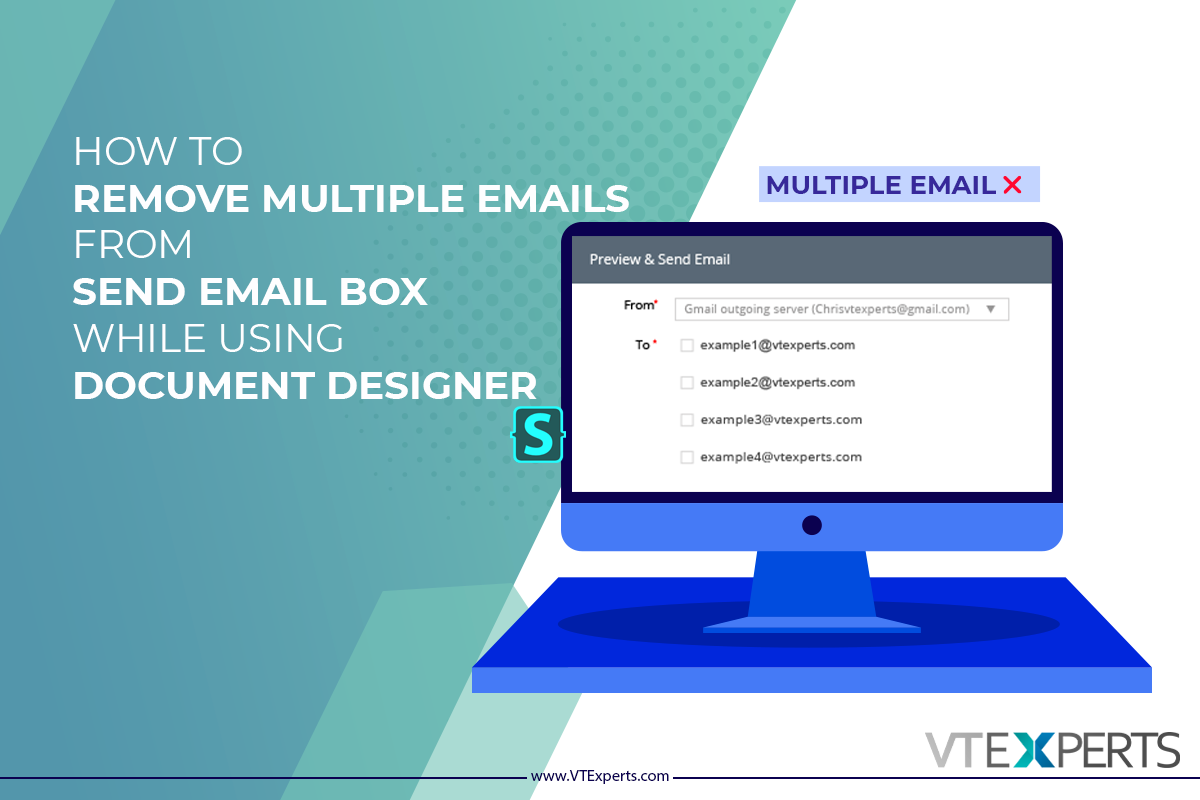
Sometimes, a single record contains more then one email fields. When user try to send a document designers template via email to that contact, multiple email addresses shows up. In this article we will learn, how can a user Remove multiple emails from send email box while sending a Document Designer Template With a little bit tweaking with CSS, you can make only the primary email of the record to appear in the send email box For doing so, first you have to install a browser extension, by the name of stylus Stylus Stylus allows you to easily install themes and skins for many popular sites. Get Stylus for chrome Here Once Stylus is installed, configure the Stylus for send email dialog box using Stylus editor Configuring a new Stylus Following is the CSS changes that you have to configure in the stylus [data-module="PurchaseOrder"] {display:none;} Make sure to provide
User groups in Shared Calendars
December 27, 2021

Article
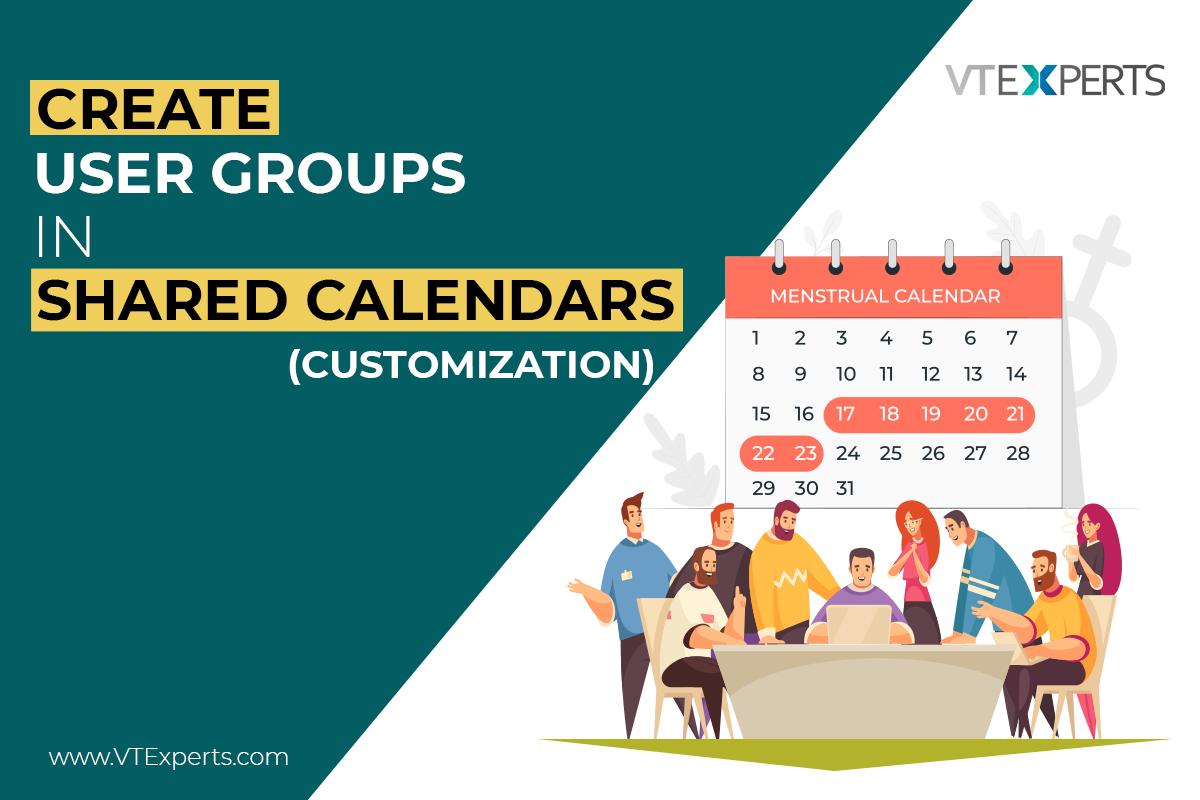
User groups in shared calendars allows to make Label Groups and add users into it, in shared calendar. Using it you can filter the calendar events based on groups. When you open shared calendar it shows all the events of the CRM users and teams, sometimes it get too complicated as the whole calendar is filled up Prominent features Go to shared Calendar Filter by Group: Check the box, in order to filter the calendar based on groups Select a group: Select the groups here and the events of the participants of the selected group will be shown Group’s participants events: Participants of the group in the sequence that is configured while adding the participants to a certain group Customization configuration Predefined groups are created as per clients requirement. In this example, 9 different groups are created with name lbl_group1, lbl_group2, lbl_group3 up to lbl_group9 Here is a screenshot showing
On Event Creation an Automated Ticket will be Generated
November 12, 2021

Article
Can a user generate an automated ticket, when an event is created in calendar? It is one of the most common question that we face from clients. Default Vtiger feature cannot do this. But, VTExperts provides a customization using which on event creation an automated ticket will be generated For example, Adam plans the physical meetings in organization XtraCare. But, he do not participate in those meeting as a member. To keep Adam inform, company wants an automated ticket assigned to Adam, whenever a user makes a calendar event. Adam’s can check the ticket and make the arrangements for the upcoming events without disturbing the privacy of other organizational members who are participating in the meeting The whole process will consists of two steps Creating and Event Generation of an automated ticket in response Firstly, an event will be created. Secondly, in response to that event an automated ticket will
VTExperts Extension Pack is Fully Compatible with VTiger 7.4
September 30, 2021

Article
Vtiger 7.4 has been released. there have been a number of changes like new workflow expressions, secure passwords, import via record number, HTML injection fix, mass calendar edit, default internal comment etc. In addition to the new features, your favorite extensions have also been upgraded to support the latest upgrade of VTiger open source. In case, you want to check the details regarding the changes made in Vtiger 7.4, then do visit the article: Vtiger 7.4 open source change log VTExpert’s extension pack compatibility with Vtiger 7.4 In regard to the release of Vtiger 7.4, VTExperts made sure that all of the extension that were previously compatible with the Vtiger 7.x are fine tuned and made fully compatible to Vtiger 7.4. As now, VTExperts extension pack is fully compatible with VTiger 7.4, so you can use the VTExpert’s extension pack to its full potential on Vtiger 7.4. In case you face
How to Set workflow upon record deletion (Customization)
December 16, 2020

Article
A very common feature that VTiger users inquire frequently about is, can we set workflows to send an email, update a field, create record, create event etc. upon deletion of a record. Unfortunately, VTiger do not provide this feature by default. That is why, we at VTExperts provide a customized solution for this problem. For example, a user (e.g. administrator) of a VTiger CRM system wants to get notified through mail when any other user of the CRM system deletes a record. By default, this feature is not supported by VTiger CRM and hence this task cannot be performed on default VTiger configurations. This customization gives you a new option to Trigger Workflow on Record Deletion Practical Example for further explanation of this customization and how to use it An Admin user wants to get notified through Email whenever a contact is deleted Workflow Now, we will set the workflow, which will send a notification (in the form of email) whenever a record (Contact) is
Google Maps in VTiger: Service now loads only when it is called
January 18, 2019
Article
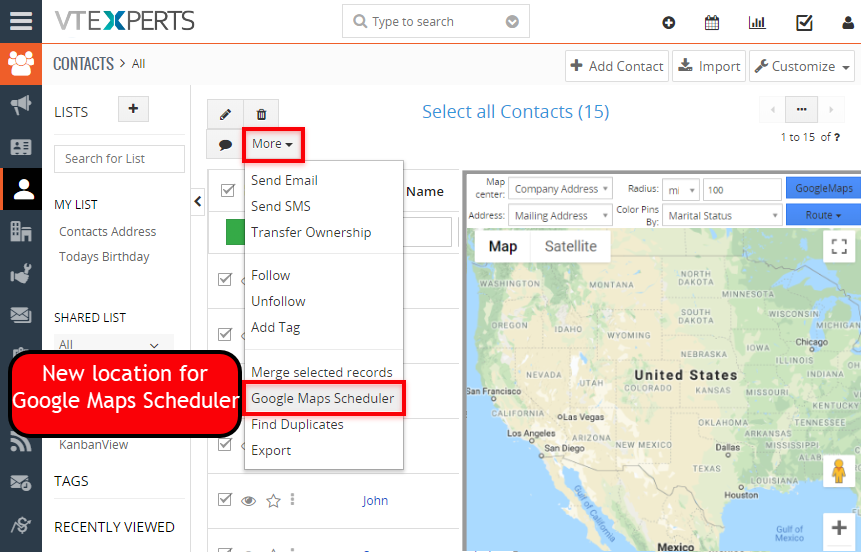
Our extension, Google Maps & Route Integration, helps VTiger users to reach the leads/ clients more efficiently by showing them as colored pins on the Google Maps. It enables users to choose the Map Center which can be anything from Company Address to User or Zip code. It can draw routes automatically or manually and according to four different types I.e Walk, cycling, Transit and Drive. These can also be printed as ‘directions’ using smart devices. This extension allows users to schedule their route as well as print it in the form of a map. This feature is very much identical to Google Maps. It also supports multiple addresses when used with Google Address Lookup extension. New Feature We have tweaked it a little bit so that the service now loads only when it is called. This keeps the system robust and efficient. You can go to any module for which this extension is enabled. On the Top left, there is “More’ button. The Google Maps will
Send Emails Directly From Custom Modules in VTiger
December 18, 2018
Article
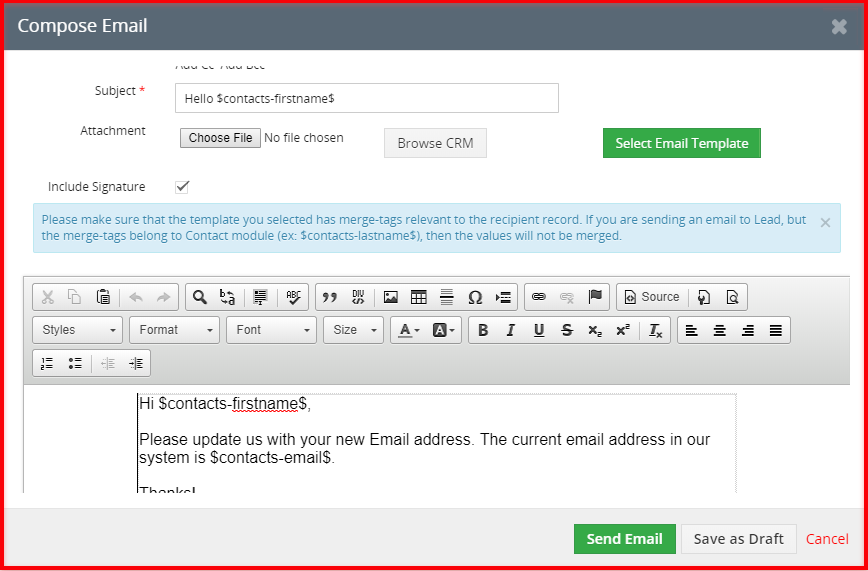
Custom Module & Relationship builder for VTiger is a very handy extension that enables the CRM admins to create new Custom Modules in the blink of an eye. These custom modules are made following VTiger standards strictly. In addition, the relationship builder allows CRM admins to link together existing modules as well as new custom modules. It supports 1:1, 1:M and M:M relationships. All the modules made by this extension includes Activity, Documents & Comments widgets and Modified By, Created By fields. New Feature We have added a new feature in this extension to make it a more powerful tool. Users can now send emails from a newly created custom module. You can see the ‘Send Email’ button in the top right corner of the record of the custom modules. Clicking this button will open an email composer. You can choose to send emails to any of the record from any of the modules as well as map data from
Advanced Custom Fields for VTiger Supports PDF and Image Uploads
December 7, 2018
Article
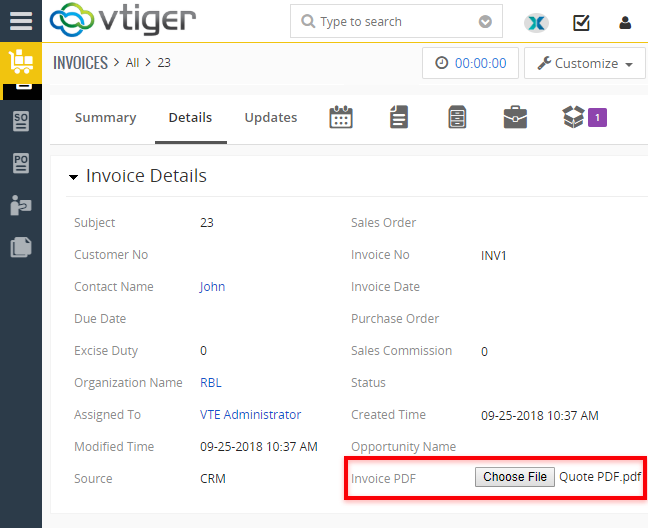
Advanced Custom Fields The Advanced Custom Field Extension was designed for system admins to simply add Advanced Custom Fields to selected modules, where needed, other than standard fields. The Advanced Custom Fields are of 3 types – HTML Description Field (which supports RTF), Assigned to Field (which is really a user picklist) and Upload Field (which allows PDF documents and Image Uploads). When it comes to the number of Advanced Custom fields added, there is no limit. It supports Edit/ Create/ Detail View. Supports all the Standard and Custom VTiger Modules as well. Upload Field for PDFs and Images Now, the feature that we are discussing here is the Upload Field. An upload custom field allows to add an image as well as PDFs to any record of any module. You can add as many custom upload fields as required – there’s no limitation for it. Use Case For instance, take an example of Quotes Module. Users can upload an image of the Product
Knowledge Base Extension
December 3, 2018

Article
Knowledge Base This extension was designed to allow users to access internal documentation more easily. Very easy to use navigation/interface accessible from any page in VTiger. In addition, you can open and close it while editing/creating records. It does not loads a new page and keeps you on the current page. It basically opens a popup/overlay, meaning that you can open and close it while editing/creating records. In knowledge base you can put any of your internal documentations/FAQ’s. It has instant + smart search, where the results will be displayed as you type. We added custom search logic to find only relevant articles. It will give you all the articles that have subject or description that contains the searched query. The plugin itself is fully customizable. You can create your own category, set limits on articles, configure custom permissions and much more. In this article we will go over a simple
When Creating A Ticket Only Show Contacts Associated With Ticket’s Organization In VTiger 7
November 23, 2018
Article
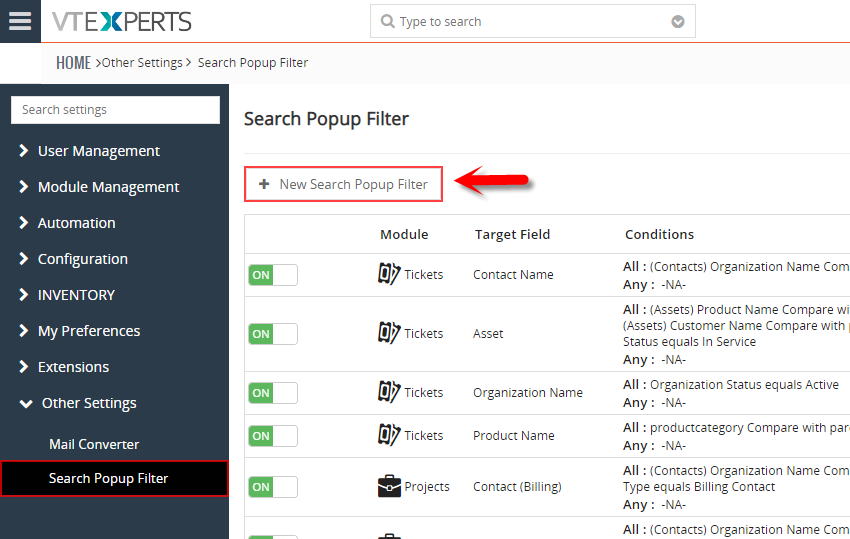
Search Popup Filter This extension was designed to apply filter (or condition) that will limit the results user will see when selecting a record (any) from a lookup/select/search popup in VTiger. It is fully customizable, meaning that you can set any condition which makes most sense to your business. One of the more common examples is “only show me Organizations that are Active (exclude Inactive)”. In addition to simple filters, you can also use “Compare with parent” operator, meaning that you can apply a filter which will check field value on the record you are on and compare it with the related record, for example if you are attaching asset to the ticket, by default you would see all available assets in the system, however you could configure it to only show assets related to an organization/customer that you are creating ticket for. In this article we will go over a simple use case on how
Only Show Active Organizations When Creating A Ticket In VTiger 7
November 21, 2018

Article
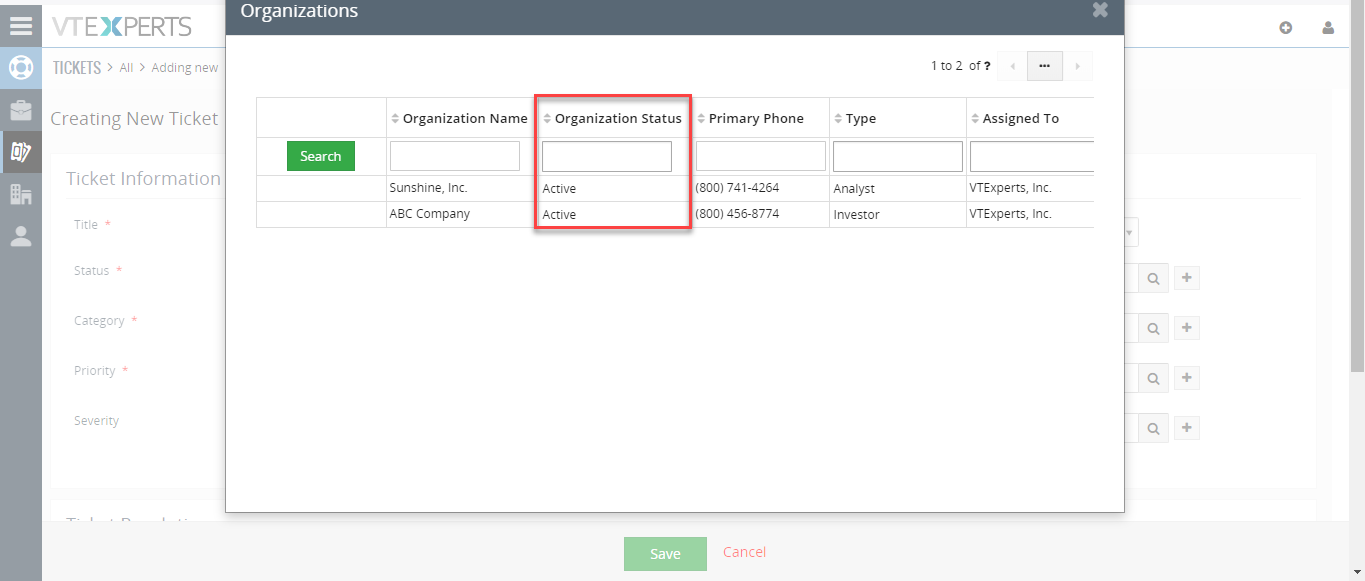
This extension was designed to apply filter (or condition) that will limit the results user will see when selecting a record (any) from a lookup/select/search popup in VTiger. How to Show Active Organizations Go to Menu > Settings > CRM Settings > Extension Pack > Search Popup Filter. Click on “New Search Popup Filter”. Add module. Select the related field. Add a condition according to your requirement. While creating a new ticket it will only search for Active Organizations. For further help, contact us on help@vtexperts.com. We’ll be glad to be of service.
Synchronize My QuickBooks Customers To/From VTiger 7
November 4, 2018
Article
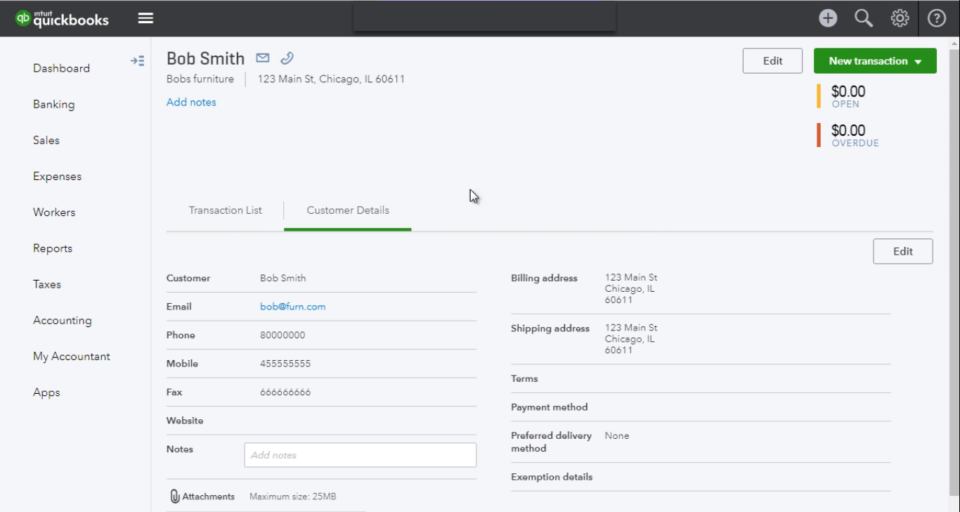
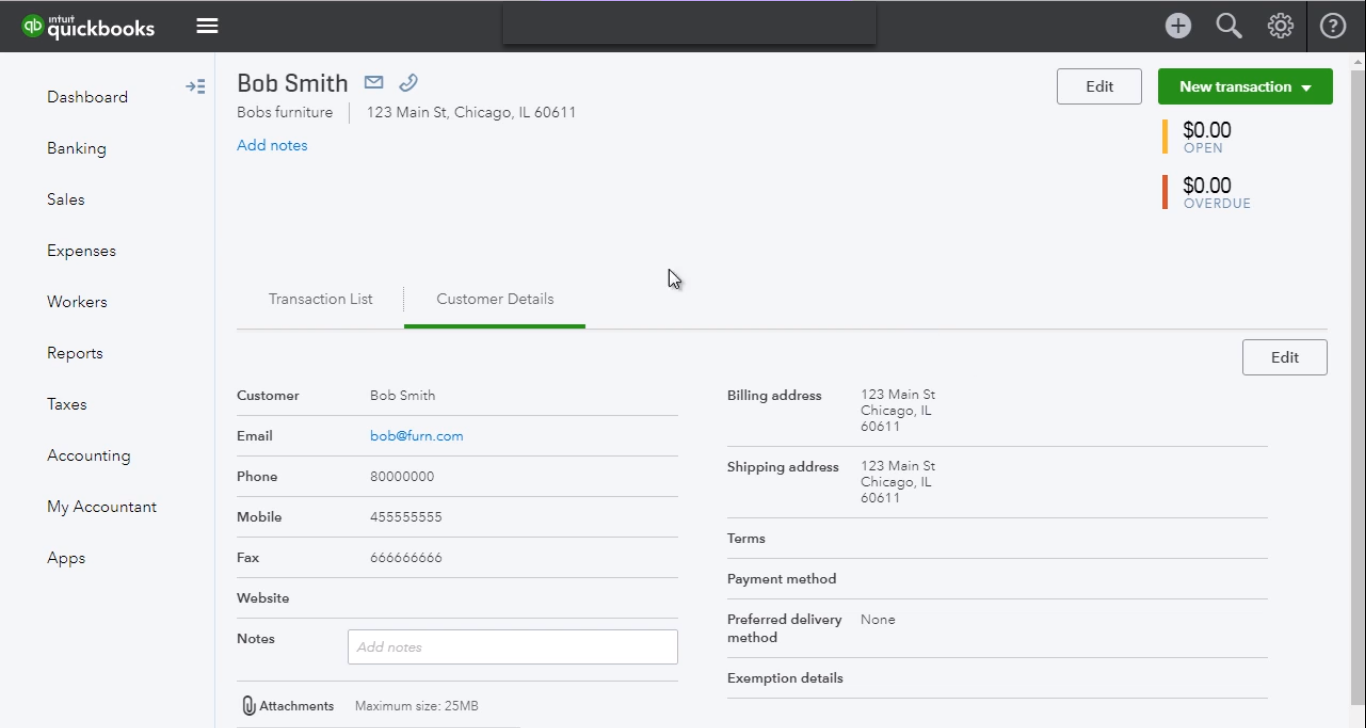
Quickbooks Online Integration with VTiger is an extension connecting VTiger to QuickBooks and enabling bidirectional synchronization of Customers (Organizations/Contacts), Invoices, Payments, Quotes (Estimates), Sales Orders (Sales Receipts), Purchase Orders, Vendors as well as Items (Services & Products). An easy to trigger option to synchronize data manually or on the schedule. It supports custom fields on the invoice as well as customer (flexible mapping). How to Synchronize Contacts Go to Menu > Settings > CRM Settings > Extension Pack > Quickbooks Online. In Customer Tab you can map fields into Quickbooks. Create a contact. You need to check box “Sync to Quickbooks” and that will automatically add this record to the queue to be synced with Quickbooks. Here is the synced Contact/Customer from the VTiger. For further help, contact us on help@vtexperts.com. We’ll be glad to be of service.
Synchronize My QuickBooks Items (Products/Services) To/From VTiger 7
November 4, 2018

Article
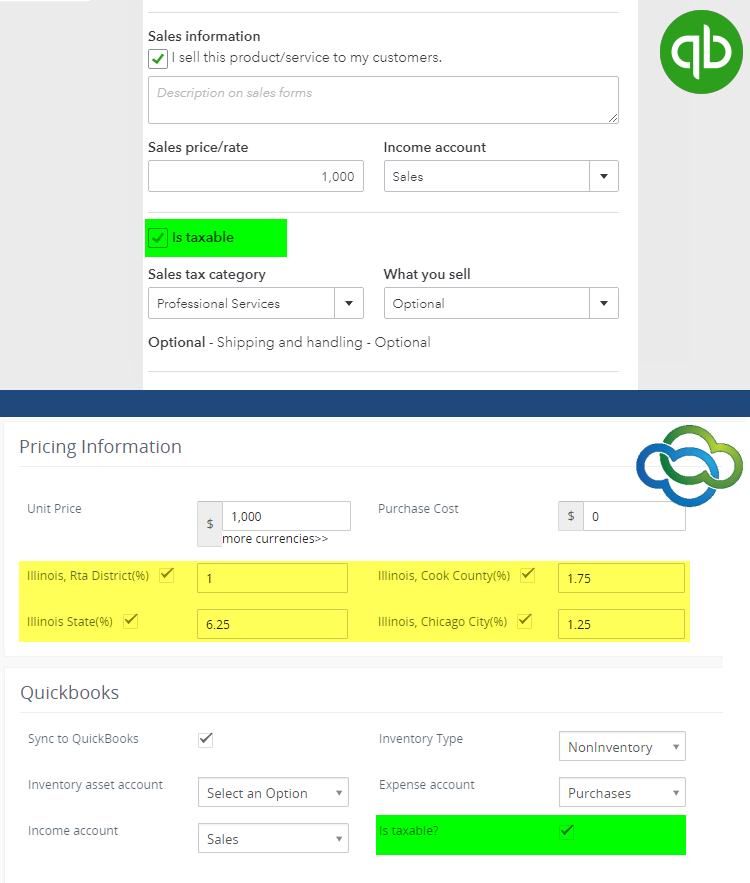
Quickbooks Online Integration with VTiger is an extension connecting VTiger to QuickBooks and enabling bidirectional synchronization of Customers (Organizations/Contacts), Invoices, Payments, Quotes (Estimates), Sales Orders (Sales Receipts), Purchase Orders, Vendors as well as Items (Services & Products). An easy to trigger option to synchronize data manually or on the schedule. It supports custom fields on the invoice as well as customer (flexible mapping). How to Synchronize My Items Go to Menu > Settings > CRM Settings > Extension Pack > Quickbooks Online. In Product & Service Tab you can map fields into Quickbooks. Create a Product. You need to check box “Sync to Quickbooks” and that will automatically add this record to the queue to be synced with Quickbooks. The integration supports tax sync. Here is the synced Items from the VTiger. For further help, contact us on help@vtexperts.com. We’ll be glad to be of service.
Synchronize My QuickBooks Payments To/From VTiger 7
November 4, 2018

Article
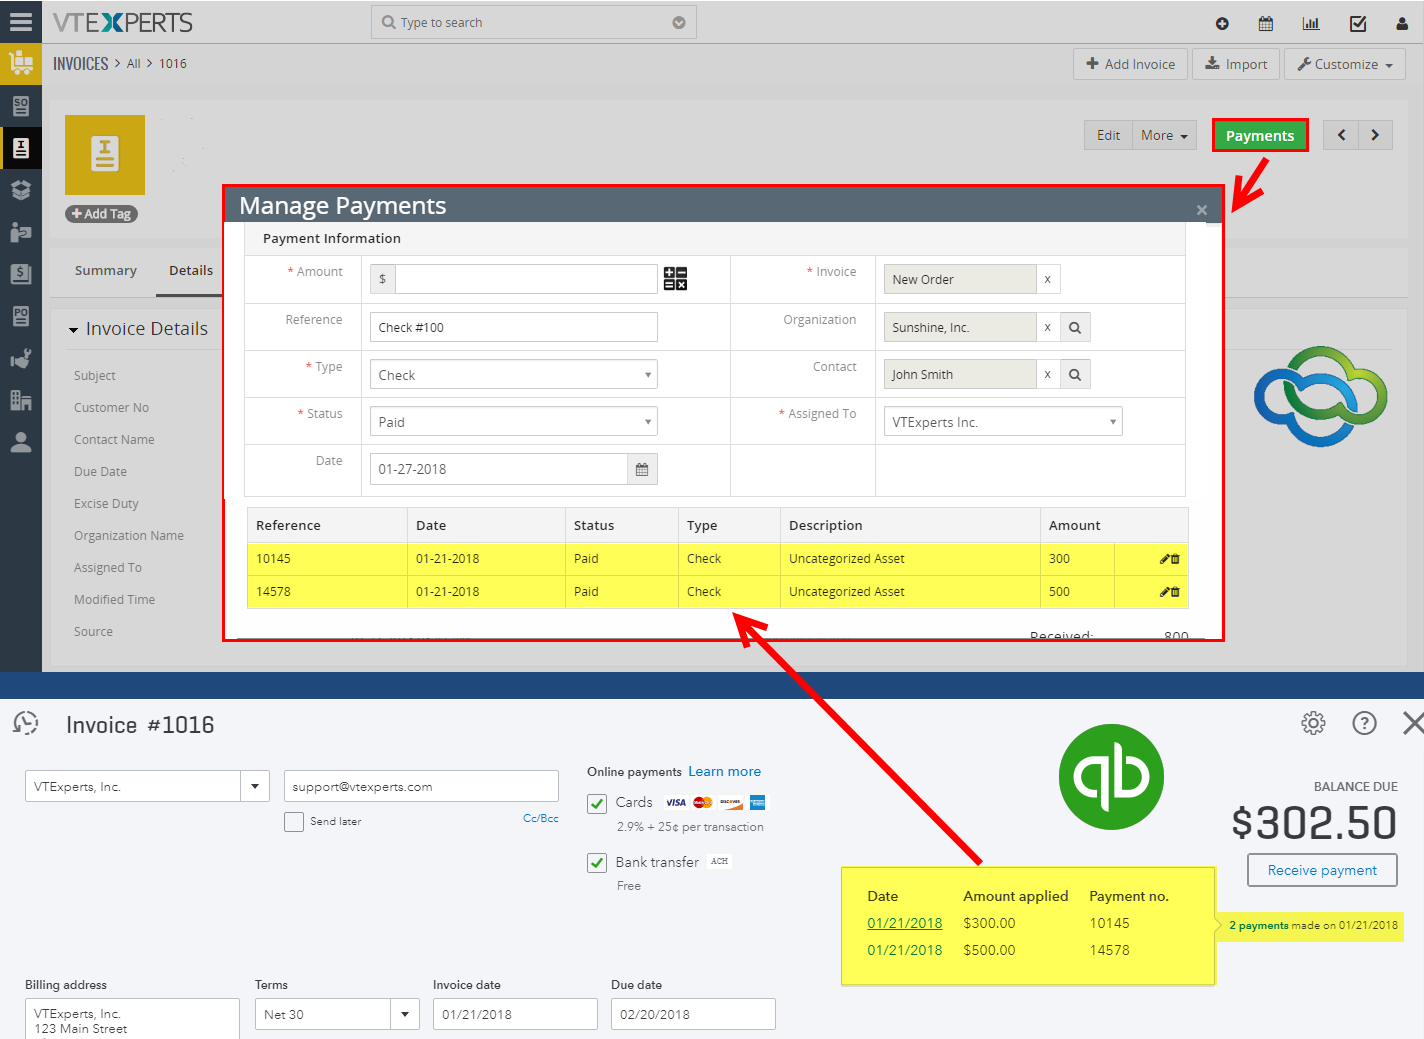
Quickbooks Online Integration with VTiger is an extension connecting VTiger to QuickBooks and enabling bidirectional synchronization of Customers (Organizations/Contacts), Invoices, Payments, Quotes (Estimates), Sales Orders (Sales Receipts), Purchase Orders, Vendors as well as Items (Services & Products). An easy to trigger option to synchronize data manually or on the schedule. It supports custom fields on the invoice as well as customer (flexible mapping). How to Synchronize Payments Go to Menu > Settings > CRM Settings > Extension Pack > Quickbooks Online. In Payments Tab these predefined fields are not editable. Create an Invoice and add a product and service. You need to check box “Sync to Quickbooks” and that will automatically add this record to the queue to be synced with Quickbooks. In invoice records. Click on the payments and “Record a Payment” The payment automatically will be synced with Quickbooks. For further help, contact us on help@vtexperts.com. We’ll be glad to be of service.
Synchronize My QuickBooks Invoices To/From VTiger 7
November 4, 2018

Article
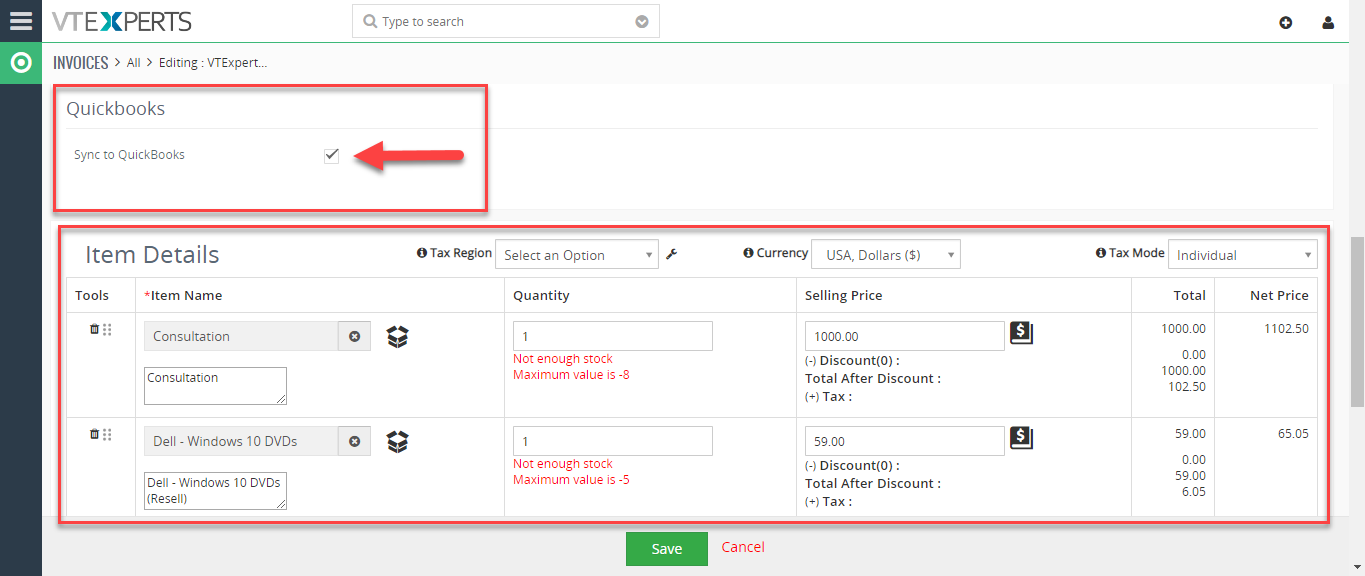
Quickbooks Online Integration with VTiger is an extension connecting VTiger to QuickBooks and enabling bidirectional synchronization of Customers (Organizations/Contacts), Invoices, Payments, Quotes (Estimates), Sales Orders (Sales Receipts), Purchase Orders, Vendors as well as Items (Services & Products). An easy to trigger option to synchronize data manually or on the schedule. It supports custom fields on the invoice as well as customer (flexible mapping). How to Synchronize Invoices Go to Menu > Settings > CRM Settings > Extension Pack > Quickbooks Online. In Invoice Tab you can map invoice fields into Quickbooks. It also supports custom fields. Create an Invoice and add a product and service. You need to check box “Sync to Quickbooks” and that will automatically add this record to the queue to be synced with Quickbooks. Here is the synced invoice from the VTiger. For further help, contact us on help@vtexperts.com. We’ll be glad to be of service.
Change/Rename Field Labels In VTiger 7
November 4, 2018

Article
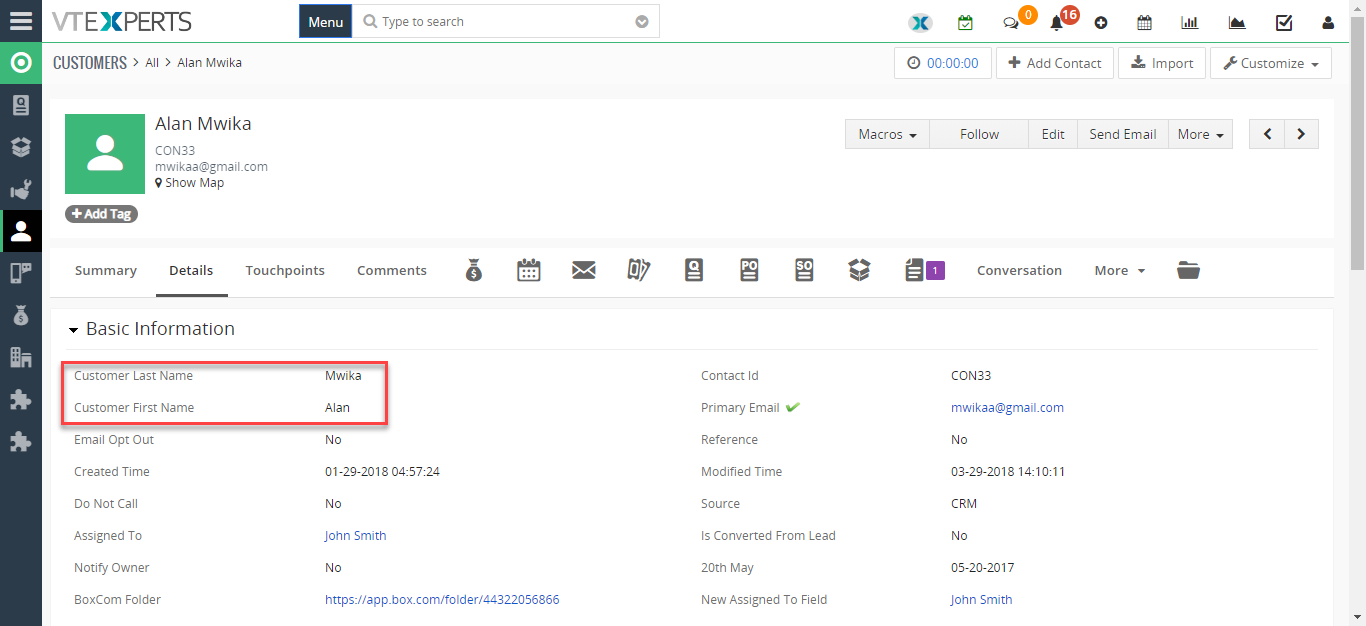
Label Editor for VTiger was designed to change any label/element in VTiger. It supports fields, modules, buttons, menu items, lists and much more! Very easy to use interface (pick language, module, search and edit labels). It has a built-in search to locate any labels that are not as obvious. How to Change/Rename Field labels Go to Menu > Settings > CRM Settings > Extension Pack > Label Editor. Select your input language. Select Module file you want to put changes in. It will show all the Variables and from there you can change the Labels. Click on “Edit” button and enter the new Label. The First/Last Name field labels are changed to Customer First/Last Name. For further help, contact us on help@vtexperts.com. We’ll be glad to be of service.
Change Menu Name In VTiger 7
November 4, 2018
Article
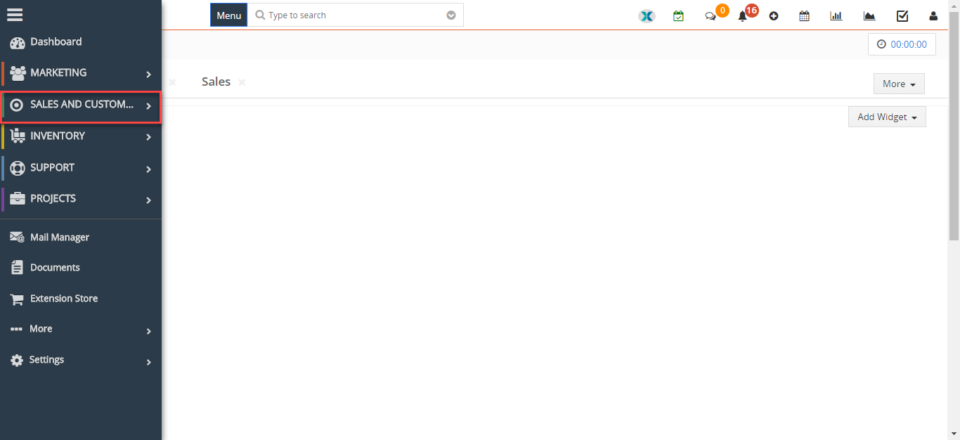
Label Editor for VTiger was designed to change any label/element in VTiger. It supports fields, modules, buttons, menu items, lists and much more! Very easy to use interface (pick language, module, search and edit labels). It has a built-in search to locate any labels that are not as obvious. How to Change Menu Name Go to Menu > Settings > CRM Settings > Extension Pack > Label Editor. Select your input language. Select Module file you want to put changes in. It will show all the Variables and from there you can change the Labels. Click on “Edit” button and enter the new Label. The Sales menu label has been changed to Sales and Customers. For further help, contact us on help@vtexperts.com. We’ll be glad to be of service.
Set Default Tax Mode In VTiger 7
November 1, 2018
Article
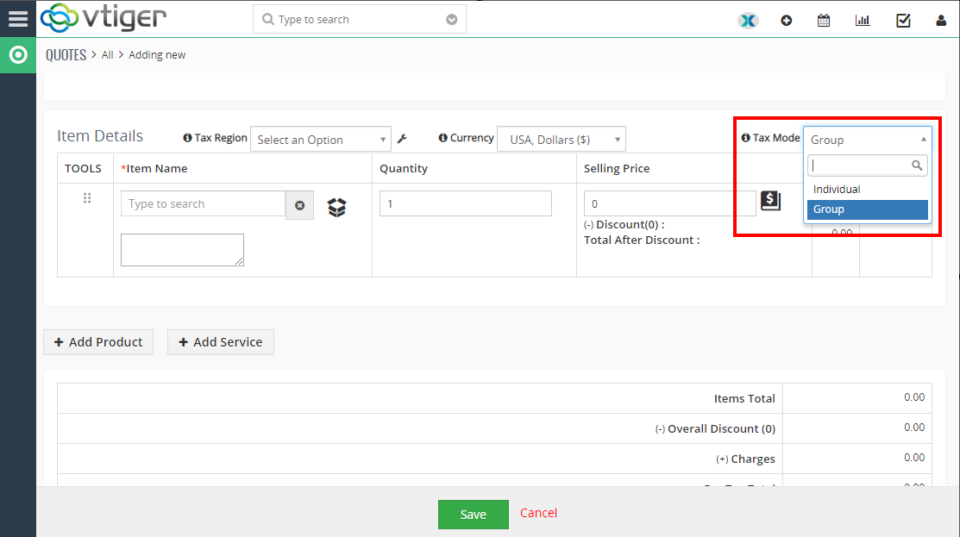
Pretty much every business has the needs of calculating taxes on the go while generating quotes, invoice, sales orders and/or purchase orders. The taxation in VTiger is quite up to the mark. Admins can set individual as well as group taxes on line items. However, there’s a very tiny limitation which does not allow to change the default tax mode. The default tax mode in VTiger is “Group Tax”. A huge number of companies use “Individual” tax mostly. This default setting of Tax mode in VTiger makes it annoying for those companies to change the mode manually each time they need to add an invoice, quote, SO or PO. It even become a problem if an organization needs to generate hundreds of such records every day. We did a customization for one of our client, where we simply switched the default tax mode from Group to Individual. So, when they
Rename Module In VTiger 7
October 25, 2018
Article
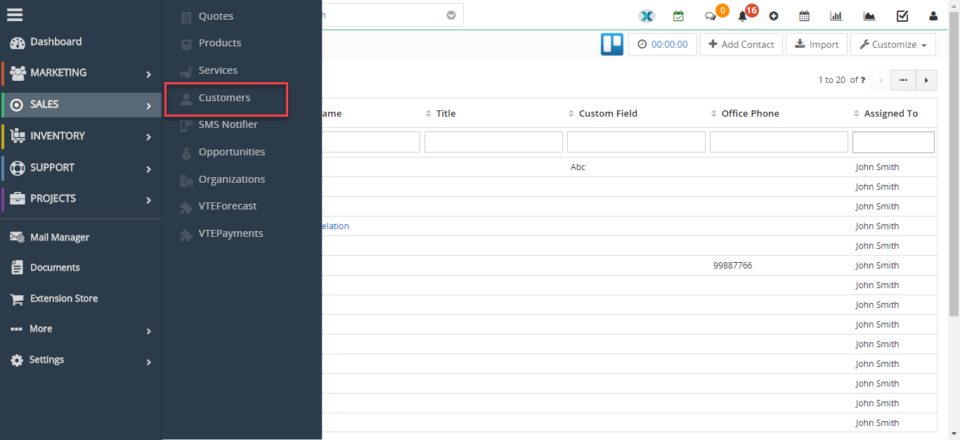
Label Editor for VTiger was designed to change any label/element in VTiger. It supports fields, modules, buttons, menu items, lists and much more! Very easy to use interface (pick language, module, search and edit labels). It has a built-in search to locate any labels that are not as obvious. How to Rename Modules Go to Menu > Settings > CRM Settings > Extension Pack > Label Editor. Select your input language. Select Module file you want to put changes in. It will show all the Variables and from there you can change the Labels. Click on “Edit” button and enter the new Label. The Contacts module label has been changed to Customers. For further help, contact us on help@vtexperts.com. We’ll be glad to be of service.
Display Emails Widget On Record Summary View In VTiger 7
October 24, 2018
Article
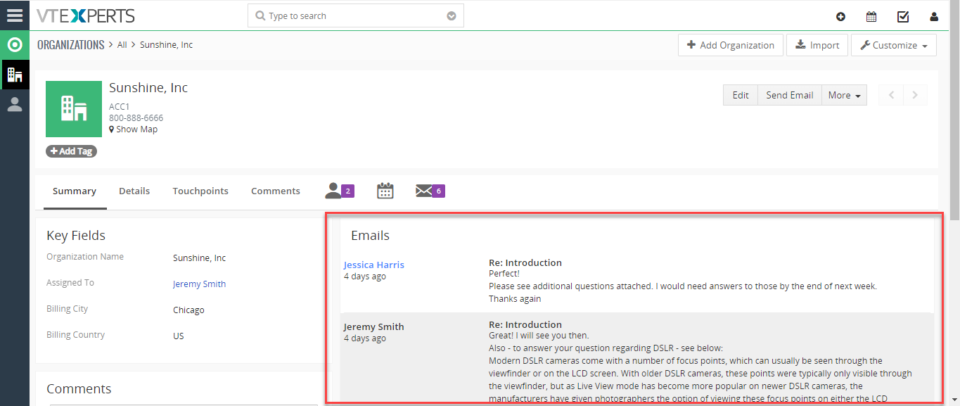
Email/Conversation view extension for VTiger transforms “simple” email list into conversation view. The view is very easy to read and includes email message on the list, meaning that you don’t need to open email to see the response. In addition, it differentiates emails from customers versus vtiger users by highlighting the background and adding divider borders. How to Display Emails Widget Go to Menu > Settings > CRM Settings > Extension Pack > Email Preview. Click “Enable Email Preview” to enable the extension. Enable the extension for desired module’s (Custom Modules also). You can Select the number of characters you want to see in the email preview. You can click the Email to expand and it will show additional text in the email. You can see the conversation view of emails in the summary view of the organization. For further help, contact us on help@vtexperts.com. We’ll be glad to be of service.
Schedule/Map Routes In VTiger 7
October 23, 2018
Article
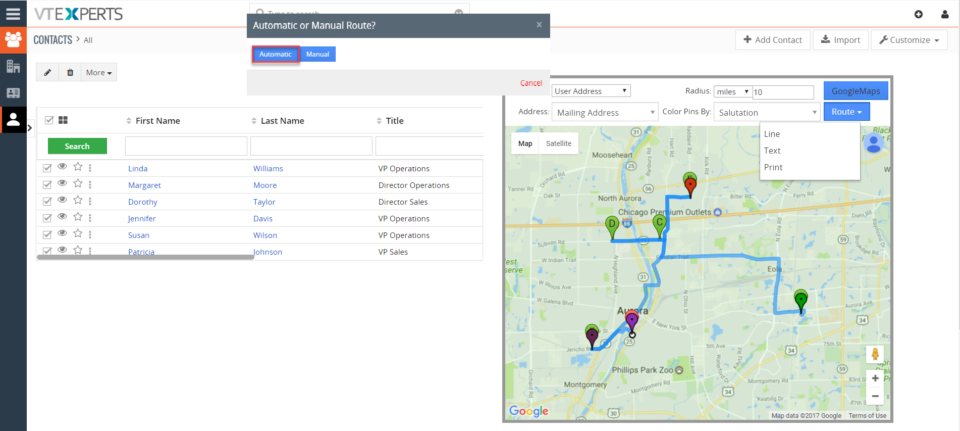
Google Maps & Route Integration for VTiger was built to give your staff the convenience to quickly see the customers (or any other module with an address) on the map as a pin. It is also capable of creating different types of routes (Walk, Drive) as well as printing them as “directions” with an option to include the map (Identical to Google Maps). In addition, the routes can be generated either automatically or manually. Hot to Schedule/Map Routes Go to Menu > Settings > CRM Settings > Extension Pack > Google Map Scheduler. Check box to Enable the extension. Select the center of the location from where the radius will be calculated and the radius area to be covered. Select the modules for the extension. In Contacts module click on “More” and select “Google Maps Scheduler“. Select the contacts and click on routes. Click on Automatic and it will generate a route. For further
Google Address Lookup Is Now Available In Quick Create
October 22, 2018
Article
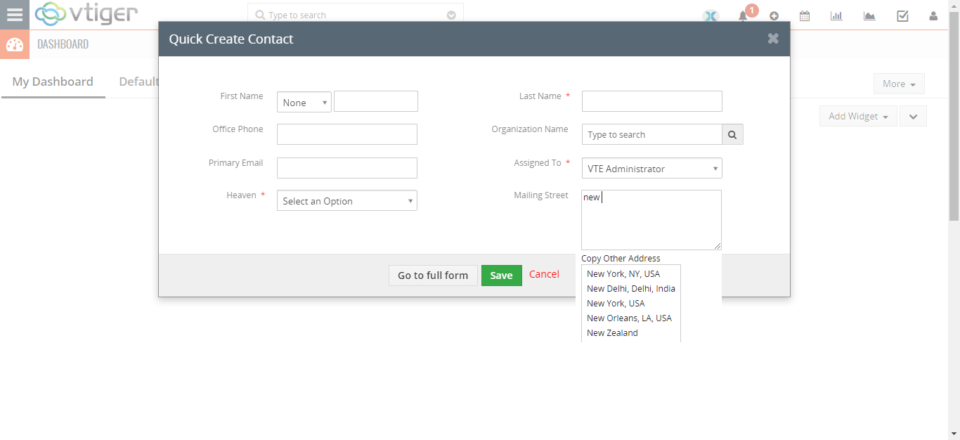
Google Address Lookup for VTiger, Is now available in quick create modal popup. User can now efficiently and accurately enter the address in quick create modal popup by using Google Maps services. As you start typing the address, it will show all possible matches closest to your location. How to add Google Address in Quick Create Note: Please Upgrade the extension if you don’t see the button. Go to Menu > Settings > CRM Settings > Extension Pack > Google Address. Click “Allow on Quick Create” to enable the extension in quick create modal popup. Now it will lookup for locations in quick create modal popup too. For further help, contact us on help@vtexperts.com. We’ll be glad to be of service.
Add Fields To Quick Create Modal Popup In VTiger 7
October 19, 2018
Article
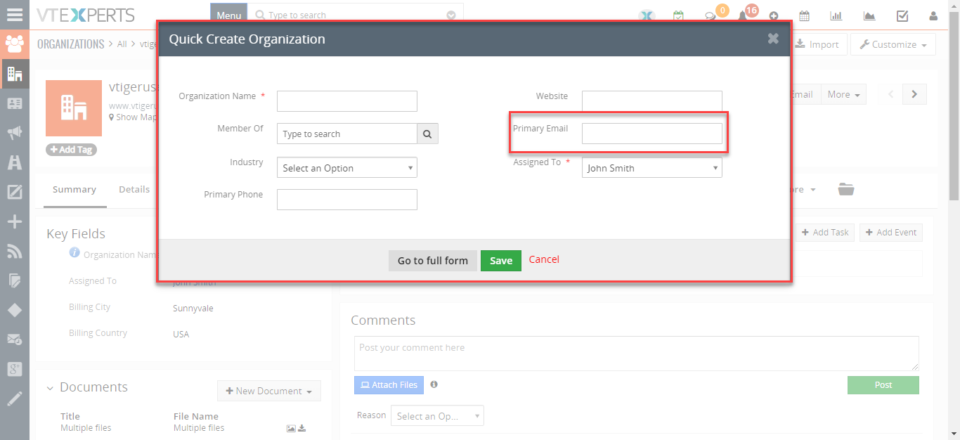
In Vtiger 7, User can add fields in the quick create modal popup. They can add/delete the fields in the modal popup according to their needs and it will save their time. How to Add Fields in Quick Create Go to Menu > Settings > CRM Settings > Module Management > Module Layouts & Fields. Select the Module. Click “Quick Create” button to add it in modal popup. Now this field will show in quick create modal popup. For further help, contact us on help@vtexperts.com. We’ll be glad to be of service.
Create Custom Layouts/Forms In VTiger 7
October 18, 2018

Article
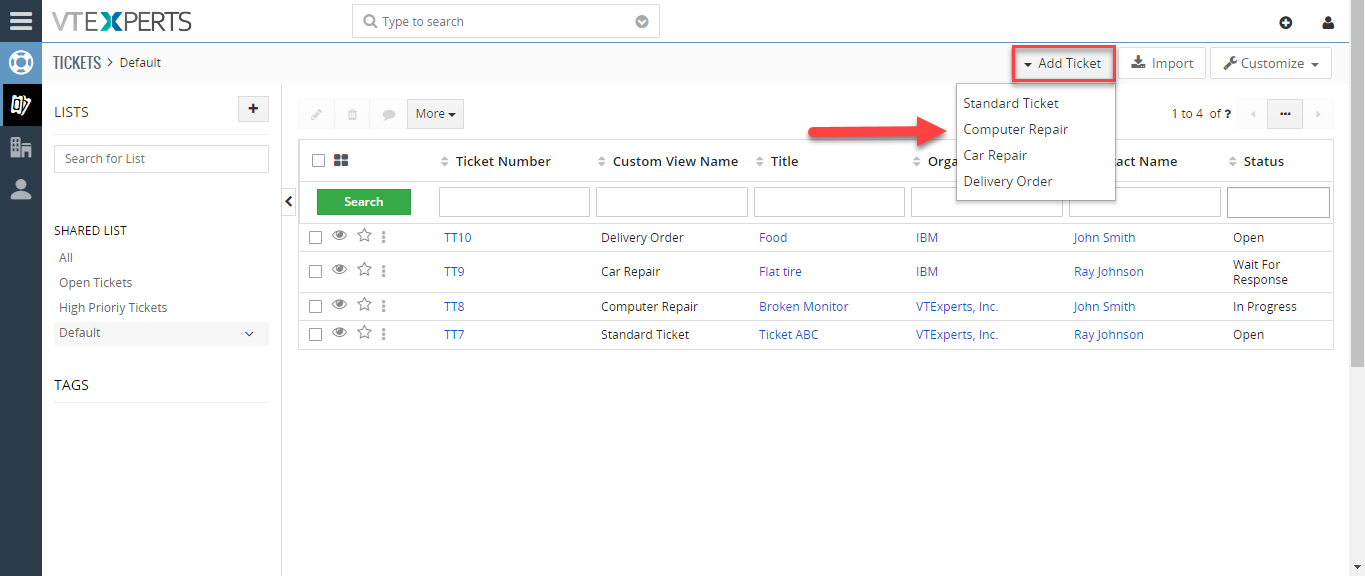
Custom Views & Forms for VTiger is designed for system administrators. You can configure different views/layouts for any module with the help of this extension. It is capable of configuring multiple views for trouble tickets, e.g “Repair Ticket” & “Support Ticket” and for both views, you can specify different sets of fields and only display the fields that apply to each type of ticket. It Supports all modules. How to Create Custom Layouts/Forms Go to Menu > Settings > CRM Settings > Extension Pack > Custom Forms & Views. Click “Add Custom Forms & View” button. Select the module. Add a name for the form. You can assign profile’s. Drag and Drop fields from available fields. Dropped in field will be shown in the form which we are creating. While creating a new record you can select the related custom form. This is a custom form view which we just have created. For further help, contact us
Save Sent Messages (From VTiger) In Your Outlook/Gmail In VTiger 7
October 17, 2018

Article
Outgoing Email Server Extension allow each user to have his/her own Outgoing Email Server(SMTP). Email server settings can be configured by admin, or each user can do it for him/herself. It supports IMAP function, meaning that every email sent will also be stored in user’s “Sent” folder on webmail/email server. How to Save Sent Messages Go to My Preferences and click on the “Outgoing Server” button. Click on the “Create” button and Configure the Outgoing Mail Server. Check box “Save Emails to Sent Folder” For further help, contact us on help@vtexperts.com. We’ll be glad to be of service.