vtigercrm
Assign Records (via round robin) To Online Users Only In VTiger 7
August 10, 2018
Article
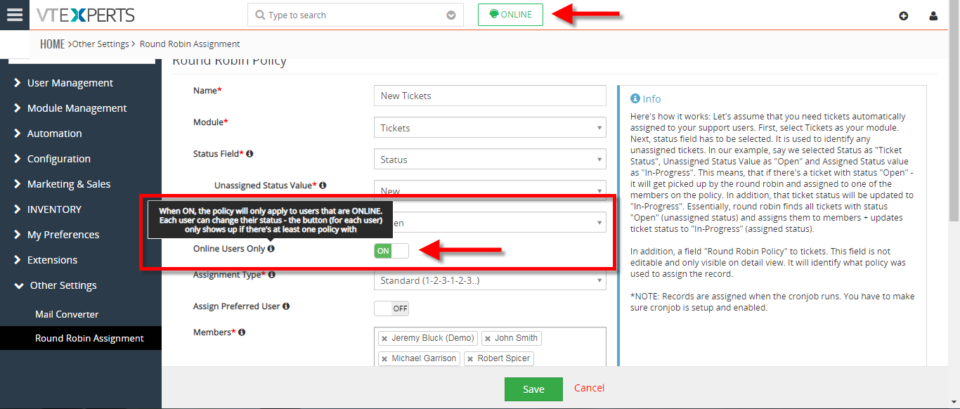
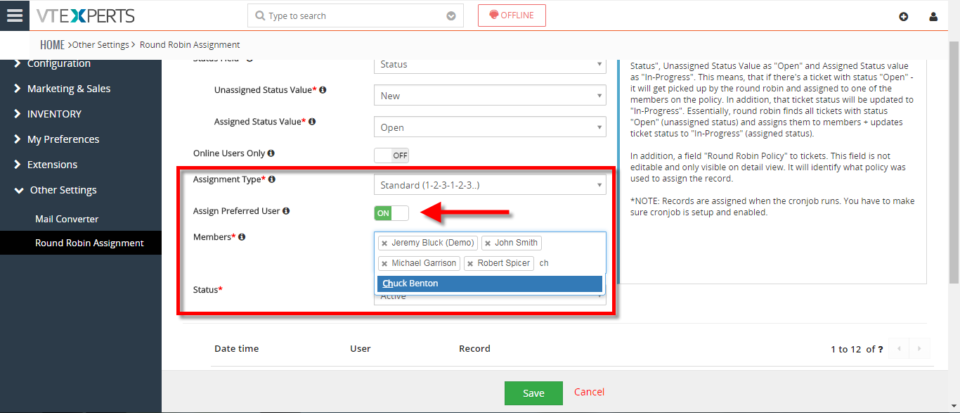
Round Robin Assignment Extension for VTiger was designed to automatically assign users to tickets, leads (or any other module). The assignment is driven based on the condition configured in the policy area. Round Robin Policy configuration consists of a trigger field e.g “Ticket Status”. How to Assign Records to Online Users Go to Menu > Round Robin Assignment. Click on the “New Round Robin Assignment” to create a new round robin rule. Add a name for the Rule. Select the module. Select the status field on which this rule with trigger. Select the unassigned status value. Select the assigned status value. You can enable ticket to get assigned only to online users. Users can switch their Online/Offline status. Select the Assignment type. Standard means each user will get same amount of tickets. You can enable “Assign Preferred User “. Means the ticket can be assigned to preferred users. Select all the users that you like to
Enable Round Robin Assignment In VTiger 7
August 10, 2018
Article
Round Robin Assignment Extension for VTiger was designed to automatically assign users to tickets, leads (or any other module). The assignment is driven based on the condition configured in the policy area. Round Robin Policy configuration consists of a trigger field e.g “Ticket Status”. How to Enable Round Robin Assignment Go to Menu > Round Robin Assignment. Click on the “New Round Robin Assignment” to create a new round robin rule. Add a name for the Rule. Select the module. Select the status field on which this rule with trigger. Select the unassigned status value. Select the assigned status value. Select the Assignment type. Standard means each user will get same amount of tickets. You can enable “Assign Preferred User “. Means the ticket can be assigned to preferred users. Select all the users that you like to be part of this assignment policy. Here is the list of existing assignments. You can see in Ticket list view
Import Users In VTiger 7
August 7, 2018
Article
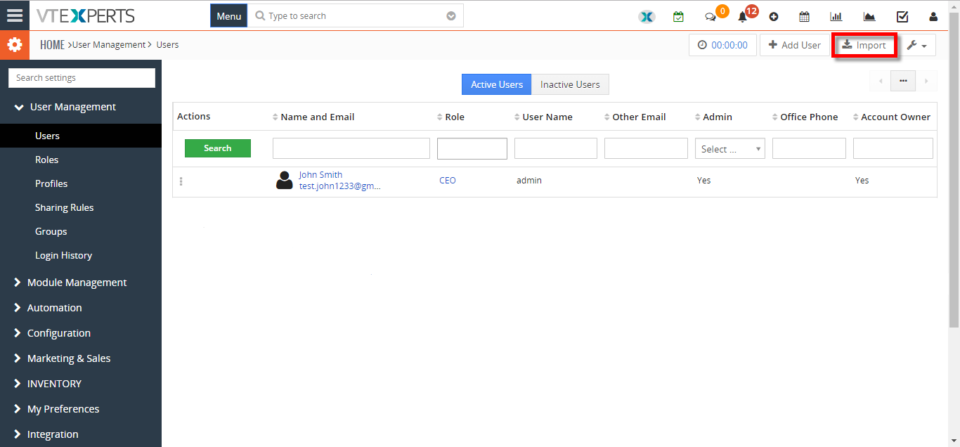
In VTiger 7, admins can Create/Import new users from CSV. file. It is a very easy way to transfer users from one instance to another and save the time for creating all the users from the start. How to Import Users Go to Menu > Settings > CRM Settings > User Management > Users. Click on the “Import” button to import users form CSV. file. Upload the CSV. file and configure field mapping. Here you can see the new users imported from the CSV. file. For further help, contact us on help@vtexperts.com. We’ll be glad to be of service.
Keep Track Of Employees Time In VTiger 7
August 6, 2018
Article
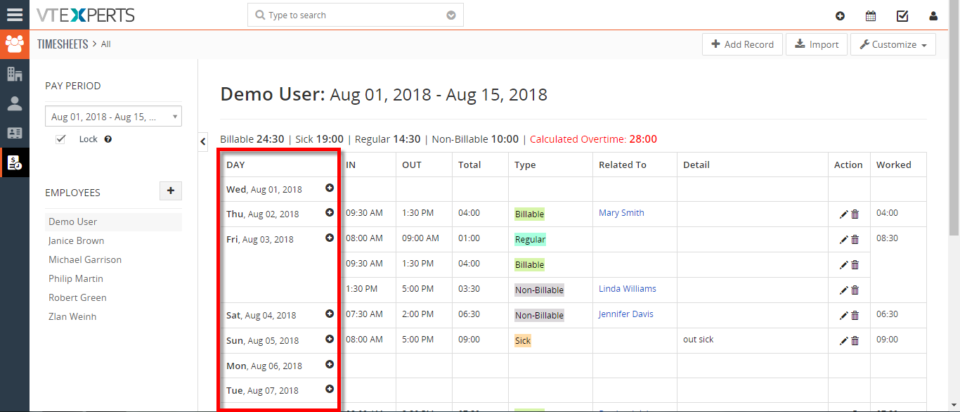
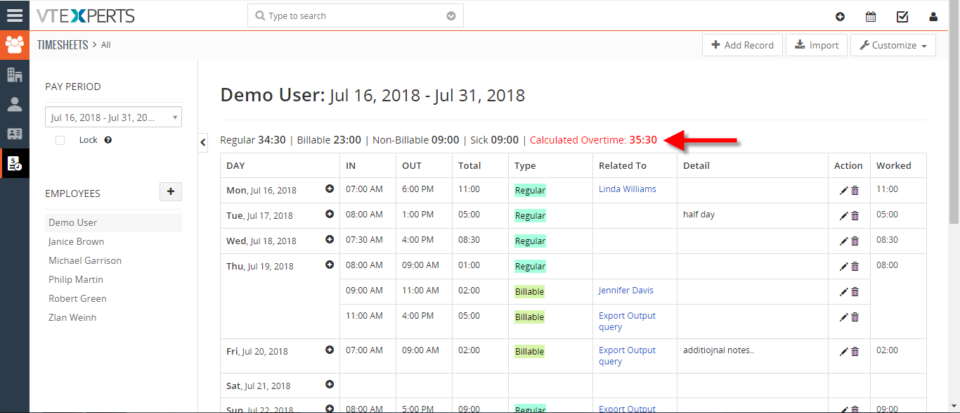
Timesheets is an extension for VTiger designed to elegantly track employee (user) time, with ability to visualize it. It supports custom periods, where you can adjust the length of the period to fit your business. In addition, periods can be locked to prevent any further modifications. It’s simplistic design, makes it extremely easy to log the time and specify the reason, description as well as associate it with an existing record in vtiger. How to Keep Track of Employees Go to Timesheets and click the drop down named as “Pay Period” that gives you the option to select a specific pay period from the list and view the time-logs for it. Select the Employee to open his time logs. Its showing the name of the user for which the time-log is being viewed and the Pay Period selected currently. Here you can see the types of the hours categorized and totaled. This column enlists days for the selected Pay Period. Each row shows a day.
Configuring SLA With A Use Case In VTiger 7
August 3, 2018
Article
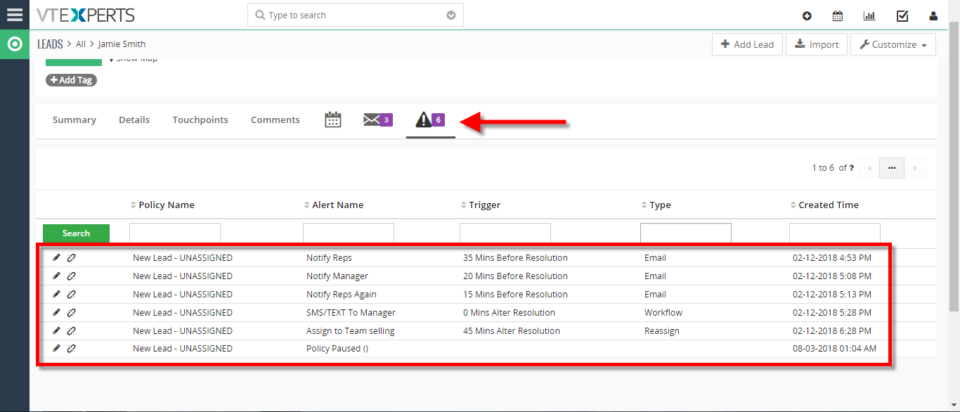
SLA Policy Extension for VTiger was designed to improve response times, accountability, when dealing with time sensitive matters. It’s mostly used in support/helpdesk department, where each ticket/case has to be assigned and worked on/resolved by certain date and time. It allows administrator to create custom SLA Policy rules, which then get automatically applied to a record. Use Case New HOT Lead comes in, if after 45 minutes the lead is still unassigned, you can automatically assign it to a sales rep or notify users/managers + trigger any workflow. How to Configuring SLA With a Use Case Go to Menu > Settings > CRM Settings > Extension Pack > SLA Policies. Click on the “New SLA Policy” button to configure a new policy. Add a Name for the new policy. Select the module you want to apply this policy to. Select the picklist you want to configure for the SLA responses. This will mark the
Show Fields From Related Module In VTiger 7
August 2, 2018
Article
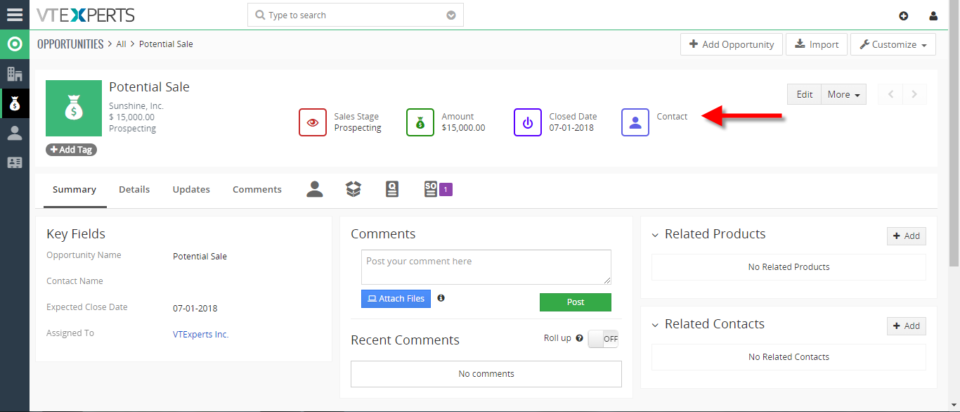
Custom Headers extension was developed to increase the visibility from summary and detail views. Headers can be fully customized, meaning you can select the icon, color and define different field label. Headers were designed to be noticed immediately. The color and the icon really helps the user to see it right away. How to Include Show Fields from Related Module Go to Menu > Settings > CRM Settings > Other Settings > Custom Headers. Click on the “New Header” button to create a new header. Select the Module and Header Name and then click on the “Select Icon” button to select the icon of the header and you can also select its color. You can select related module fields. For example you can select to show opportunities organization’s fields as well. Here you can see the Header in the Opportunities module. For further help, contact us on help@vtexperts.com. We’ll be glad to be of service.
Import Time Logs Into Timesheets In VTiger 7
July 27, 2018
Article
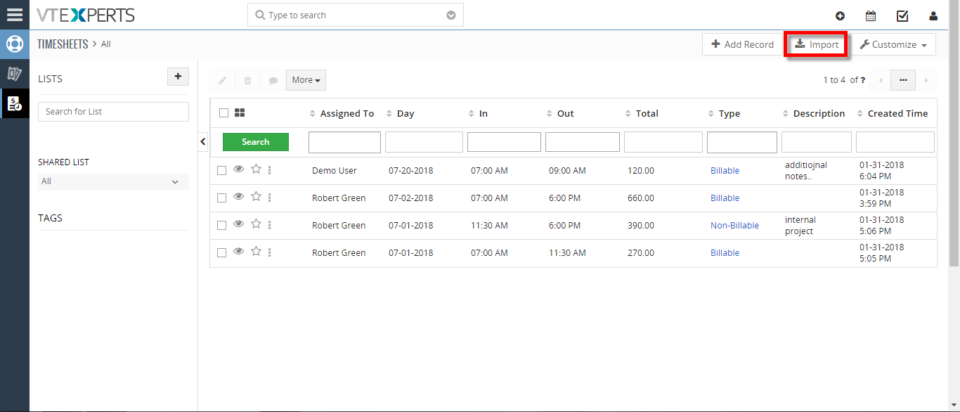
Timesheets is an extension for VTiger designed to elegantly track employee (user) time, with ability to visualize it. It supports custom periods, where you can adjust the length of the period to fit your business. In addition, periods can be locked to prevent any further modifications. It’s simplistic design, makes it extremely easy to log the time and specify the reason, description as well as associate it with an existing record in vtiger. How to Import Time Logs In Timesheets list view click on the “Import” button. Select the .csv file. Handle duplicate. Configure Field mapping. Here you can see the Import summary. For further help, contact us on help@vtexperts.com. We’ll be glad to be of service.
Configure Overtime In Timesheets Extension In VTiger 7
July 26, 2018
Article
Timesheets is an extension for VTiger designed to elegantly track employee (user) time, with ability to visualize it. It supports custom periods, where you can adjust the length of the period to fit your business. In addition, periods can be locked to prevent any further modifications. It’s simplistic design, makes it extremely easy to log the time and specify the reason, description as well as associate it with an existing record in vtiger. How to Configure Overtime Go to Menu > Settings > CRM Settings > Other Settings > Timesheets. Here you can set the limit of number of overtime hours. It will automatically recognize any hours logged above specified amount as Overtime. Here you can see the number of Overtime hours. For further help, contact us on help@vtexperts.com. We’ll be glad to be of service.
Add Tags To Any Record In VTiger 7
July 20, 2018
Article
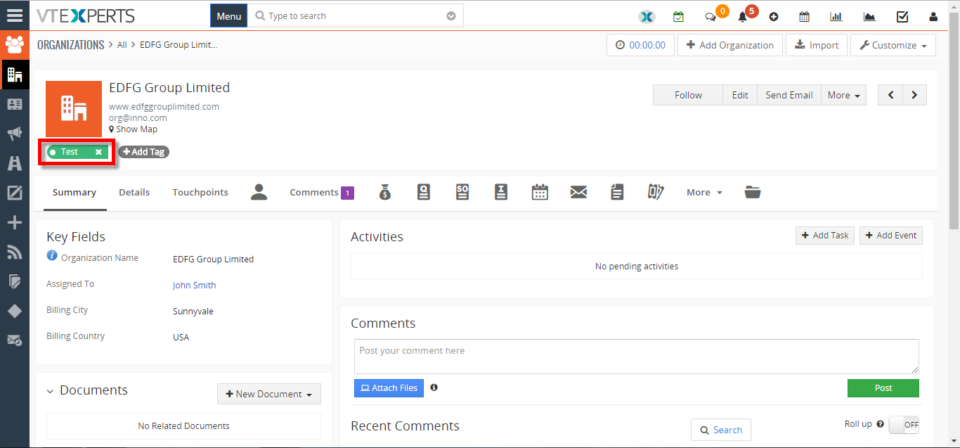
Tags are a way to organize your data in the ways that are more customized to your company. Tags help you find records that are otherwise not easily searchable. Tags are an easy way of labeling a record using a word, or short phrase. Multiple tags can be associated with a record. They are the most powerful tools which will differentiate the important records from the other records. How to Add Tags In record summary view click on the “Add Tag” button to create a new tag. Add a Tag Name. Check box “Public Tags“. Public tags (Shared Tags) are shared with all users. Here you can see a tag is created. For further help, contact us on help@vtexperts.com. We’ll be glad to be of service.
Efficiently Manage Your Tasks In VTiger 7
July 19, 2018
Article
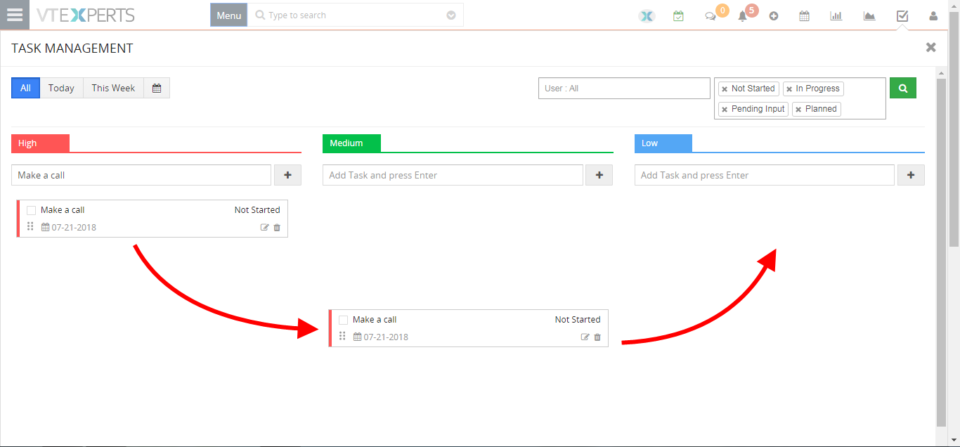
In VTiger 7, you can create new Tasks and manage them as well. Users can also select the priority according to the nature of the task and easily manage it by using drag and drop. How to Efficiently Manage Your Tasks Click on the “Task” button on the top right corner of the screen. Here you can add a Task Name under the desired priority and click on the “+” button to create a new task. Set a Time of the task and click on the save button. Here you can see a task is created. You can also change its priority using Drag and Drop. For further help, contact us on help@vtexperts.com. We’ll be glad to be of service.
Quickly Update List Columns In VTiger 7
July 18, 2018
Article
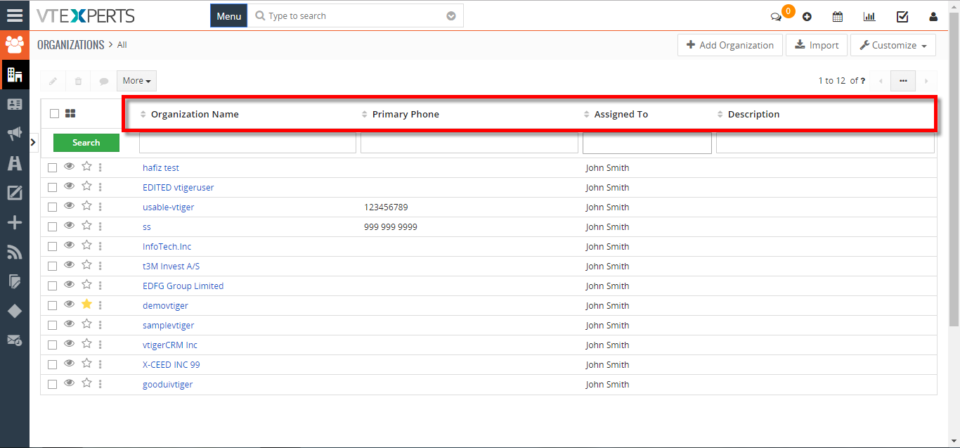
In VTiger 7 it is very easy to configure Columns List. You can quickly Add/Delete and Rearrange columns list according to your needs. It helps to get the desired information form the record without the hassle of opening the record. How to Quickly Update List Columns Click on the “Manage List Columns” icon to configure columns list. Click on the “X” button to remove the columns. You can also add new columns and rearrange them by using Drag and Drop. Here you can see the 3 highlighted fields have been deleted from the columns list. For further help, contact us on help@vtexperts.com. We’ll be glad to be of service.
Create Custom Header Tiles In VTiger 7
July 17, 2018
Article
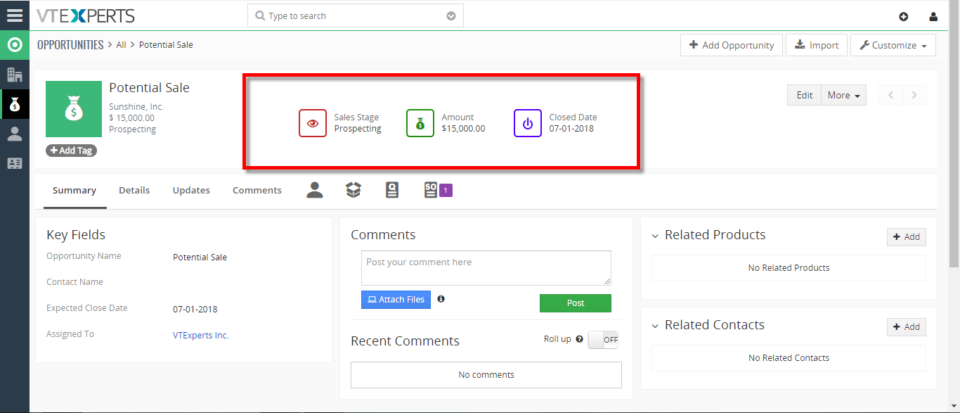
Custom Headers extension was developed to increase the visibility from summary and detail views. Headers can be fully customized, meaning you can select the icon, color and define different field label. Headers were designed to be noticed immediately. The color and the icon really helps the user to see it right away. How to Create Custom Header Tiles Go to Menu > Settings > CRM Settings > Other Settings > Custom Headers. Here click on the “New Header” button to create a new header. Select the Module and Header Name and then click on the “Select Icon” button to select the icon of the header and you can also select its color. Select the field you would like to display on the header and you can arrange the header sequence in which headers show up. Here you can see the Header in the Opportunities module. For further help, contact us on help@vtexperts.com. We’ll be glad to be of service.
Make Timesheets Read Only In VTiger 7
July 16, 2018
Article
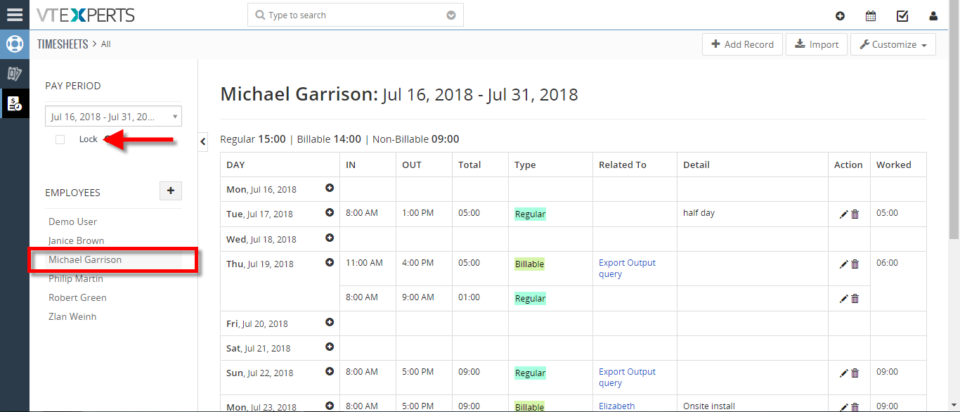
Timesheets is an extension for VTiger designed to elegantly track employee (user) time, with ability to visualize it. It supports custom periods, where you can adjust the length of the period to fit your business. In addition, periods can be locked to prevent any further modifications. It’s simplistic design, makes it extremely easy to log the time and specify the reason, description as well as associate it with an existing record in vtiger. How to Make Timesheets Read Only Go to Timesheets select an Employee Enable the “Lock” check box. Click “Yes“. If its locked user will no longer be able to Add/Modify or Delete. For further help, contact us on help@vtexperts.com. We’ll be glad to be of service.
Filters are added in Complete Record Timeline/Summary (Communication + Updates) Extension for VTiger
July 16, 2018
Article
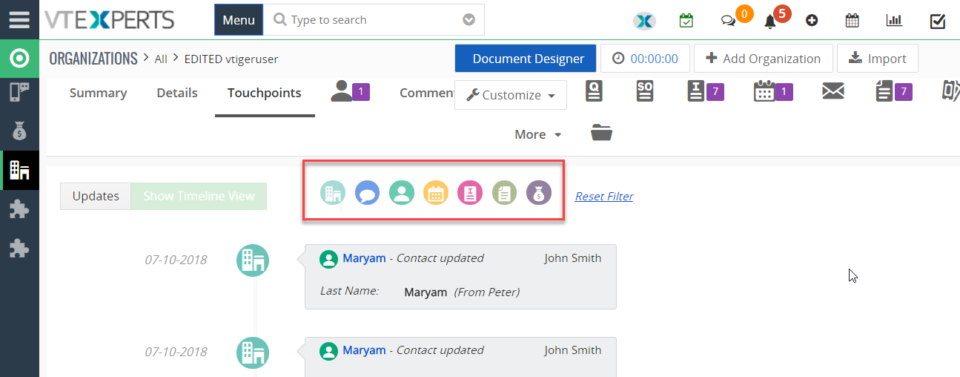
In VTiger, if you are trying to find out more details about a contact/organization/lead, you would have to click through all the related lists and review any tickets/opportunities one by one. However, with the Complete Record Timeline/Summary (Communication + Updates) Extension for VTiger, you will be able to see all of it in a single glance. What it does is that it enables the user to see any communication (emails, calls, comments) as well as updates for a selected record. It rolls up the information from 3 relationship level deeps, meaning if you are viewing organization timeline, you will see any information related to organization (emails, updates, comments) as well as any information related to organizations’ tickets/opportunities (or other related modules). We have added filters in this extension so you can see the updates of a selected module separately from the main timeline. For example, when user clicks any
Remove Shipping & Handling Charges On Quotes/Invoices/Orders In VTiger 7
July 9, 2018
Article
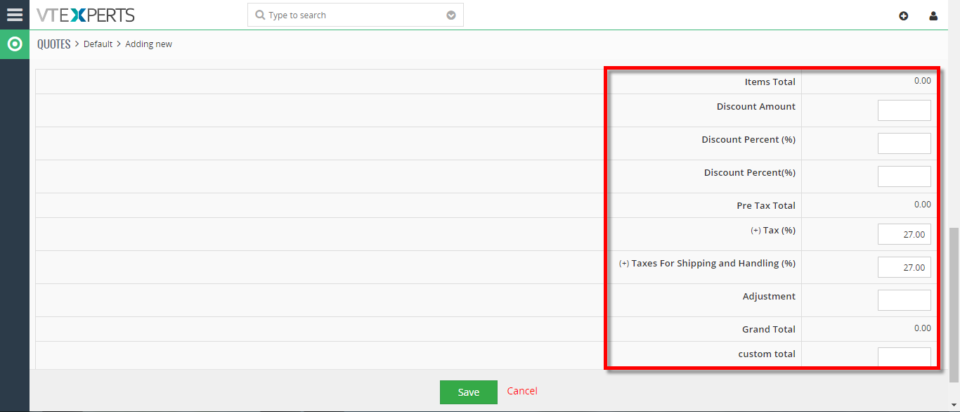
Item Details Customizer (Advanced) is an enhanced version of our standard “Item Details Customizer” which allows users to customize Item Details (Product/Services) for Quotes, Invoices, Sales & Purchase Orders. Users can also specify new formulas for each column as well as customize formulas for Totals. Remove Shipping & Handling Charges On Quotes Go to Menu > Settings > CRM Settings > Extension Pack > Item Details Customizer(Advanced). Click on the “Quotes” tab and select “Totals“. Click on the “Delete” icon to remove Shipping & Handling Charges. Here you can see there are no Shipping & Handling Charges while creating a Quote. For further help, contact us on help@vtexperts.com. We’ll be glad to be of service.
Add Custom Fields In Comments In VTiger 7
July 6, 2018
Article
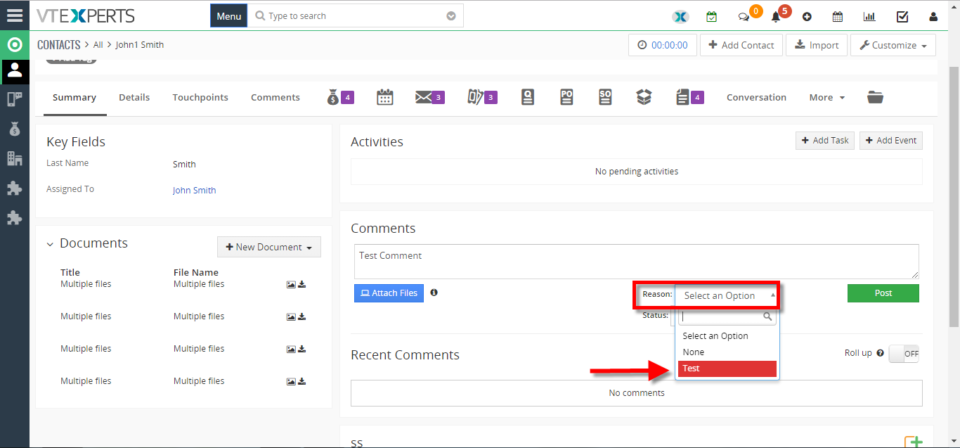
In Vtiger 7 user can add color comments by using our Advanced Comments extension. It is simply an enhancement to existing comments functionality. It adds up to two picklist fields to the comments section and allows the user to “categorize” comments added. In addition, comments are highlighted based on the configured picklist value, which makes it even more useful. In addition, it supports rich text formatting in comments How to Add Custom Fields in Comments Go to Menu > Settings > CRM Settings > Other Settings > Comments(Advanced). Name the picklist and click on the Green button next to the save button to add a new Custom Field. Click on the “+ Add Value” button to add a new Custom Field. Enter a value name and select a color. Here you can see the added Custom Field. For further help. contact us on help@vtexperts.com. We’ll be glad to be of service.
See Opened Emails Sent From VTiger 7
July 5, 2018
Article
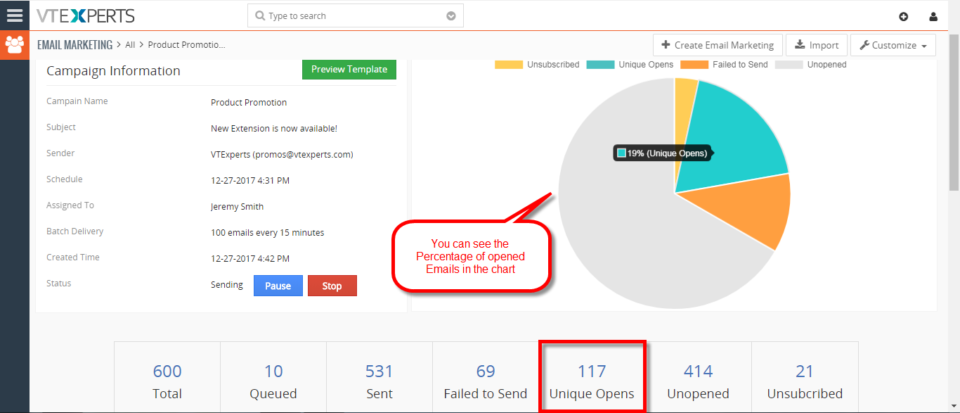
Email Marketing Extension will transform VTiger into sophisticated email marketing/campaign tool. It will include a step by step wizard, easy to use “marketing list” (to load contacts/leads/organizations), review & send + confirmation/summary view that shows exactly what and when is going to be sent. How to See Opened Emails Sent from VTiger Go to the Menu > Marketing > Email Marketing and Open a Sending/Sent campaign. In Summary view you can see the number of Opened Emails as well as the percentage. For further help, contact us on help@vtexperts.com. We’ll be glad to be of service.
Add Running Sub Totals On Quotes/Invoices/Orders In VTiger 7
June 27, 2018
Article
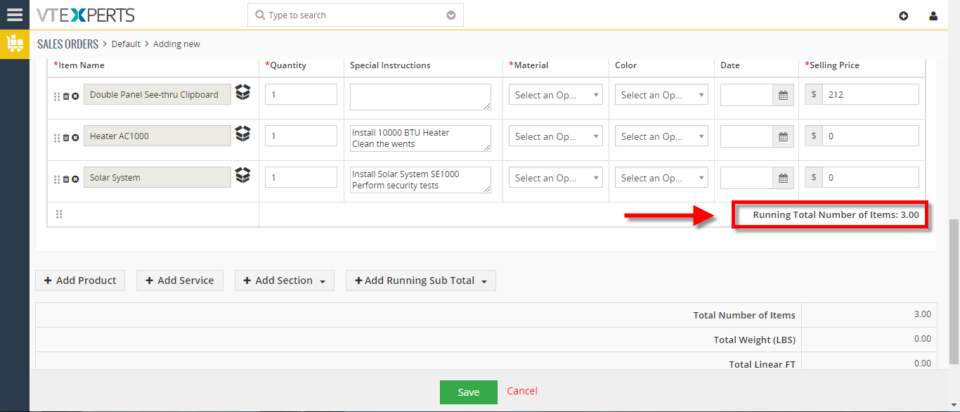
Item Details Customizer (Advanced) is an enhanced version of our standard “Item Details Customizer” which allows users to customize Item Details (Product/Services) for Quotes, Invoices, Sales & Purchase Orders. Users can also specify new formulas for each column as well as customize formulas for Totals. How to Add Running Sub Totals Go to Menu > Settings > CRM Settings > Extension Pack > Item Details Customizer(Advanced). Click on the “Sales Order” tab and select “Totals“. Check box the label field for adding a Running Sub Total. While creating a Sales Order you can add the configured running sub total by clicking the “Add Running Sub Total“. drop down menu. Here you can see the Running sub Total In Sales Order. For further help, contact us on help@vtexperts.com. We’ll be glad to be of service.
Map Data in Emails from VTiger Records : New Addition in Email Marketing/ Automation Extension for VTiger
June 27, 2018
Article
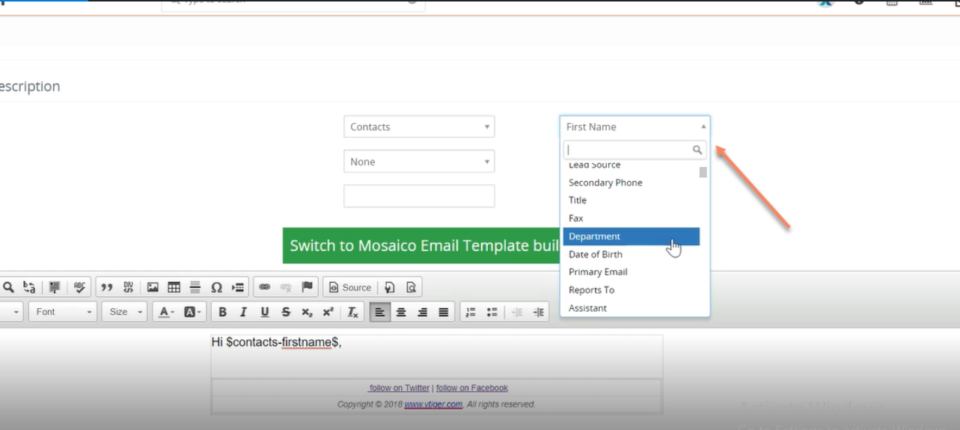
We have added a very helpful feature in Email Marketing Automation/Campaign Extension for VTiger. This extension makes VTiger a delightful marketing tool because of its simple configuration. Comes with a step by step implementation Wizard with an easy to select & customizable marketing list that supports Leads, Contacts & organizations. Next step is to create new or select an existing email template. It supports Mosaico template builder other than the standard vtiger template builder so you can create innovative emails, simply and easily. Then there is a confirmatory/send summary view. It also supports various email outgoing servers and works with our other extension, Multi SMTP. You can schedule emails to go out in batches (to avoid spamming them), set the failed emails to retry and shows status of the emails as Opened, Sent , Failed, Unsubscribed and Unopened. It also supports executive summary charts. Moreover, gives a built-in Unsubscribe
Bill For Time Spent Via Time Tracker In VTiger 7
June 27, 2018
Article
Time Tracker for VTiger Extension is designed to quickly & easily track the time spent while working on a task. It’s unique design allows to show and hide the timer within a single click without leaving the page. It integrates with Accounting/Invoicing and allows rates to be specified for each type of “time tracking activity” as well as custom rates per client. It is compatible with Contacts, Organizations, Leads, Tickets, Projects & Opportunities. How to Bill for Time Spent Go to the Invoice’s and create a new Invoice. After adding a Contact/Organization scroll down and click on the “Review Time Logs” button to bill for the time spent. These are all the time logs that we have not billed the customer for. Here you can also see all the detail (Type, Assigned to, Duration). Check box the time log and click on the “Add To Invoice” button. Here you can see the time logs has been added to the
Create Custom PDFs In VTiger 7
June 22, 2018
Article
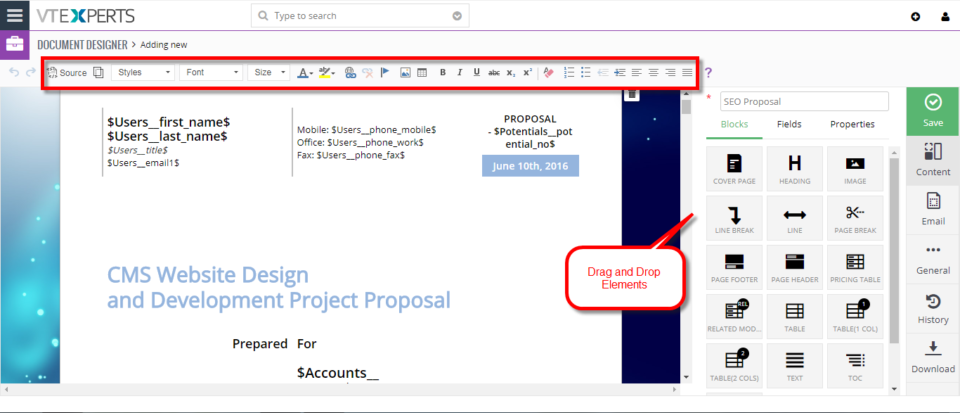
Proposal & Document Designer for VTiger is the ultimate sales tool for document automation. We extend the power of your CRM and give you everything you need to turn your leads into clients and close deals faster. No need to switch between word processors, CPQ tools, e-signing apps, and your inbox. Proposal & Document Designer for VTiger lets you create sales documents, employ dynamic quoting, get electronic signatures, and automate your workflow all the while. How to Create Custom PDFs Go to Menu > Settings > CRM Settings > Extension Pack > Document Designer. Click on the “Add” button to create a custom PDF. You can user Rich Text formatting options in the custom PDF. You can also Drag and Drop elements form the right side of the screen. You can add and modify Fields(Start date, Down Payment etc) and Signature. You can add Images. You can add Pricing Table and Related Module. In addition, you can Insert Data from
Setup Multiple Email (SMTP) Servers Per User In VTiger 7
June 20, 2018
Article
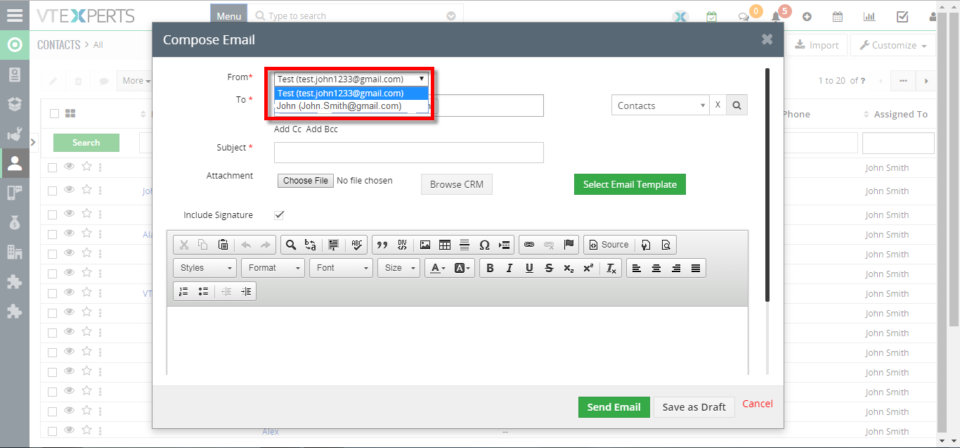
Outgoing Email Server Extension allow each user to have his/her own Outgoing Email Server(SMTP). Email server settings can be configured by admin, or each user can do it for him/herself. It supports IMAP function, meaning that every email sent will also be stored in user’s “Sent” folder on webmail/email server. How to Setup Multiple Email (SMTP) Servers Per User Go to My Preferences and click on the “Outgoing Server” button. Click on the “Create” button and Configure the Outgoing Mail Server. You can add more then One Email or Different Emails for each User. Now open a contact and click on the “Send Email” button. You can send Email on behalf of these two accounts. Select the Email account you want to send the mail from. Here you can see this mail is sent from the 2nd Email ID using VTiger Outgoing Mail Server. For further help, contact us on help@vtexperts.com. We’ll be glad to be of service.


Smooth Loading Of Advanced Comments In VTiger 7