VTiger Blog – News, Common Errors & Helpful Tips
Change Record Numbering Sequence Or Prefix In VTiger 7
November 23, 2017
Article
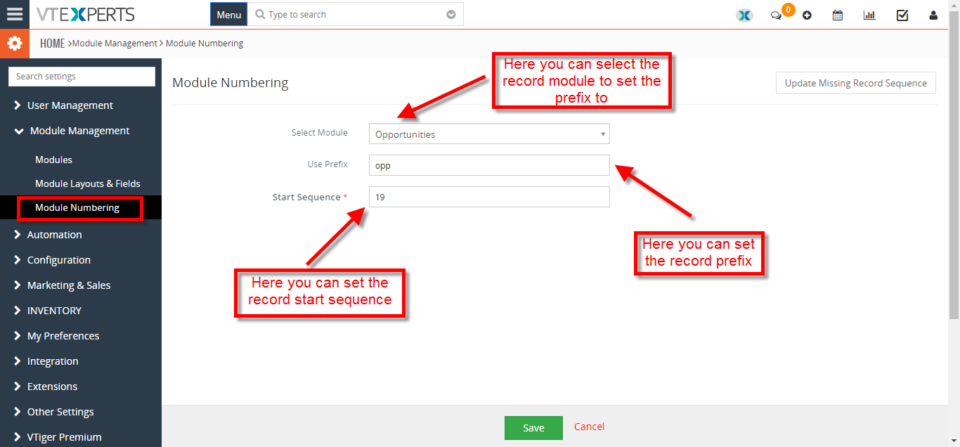
In VTiger 7 user can change the Record numbering sequence and Prefix. This feature help the user to configure the start sequence of the records and set their prefix which help user to mange the records in a very efficient way. How to Change Record Numbering and Prefix Go to the “Menu” and click on the “Settings” button and select “CRM Settings“. Under the “Module Management” drop down menu select “Module Numbering“. From here you can set the Prefix and Start Sequence of the records.
See Who And When Logged Into VTiger 7
November 22, 2017
Article
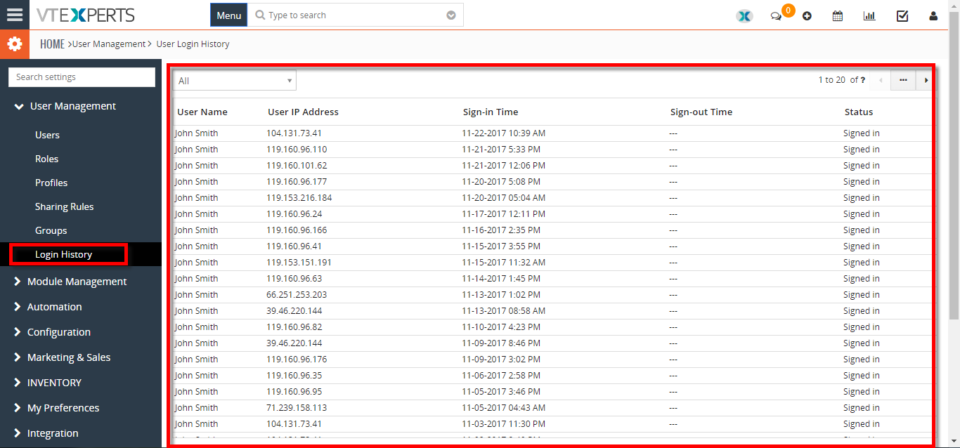
In VTiger 7 user can see the login history. This feature help’s the user to keep track of other user’s logins timings. User can Enhance Security by using our extension, Designed to enforce proper security standards in VTiger. Our tool allows system administrators to force users to change their passwords every xx days, and implements secure password rules. It tracks successful and failed logins, and locks users after number of incorrect logins. How to See Who and When Logged into VTiger Go to the “Menu” and click on the “Settings” button and select “CRM Settings“. Under the “User Management” drop down menu select “Login History“. Here you can see all the user logins detailed history.
Change Default Landing Page For Calendar To List View in VTiger 7
November 22, 2017
Article
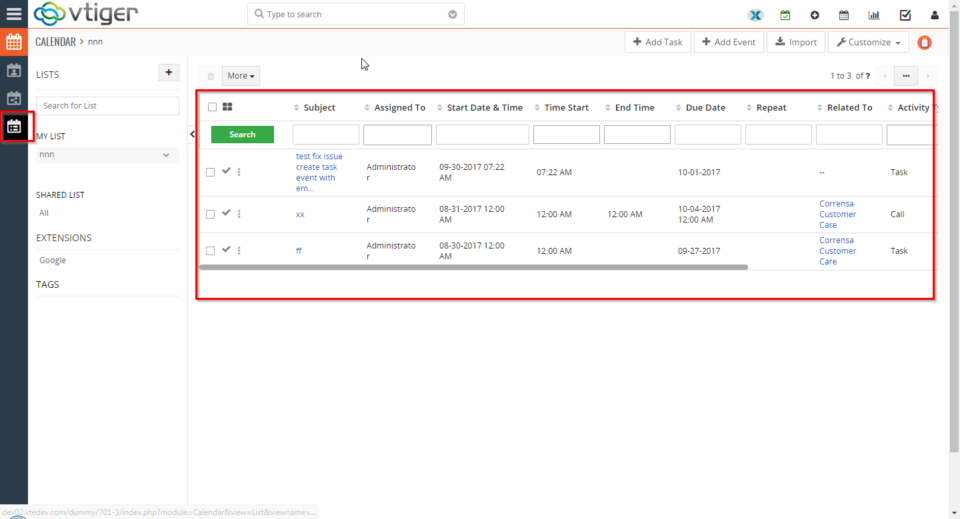
In VTiger 7 user can configure the default landing page for the calendar. This feature help the user to see the current configured view settings every time the user’s open the calendar. How to Change Default Landing Page Go to the “Menu” and click on the “Settings” button and select “CRM Settings“. Under the “My Preference” drop down menu select “Calendar Settings“. From here click on he “Edit Icon” next to the “Default Calendar View“. Here you can select the difference types of calendar view and click on the “Check Mark” button to safe the change’s.
Hide Completed Activities/Events From Calendar View In VTiger 7
November 21, 2017
Article
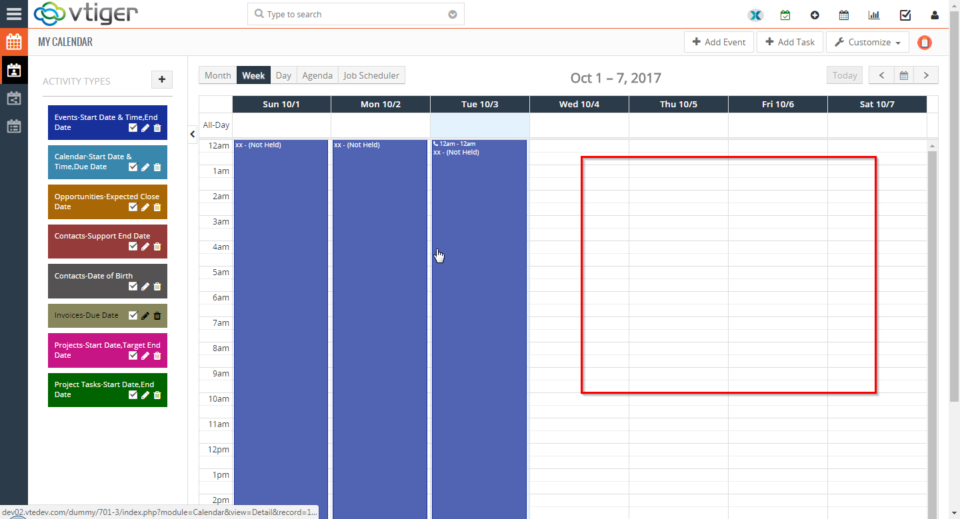
In VTiger 7 user can hide the completed activities/events in the calendar view. This Feature help the user to manage the events in a very efficient way and focus on the upcoming events. How to Hide Completed Activities/Events Go to the “Menu” and click on the “Settings” button and select “CRM Settings“. Under the “My Preference” drop down menu Select “Calendar Settings“. From here click on the “Edit Icon” next to the “Hide Complete Calendar Events“. To hide the the completed events in calendar view “Check The Box” and click on the “Check Mark” button to save the change’s.
Setup VTiger To Start Email In Gmail/Outlook Instead Of Built In VTiger Popup In VTiger 7
November 17, 2017
Article
In VTiger 7 user can configure the Email to be composed in the VTiger composer window or in the default email program e.g outlook/gmail/office365. This feature help the user to compose the email in the desired environment. How to Setup VTiger to Start Email in Gmail/Outlook Go to the “Menu” and click on the “Settings” button and select “CRM Settings“. Under the “My Preference” drop down menu select “My Preference“. From here scroll down to the bottom of the screen and click on the “Edit Icon” next to the “Internal Mail Composer“. “Check” means it will compose the mail in the VTiger window, “Uncheck” mean’s it will open default email program e.g outlook/gmail/office365. Chick on the “Check Mark” to save the change’s.
Change Default View When Opening A Record In VTiger 7
November 16, 2017
Article
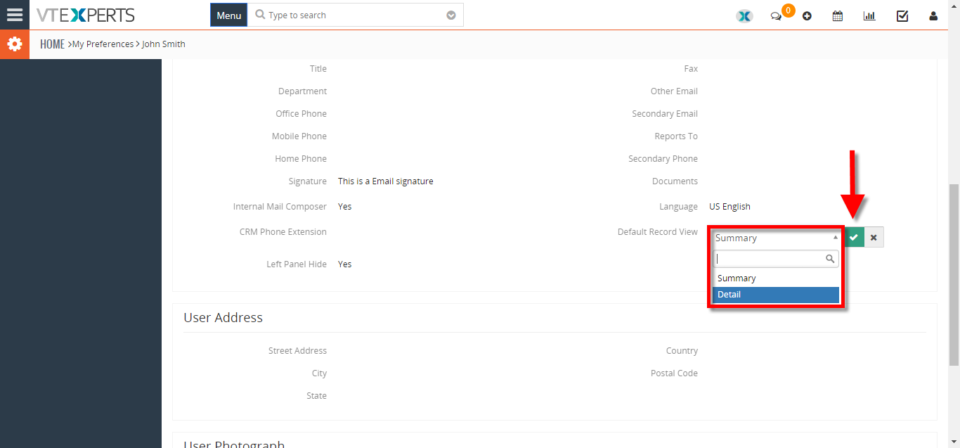
In VTiger 7, users can configure the default view when opening a record. This feature helps to select the default record view to Summary or Detail view. Every time user opens a record, it will show the currently configured view for that record. How to change default view Go to the “Menu” > “Settings“, and select “CRM Settings“. Under “My Preferences” block, select “My Preferences“. From here scroll down to the bottom of the screen and click the “Edit icon” next to the “Default Record View“. Now select the “Detail” view and click on the “Check Mark” to save the change’s.
Change Default Landing Page/Module In VTiger 7
November 16, 2017
Article
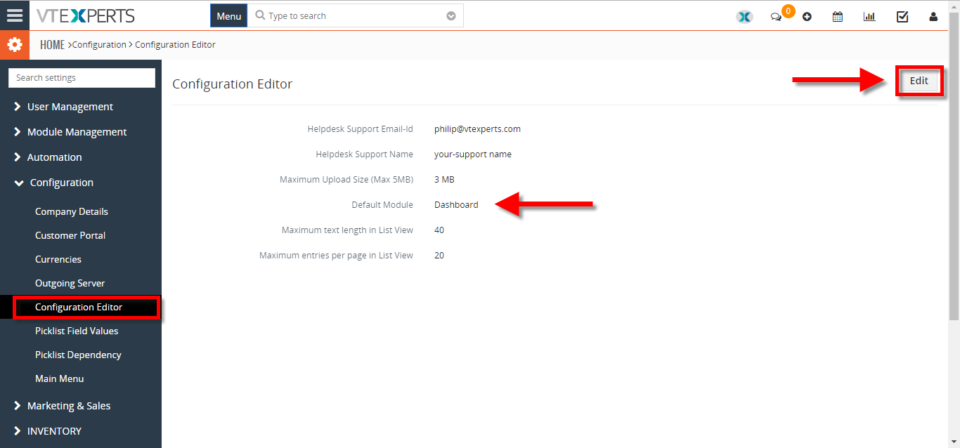
In VTiger 7, users can configure the default page/module to show after logging into the CRM. This feature helps users to directly log onto the most used page/module (which is currently configured by the user) and saves the time of the user. How to Change Default Landing Page/Module Go to the “Menu” > “Settings“, and select “CRM Settings“. Under the “Configuration” block, select “Configuration Editor“. From here click on the “Edit” button on the top right corner of you screen to change the default landing module or page. Click on the “Default Module” field to change the current default landing page/module and select the desired module. Then hit “Save” button to save the changes.
Increase File Upload Size In VTiger 7
November 14, 2017
Article
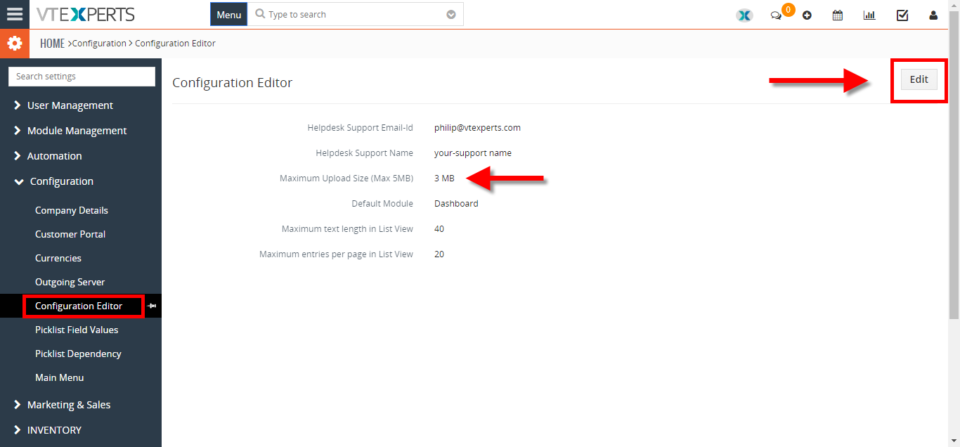
In VTiger 7, you can change the upload file size to Maximum 5MB. Even there’s an option to Bypass The Maximum Size. You can do so by following the steps mentioned below. This will help users to upload bigger files to VTiger. How to Increase File Upload Size Go to the “Menu” > “Settings“, and select “CRM Settings“. Under the “Configuration” section, select “Configuration Editor“. Then click “Edit” button on the top right corner of the screen to change the current values. You can set the upload size value maximum to 5MB and click on the “Save” button. To bypass the 5 MB limit, you will have to modify config.inc.php value. This requires connecting to your VTiger service via FTP or Cpanel, locating the file (should be in your vtigercrm directory) and adjusting the max_upload_size value. Note: in some cases it’s a server restriction, so you might need to adjust your php.ini to allow larger files or
Automatically Collapse Blocks On Detail View In VTiger 7
November 13, 2017
Article
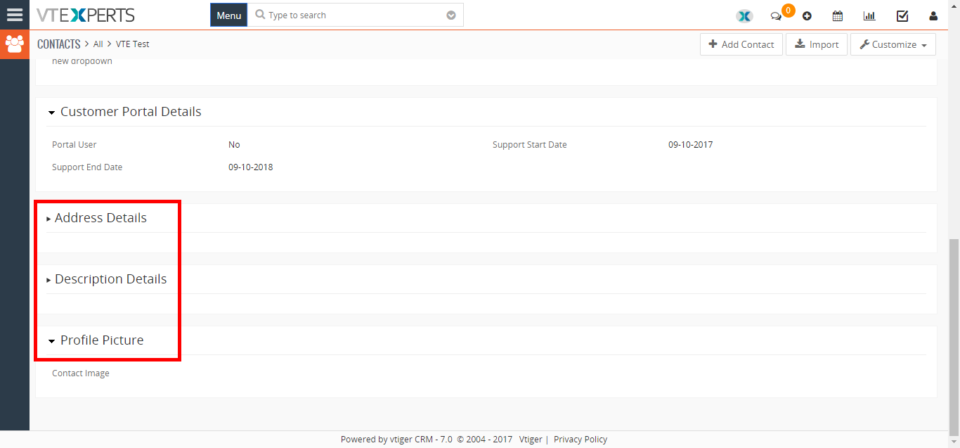
In Vtiger 7, users can set the blocks to automatically collapse in the detailed view. This feature helps users to configure which information block they want to see more and which they use occasionally and keep them hidden by default. How to Automatically Collapse Blocks Go to the “Menu“, “Settings“, and select “CRM Settings“ Under the “Module Management” block, select “Module Layout and Fields“. From here click on the “Select Module” to select the module. Here you can set the the block to collapse on the detail view by clicking on the “Yes/No Switch“. You can see that the block are collapsed in the detailed view.
Color Lists In VTiger 7
November 11, 2017
Article
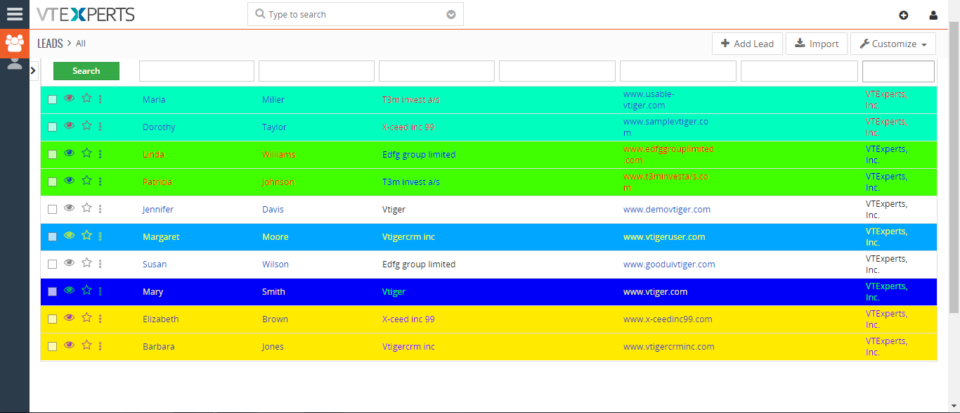
In VTiger 7, users can color the rows on the list view by using our VTiger Listview Colors extension. This extension is extremely helpful for users to quickly identify the records that need attention using predefined color codes. User can configure color codes for each module and specify color text, backgrounds and active color. How To Color Lists To add colors go the “Menu“, “Settings” , and select “CRM Settings“. Click “Other Settings” button and select “VTE List View Colors“. From here click on the “Add color” button to configure the color of the list. Select the module of the lists you want to add colors. Select the color of the text and the list as shown below. Users can add conditions to specify different colors of the list in the same module.
Add “Send Mail” Button To Custom Modules In VTiger 7
November 10, 2017
Article
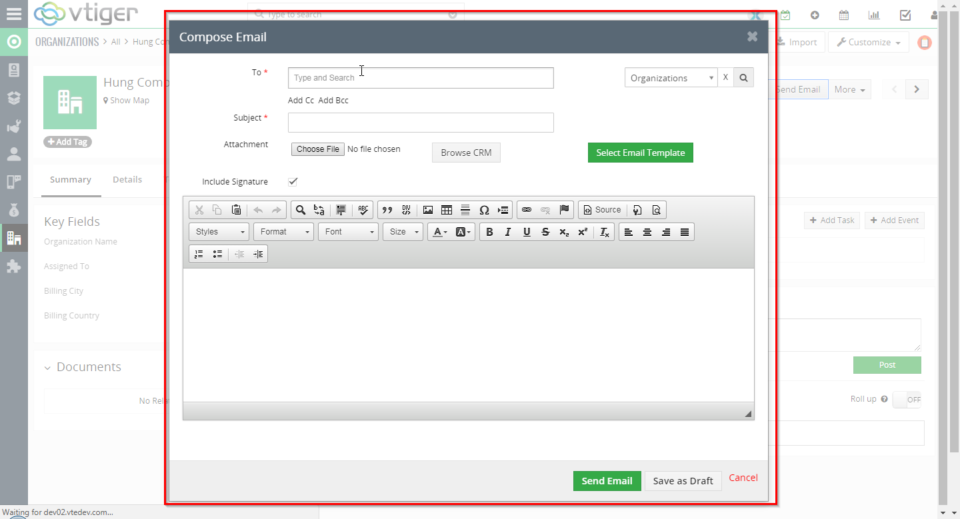
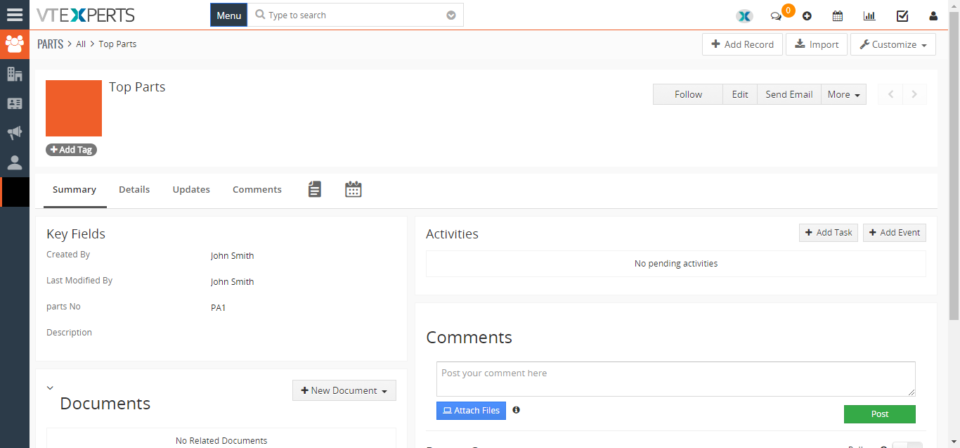
In VTiger 7, VTE Custom Module Builder does not add “Send Mail” button to custom modules because the Email field is not a default field when creating a custom module. You can do it by changing the code of the Custom Modules. How To Add “Send Mail” Button Add the function below to modules/CustomModuleName/models/DetailView.php file.
Allow Quantity Of 0 In Quotes/Invoices/Sales & Purchase Orders In VTiger 7
November 7, 2017
Article
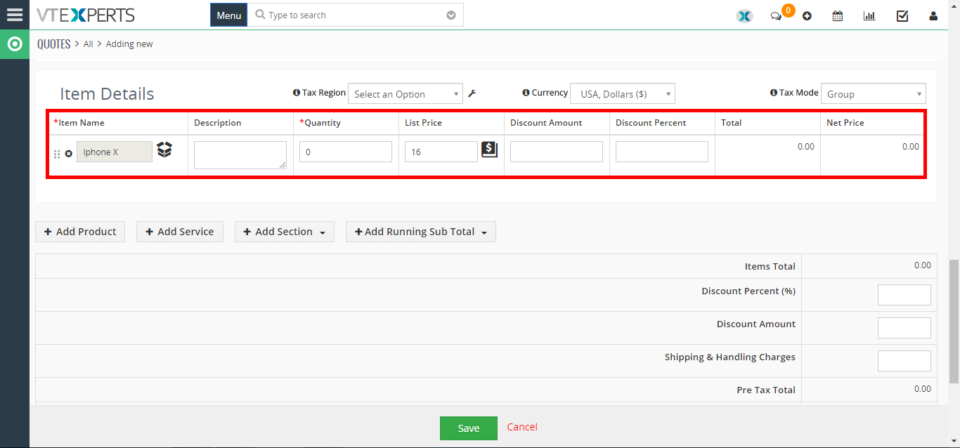
The Quantity default value is “1” in VTiger. If a user wants to show the product in the quote and doesn’t want to add its price in the total, he needs to set the Quantity to “0”. To set the default value follow the steps mentioned below. Issue: Adding items with Qty 0.0 in order to list Optional on Quotes That way the Products price would be visible for the customer but it would not affect the quote’s total. Solution: Open file: layouts\v7\modules\Inventory\partials\LineItemsContent.tpl Change data validation engine for Quantity. Around row 135 you find this code. <input id="{$qty}" name="{$qty}" type="text" class="qty smallInputBox inputElement" data-rule-required=true data-rule-positive=true data-rule-greater_than_zero=true value="{if !empty($data.$qty)}{$data.$qty}{else}1{/if}"/> Replace it with this: <input id="{$qty}" name="{$qty}" type="text" class="qty smallInputBox inputElement" data-rule-required=true data-rule-positive=true value="{if !empty($data.$qty)}{$data.$qty}{else}1{/if}"/> For further help, please send an email to help@vtexperts.com. We’ll be glad to be of service.
Change Icon For Custom Module In VTiger 7
November 3, 2017
Article
Don’t like the default icon, you can change the default icon after Creating a Custom Module with the help of Custom Module Builder Extension. User can set the icon of their own choice by following the steps mentioned below. Issue: How to change the icons of custom modules which have jigsaw puzzle icons by default? Solution: You need to create a css file “layouts/v7/modules/{moduleName}/resources/Styles.css” and add into vtiger_links table. Then get content of icon class in “layouts/v7/lib/vt-icons/style.css” Replace content in “layouts/v7/modules/{moduleName}/resources/Styles.css” For further help, please send an email to help@vtexperts.com. We’ll be glad to be of service.
Change Template Order When Composing Email In VTiger 7
November 1, 2017
Article
Want to change the order of the Email Templates. The purpose of this feature is to allow users to keep the mostly used templates on top of the list. It saves the users’ time to scroll down and find the template. Here’s how to change the standard sort order of the email templates. Solution: Go to modules/EmailTemplates/models/ListView.php find function getQuery() {} inside that function , Change query as per your need. For more information on email templates check out vtiger wiki: https://wiki.vtiger.com/vtiger6/index.php/Email_Templates As well as a customization we did for email templates, that you might find helpful: VTiger 6 Customization: Customized Email Templates with Sharing/Permissions + Workflows . For further help, please send an email to help@vtexperts.com. We’ll be glad to be of service.
Remove AD From Dashboard Page In VTiger 7
October 30, 2017
Article
Unwanted add’s on your Dashboard. If you want to get rid of those add’s follow the steps mentioned below. Issue: I need to remove the extension store banner ad displayed on dashboard. Solution: Create a new .php file in the root director with this code. Just copy paste this code in a php file, name it whatever you want, save it and then upload it in the root directory. Once uploaded, you have to run it in the browser. For further help, please send an email to help@vtexperts.com. We’ll be glad to be of service.
Can’t Save Webform Configuration (Selected Fields Do Not Save) In VTiger 7
October 29, 2017
Article
There’s a very common bug circulating around for a while in VTiger 7 Webforms. The bug doesn’t allow to save configuration of Webforms after setting them up. Using HTML option doesn’t work either. I was asked for a solution to this problem too many times that I preferred to put the solution into writing. Issue: Webforms do not seem to be working in 7.0. When trying to set up a new webform, it does not save the preference of fields. Moreover, using the form HTML, nothing is displayed. Solution: If you run into that problem, you need to update following tables in your database. In case the tables are not there, create them: Table: vtiger_webforms Table: vtiger_webforms_field For further help, please send an email to help@vtexperts.com. We’ll be glad to be of service.
Non Admin Users Can’t See Lists (Blank Area) In VTiger 7
October 27, 2017
Article
Issue: I have assign users to a role and then assign privileges directly to a role however even if I assign every privilege to a users role and sign into that users account that user still cannot see any content unless they are an admin. Solution: Running the following SQL commands to create the tables will solve the issue: For further help, contact us on help@vtexperts.com we’ll be glad to be of service.
Where To Setup Email Signature In VTiger 7
October 26, 2017
Article
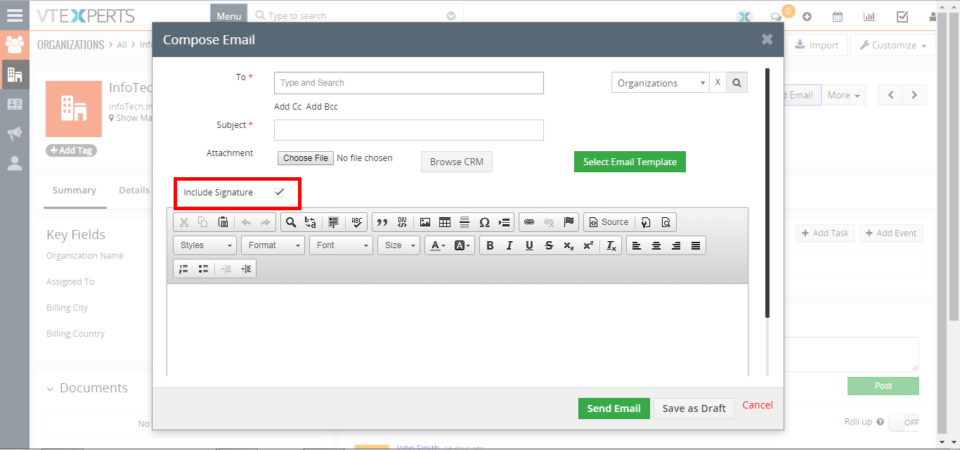
Want to setup Email Signatures one time (just like a template) and use as many times. This feature helps to simply adding the signature in the emails while sending the emails from VTiger. By configuring the signatures one-time, there is no need to submit them in every email being sent. Also, the signatures can be added to every email going out. How to Setup Email Signature To setup Email Signature click on the “User Profile” and select “My Preferences“ Enter the Signature in the “Signature” field and click on the “Tick Mark” to save them. While composing an email, check the the “Include Signature” checkbox to add the signature in the email. Now when the email is sent, it will include the signatures which you configured in the user preferences. For further help, contact us on help@vtexperts.com we’ll be glad to be of service.
Email Campaigns Extension for VTiger 7 Open Source – Progress Update
October 25, 2017
Article
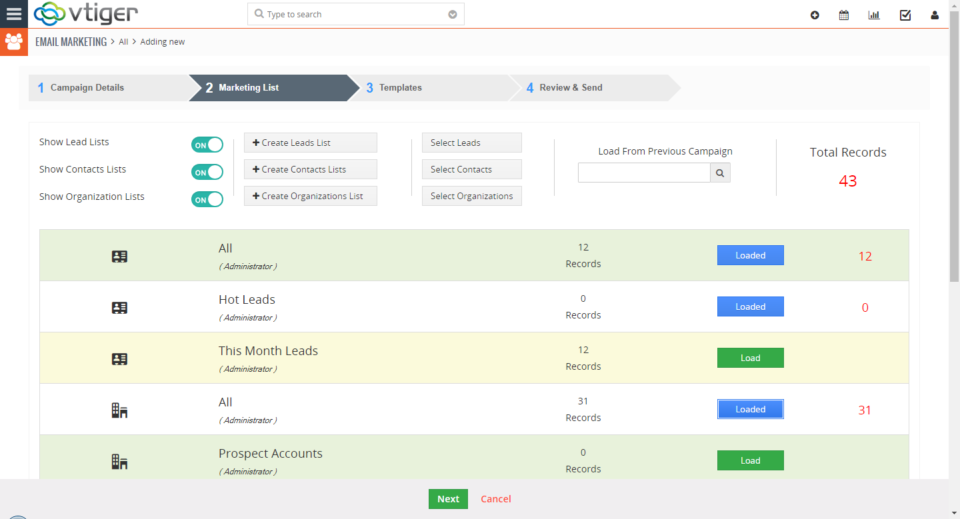
For the last few months we’ve been working on a new extension that will transform VTiger into sophisticated email marketing/campaign tool. The extension will include a step by step wizard, easy to use “marketing list” (to load contacts/leads/organizations), review & send + confirmation/summary view that will show exactly what and when is going to be sent. In addition, it will support batch sending, meaning that you can schedule emails to go out over 15, 30, 60min instead of sending them all at once. We also integrated Mosaico template builder with our campaign/marketing tool. Mosaico is an open source template builder which allows users to create amazing email templates, the functionality is very similar to mailchimp, constant contact or any other email marketing platform. We are anticipating to have this vtiger extension available in the next month and would like to share the progress we made so far. Start New
Edit Fields From Listview In VTiger 7
October 25, 2017
Article
In VTiger 7, users can edit fields right from the listview in any record. This feature saves the time that would otherwise be spent in opening the record and then editing the field. Users can simply add or change the data of a record on the list view. How to Edit Fields on the Listview To edit fields on the listview: Double click on the field of specific record you want to edit. Add the data in the field and click on the “Tick Mark” to save the changes. And the desired info will be added to that record’s field without having the need to open the record For further help, contact us on help@vtexperts.com we’ll be glad to be of service.
Quickly Update List Columns In VTiger 7
October 24, 2017
Article
VTiger 7 allows you to add, remove and rearrange the list columns. This feature helps user to add, remove and rearrange the list columns of more than 1 records by selecting them. How To Quickly Update List Columns Select the desired records and click on the “Manage list columns” button to update the columns list. You can rearrange the columns by drag and drop and also add and remove columns. Click on the “Update List” button to save the changes It will change the Columns list according to the new settings. For further help, contact us on help@vtexperts.com we’ll be glad to be of service.
Include Phone, Email (or any other field) in VTiger 7 Search
October 18, 2017
Article
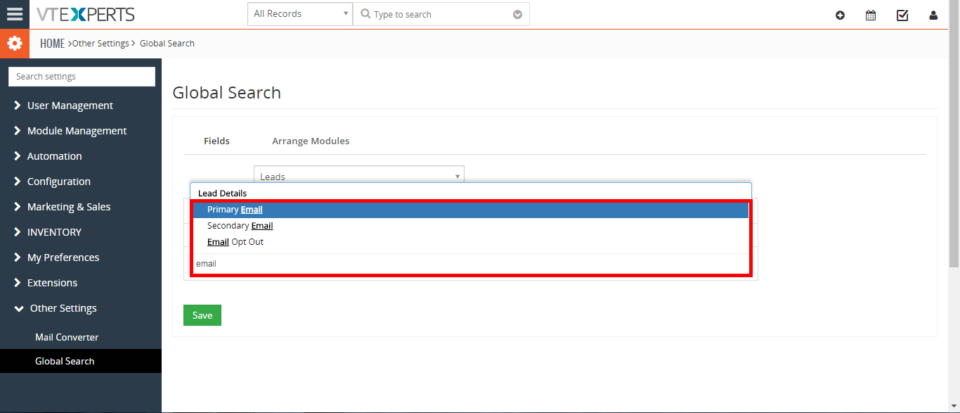
Take a look on how you can search from all the modules and records by using Global Search extension and it will show all the matching results. This feature helps you to search entire database and give you the results instead while the standard search will only search record name. How to Include Phone, Email in VTiger Search First install the extension Global Search form Extension pack for VTiger To include search fields in Global Search. Go to the “CRM Settings“. Select the “Other Settings” and click on the “Global Search“ Select a module that you want to add the search fields to and select the desired field. Add the field name on the given space to add the field. Search and select the desired field that you want to include in the Global Search. After adding the fields click on the “Save” to save the changes.
Pre-Format Phone Numbers To Your Requirement In VTiger 7
October 18, 2017
Article
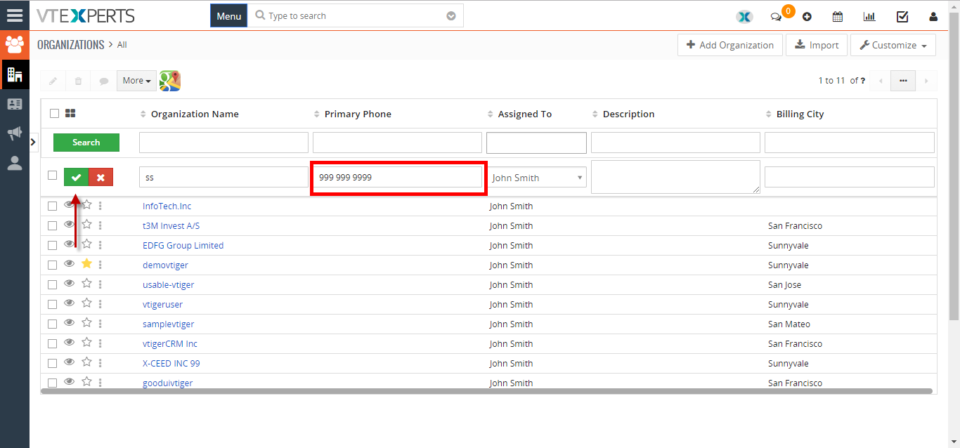
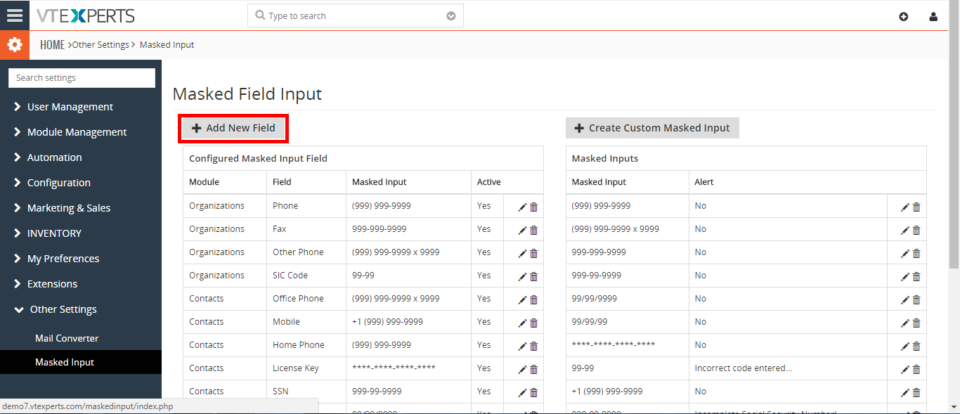
Admin can restrict users to enter fields in a certain format by using Masked Input extension. This feature allows you to configure the formats of Phone numbers and set them default in VTiger. So when users work and add data to the CRM, they will only need to enter phone numbers without the need of formatting each number for example adding “-” or space or “()”. How to Preformat Phone Number First, install the extension Masked Input extension from the Extension pack for VTiger. Then, go to the “CRM Settings” and select the “Other Settings” and click “Masked Input“. Then Click on the “Add New Field” button to create a new preformatted field. Select a Module you want to add field to. Select the field type. Select the format for the field you have selected. Click on the “Save” button to save the changes. For further help, contact us
Quickbooks Online & VTiger 7 Open Source Integration – Progress Update
October 17, 2017
Article
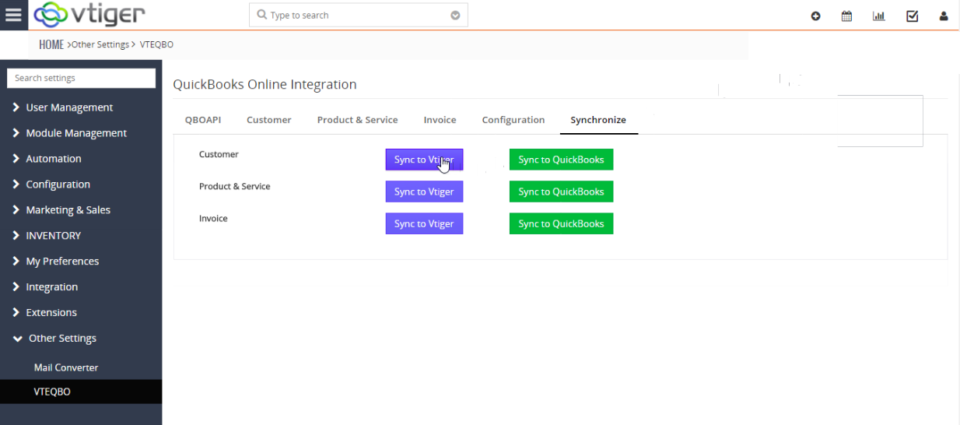
We have been actively working on our next major extension release – VTiger 7 & QuickBooks Online Integration and would like to share our progress with the community. So far, we completed sync of customers (organization/contact) and products/service as well as built the engine for logs, quickbooks queue and graphical user interface. It’s fair to say, that we are half way there (50% complete) and we are expecting the beta release in the next 1-2 months. If you would like to participate in beta testing – please contact us at help@vtexperts.com! Here are some screenshots of the interface/functionality. Synchronize Tab (Initiate 2 way Sync between VTiger & QuickBooks Online) Customer Tab (Map VTiger Contacts & Organizations into QuickBooks Customers) Configuration Tab (Configure bidirectional sync & set primary data source) Quickbooks API Tab (Enter Quickbooks API Details to connect to VTiger)


